ファームウェアのアップデート
このセクションでは、ファームウェアのアップデート方法について説明します。私たちは SEGGER J-Link、OpenOCD や Serial-COM 経由など、様々な方法をサポートしています。
注釈
更新プロセス中は接続を維持し、正しい デバイス と インターフェース を使用してください。
LEAPS UWBS はBLE経由でのファームウェアアップデートもサポートしており、より詳細な情報については BLE経由のファームウェア更新 を参照してください。
より詳細な情報については、以下からご希望の方法を選択してください:
セットアップの準備
少なくともデバイスがあります。
更新するバイナリファイル。(.hex または .bin)
SEGGER J-Link をインストールしました。
SEGGER J-Linkを使ったアップデート方法のステップバイステップの説明
SEGGER J-Linkをインストールします。
Windows用のダウンロードファイル
JLink_Windows_V766_x86_64.exeを探してください。
ファイルをダブルクリックしてインストールを開始します。
プロンプトが表示されたら、管理者パスワードを入力してください。
ライセンス条項を読み、同意してください。
デフォルトのインストール先フォルダは、通常
C:∕Program Files (x86)∕SEGGERJLinkにあります。デフォルトのUSBドライバを承認してください。
インストールが完了すると、システムフォルダにフォルダとドライバファイル一式がインストールされます。新しくインストールするたびに、これらのファイルは上書きされますのでご注意ください。
JLink_macOSX_V766_x86_64.pkgという名前の macOS ダウンロードファイルを探してください。
ファイルをダブルクリックしてインストールを開始します。
ライセンス条項を読み、同意してください。
プロンプトが表示されたら、管理者パスワードを入力してください。このパスワードはアプリケーションフォルダに書き込むのに必要です。
インストール後、次の場所にフォルダができます:
/Applications/SEGGER/JLink_V766/. バージョンごとにフォルダが異なることを覚えておいてください。このフォルダにはアプリケーションに関連するすべての実行ファイルとライブラリが保存されます。GNU/Linux用のSEGGERダウンロードサイトにアクセスし、目的のパッケージを見つけてください。32/64ビット版から選択してください。
.tgzファイルをダウンロードし、コンピュータに保存してください。
ターミナルウィンドウを開きます。
例えば、Ubuntu (Linux) で64ビットの .tgz ファイルをインストールするには、以下のコマンドを使ってください:
mkdir -p ~/opt/SEGGER
cd ~/opt/SEGGER
tar xf ~/Downloads/JLink_Linux_V766_x86_64.tgz
chmod a-w ~/opt/SEGGER/JLink_Linux_V766_x86_64
ls -l ~/opt/SEGGER/JLink_Linux_V766_x86_64
上記のコマンドを実行した後:
~/opt/SEGGER にフォルダが作成されます。
ダウンロードした .tgz ファイルの内容が ~/opt/SEGGER フォルダに展開されます。
JLink_Linux_V766_x86_64` ファイルのパーミッションが変更されます。
~/opt/SEGGER/JLink_Linux_V766_x86_64 フォルダの内容をチェックすることでインストールを確認できます。
新規インストール時にシステムフォルダ内の既存のファイルを上書きすることに注意してください。
SEGGER J-Link を開き、バイナリファイルをフラッシュします。
最新の J-Link ソフトウェア&ドキュメントパックがインストールされていることを確認してください。
J-LinkをPCに接続してください。
ターゲットシステムをJ-Linkに接続
J-Flash Liteの起動
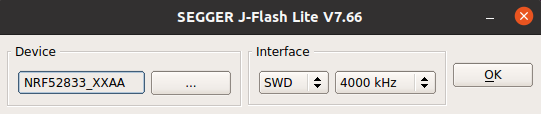
デバイス、デバッグインターフェイス、通信速度の選択
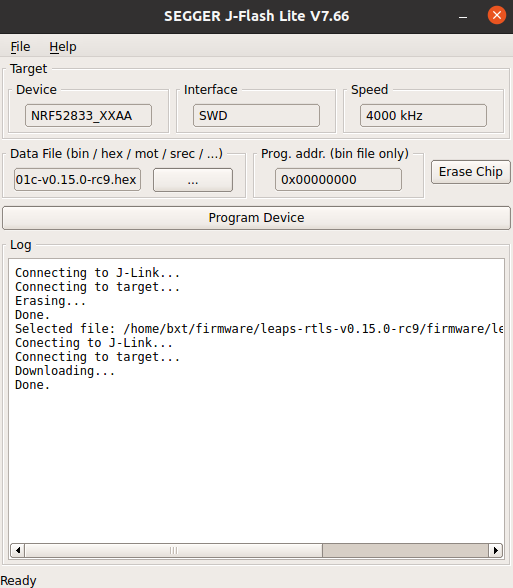
ファイルを選択し、[デバイスをプログラム]をクリックするか、[チップを消去]をクリックします。
J-Flash Liteは要求された操作を実行します
最新の J-Link ソフトウェア&ドキュメントパックがインストールされていることを確認してください。
J-LinkをPCに接続します。
ターゲットシステムをJ-Linkに接続
J-Link Commanderを起動してください。
以下のコマンドを入力してください:
J-Link> device <devicename> // 既知のデバイスのリストについては、ここを参照してください。
J-Link> r
J-Link> h
J-Link> loadbin <PathToBinFile>, <programmingaddress>
J-Link Commander はフラッシュダウンロードを実行し、成功したら時間統計を出力します。
更新が完了すると、ボードは自動的にリセットされます。
セットアップの準備
少なくとも 1 つのデバイス。
パッケージには、アップデート用のスクリプトとバイナリが含まれています。
Installed OpenOCD.
OpenOCD (Open On-Chip Debugger) 経由でのアップデート方法を順を追って説明します。
OpenOCD デバッガのインストール
Windows 用の xPack OpenOCD package をダウンロードする。
C:\xpack-openocd-0.11.0-1フォルダーに解凍します。パスを追加します: Windows ユーザーパス環境変数に
C:\xpack-openocd-0.11.0-1\binというパスを追加してください。
macOS 用の xPack OpenOCD package をダウンロードする。
tarball を解凍してローカルにインストールします。
例えば、xpack-openocd-0.11.0-1-linux-arm.tar.gz ファイルをインストールするには、以下のコマンドを使います:
mkdir -p ~/.local/xPacks/openocd
cd ~/.local/xPacks/openocd
tar -zxvf ~/Downloads/xpack-openocd-0.11.0-1-linux-arm.tar.gz (with PC’s AMD core, using … linux-x64.tar.gz with PC’s Intel core)
....
sudo chmod -R -w xpack-openocd-0.11.0-1/
~/.local/xPacks/openocd/xpack-openocd-0.11.0-1/bin/openocd --version
export PATH="~/.local/xPacks/openocd/xpack-openocd-0.11.0-1/bin/:$PATH"
cd ~
source .bashrc
GNU/Linux用の`xPack OpenOCD package <https://github.com/xpack-dev-tools/openocd-xpack/releases>`_をダウンロードしてください。
tarball を解凍してローカルにインストールします。
例えば、Ubuntu (Linux)では、xpack-openocd-0.11.0-1-linux-arm.tar.gzファイルをインストールするには、以下のコマンドを使用します:
mkdir -p ~/.local/xPacks/openocd
cd ~/.local/xPacks/openocd
tar -zxvf ~/Downloads/xpack-openocd-0.11.0-1-linux-arm.tar.gz (with PC’s AMD core, using … linux-x64.tar.gz with PC’s Intel core)
....
sudo chmod -R -w xpack-openocd-0.11.0-1/
~/.local/xPacks/openocd/xpack-openocd-0.11.0-1/bin/openocd --version
export PATH="~/.local/xPacks/openocd/xpack-openocd-0.11.0-1/bin/:$PATH"
cd ~
source .bashrc
OpenOCDのバージョンを確認する
openocd --version
xPack OpenOCD, x86_64 Open On-Chip Debugger 0.11.0-00155-ge392e485e (2021-03-15-16:43)
Licensed under GNU GPL v2
For bug reports, read
  http://openocd.org/doc/doxygen/bugs.html
パッケージをダウンロードしてPCに解凍します。
UDKボードの例: WinZip や 7-Zip のようなプログラムを使って、ダウンロードした to be defined ファイルを解凍します。
お気に入りのターミナル アプリケーションを開きます。
Linux または macOS では、ターミナル アプリケーションのように。
Windowsでは Powershell アプリケーションのようなものです。
抽出されたパッケージが含まれるフォルダーに移動します。
cd から /path/to/LEAPS-UWBS-Firmware-OpenOCD
ケーブルを使用してデバイスを PC に接続します。
UDK ボードの例: USB-Cデータケーブルを使用して、デバイスの USB-C Data Port 2 をPCに接続します。
スクリプトを実行して、ファームウェアを自動的に更新します。
Windows では、udk-leaps-uwbs-firmware.bat コマンドを使用します。
macOSでは、 udk-leaps-uwbs-firmware.sh コマンドを使用する。
GNU/Linuxでは、udk-leaps-uwbs-firmware.sh コマンドを使用する。
たとえば、Ubuntu (Linux) の場合:
./udk-leaps-uwbs-firmware.sh
xPack OpenOCD, x86_64 Open On-Chip Debugger 0.11.0-00155-ge392e485e (2021-03-15-16:43)
Licensed under GNU GPL v2
For bug reports, read
  http://openocd.org/doc/doxygen/bugs.html
DEPRECATED! use 'adapter speed' not 'adapter_khz'
set_test_mode
Info : Using CMSIS-DAPv2 interface with VID:PID=0x0d28:0x0204, serial=01100E003602002e003f4146570120313238
Info : CMSIS-DAP: SWD Supported
Info : CMSIS-DAP: FW Version = 2.1.0
Info : CMSIS-DAP: Serial# = 01100E003602002e003f4146570120313238
Info : CMSIS-DAP: Interface Initialised (SWD)
Info : SWCLK/TCK = 1 SWDIO/TMS = 1 TDI = 0 TDO = 0 nTRST = 0 nRESET = 1
Info : CMSIS-DAP: Interface ready
Info : high-speed (adapter speed 10000) may be limited by adapter firmware.
Info : clock speed 10000 kHz
Info : SWD DPIDR 0x2ba01477
Info : nrf52.cpu: hardware has 6 breakpoints, 4 watchpoints
Info : starting gdb server for nrf52.cpu on 3333
Info : Listening on port 3333 for gdb connections
target halted due to debug-request, current mode: Thread
xPSR: 0x01000000 pc: 0x000031ec msp: 0x20003488
target halted due to debug-request, current mode: Thread
xPSR: 0x01000000 pc: 0xfffffffe msp: 0xfffffffc
Info : nRF52840-CKAA(build code: D0) 1024kB Flash, 256kB RAM
auto erase enabled
wrote 1048576 bytes from file leaps-rtls-all-2ab-v0.14-rc25.hex in 38.776192s (26.408 KiB/s)
更新が完了すると、ボードは自動的にリセットされます。
Install LEAPS-COM tool
Follow instructions in section describing how to install LEAPS-COM.
You will need
At least one device connected via the USB port or the serial port, alternatively, the device advertises on the BLE interface if enabled.
The firmware binary included in the package.
The python3 installed on you system.
Connect USB data cable to the USB port. Execute following command to update Firmware and Extended-Loader on the available devices that are connected on the USB interface.
$ python3 -m leapscom --usb --main main.bin --eldr eldr.bin
In order to update only certain devices you need to specify serial number.
$ python3 -m leapscom --usb 630D46F2D51482FC 7E1C5859C2ECF343 --main main.bin --eldr eldr.bin
Before update, make sure that BLE is enabled on the devices (see section Discovering devices for more details). Execute following command to update Firmware and Extended-Loader of all the devices that are advertising on the BLE interface.
$ python3 -m leapscom --ble --main main.bin --eldr eldr.bin
In order to update only certain devices you need to specify the BLE address.
$ python3 -m leapscom --ble FE:40:B4:BC:D3:42 E0:05:86:49:A9:40 --main main.bin --eldr eldr.bin
Connect USB data cable to the Serial port. Execute following command to update Firmware and Extended-Loader over the serial ports.
$ python3 -m leapscom --dev /dev/ttyACM0 /dev/ttyACM1 /dev/ttyACM2 --main main.bin --eldr eldr.bin
ファームウェアを確認し、成功を確認してください
お好きなターミナル・アプリケーションを開いてください、
GNU/LinuxまたはmacOSでは、Terminal アプリケーションのようにする。
Windowsでは Powershell アプリケーションのようなものです。
例えば、Ubuntu(Linux)では、minicomを開いてダブルエンターを押す:
minicom -b 115200 -D /dev/ttyACM0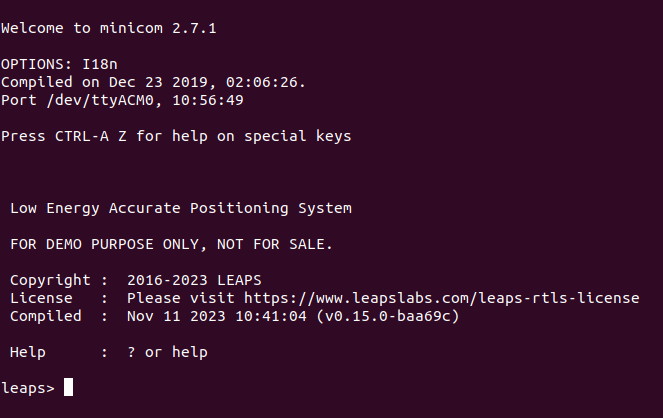
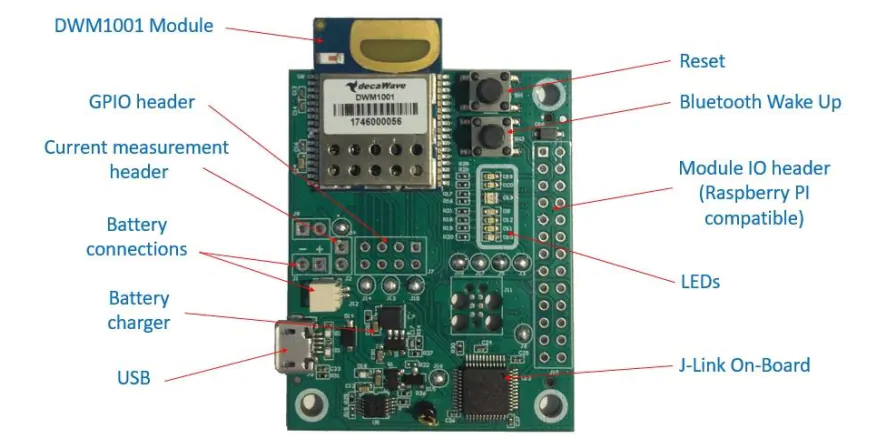
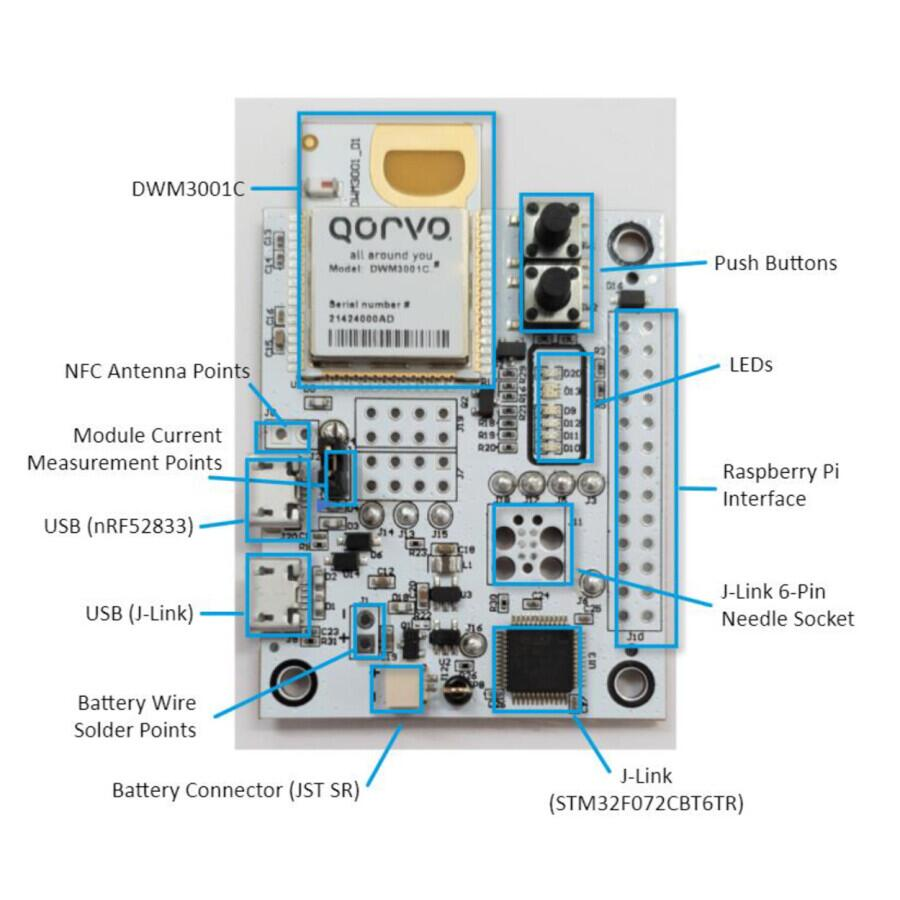
接続のために、まず DWM1001-DEV と DWM3001CDK 開発キットの主なコンポーネントの概要を見てみましょう。
注釈
UDKキットについては、 ハードウェアインターフェイス セクションの詳細情報を参照してください。