LEAPS Center
LEAPS Center は、デバイス管理、ネットワーク管理、ネットワーク全体の位置情報と遠隔測定データの可視化を提供するウェブアプリケーションです。
主な機能
2Dと3Dのグリッドはリアルタイムで位置を更新し、ネットワーク内のデバイスを視覚化します。
その他の便利な機能には、ユーザー管理、ゾーン管理、ゾーン履歴、フロアプラン管理、ポジション履歴、ポジションヒートマップがあります。
The LEAPS Center は MQTT Broker を介して LEAPS Server と相互接続します。LinuxとWindowsのプラットフォーム上でサービスとして動作する。
インストール
システム要件
Dockerのシステム要件はOSによって異なります。
Linuxの場合、64ビット・アーキテクチャ、互換性のあるカーネル・バージョン、特定のカーネル機能が必要だ。
Windowsでは、仮想化を有効にしたWindows 10上でDocker Desktopを使用します
macOSの場合は、macOS 10.13以降のDocker Desktopを使用してください。ハードウェアに関しては、最低2GBのRAMと十分なCPUとディスク容量を推奨します。
注釈
最新の詳細については Docker 公式ドキュメントを参照してください。
使用方法
PCにDockerをインストールする
さらに、以下のコマンドを参考にしてインストールすることもできる:
curl -fsSL https://get.docker.com -o get-docker.sh
sudo sh ./get-docker.sh
sudo usermod -aG docker $USER
コンフィギュレーション・パッケージを準備する。
設定ファイル を含むleaps_centerディレクトリを作成します。
leaps-center-web.conf
アプリケーション.特性
leaps-center-history.properties
leaps-center-web.properties
Or you can download the LEAPSCenter configuration package.
PCでコマンドプロンプトまたはターミナルウィンドウを開く。
LEAPS Center構成パッケージを解凍したディレクトリに移動します。
たとえば、Ubuntu (Linux) の場合:
cd LEAPS_CENTER_DOCKER/
LEAPS Center Dockerパッケージをインストールし、実行します:
docker run -d -p 80:8080/tcp --name some_name -v /path/to/data/data/:/app/data/ -e LEAPS_CENTER_HOME=/app/data/ leapslabs/leaps_center:tag sh -c "cd /app && java -jar leaps-center-web.jar"ここで、
some_nameはコンテナに割り当てたい名前であり、tagは希望するleaps-center-webバージョンを指定するタグである。leaps_centerイメージは、設定ファイル、アプリケーションログ、設定/ノード履歴データベースを格納する外部マウントフォルダと共に動作する必要があります。
オプション
-v /path/to/data/:/app/data/は/path/to/data/にあるフォルダを内部の/app/dataフォルダにマウントします。データフォルダには以下のファイルが必要です。
推奨される走行オプション
--user $(id -u):$(id -g)特定のユーザーとグループの下でインスタンスを実行する。
--restart unless-stoppedサーバーがクラッシュした場合にインスタンスを自動的に再起動する。走行オプション
--security-opt seccomp=unconfinedこのオプションは32ビットのRaspberry Piイメージ(Raspbian)で必要です。なぜなら、Dockerイメージに悪影響を与える(MQTTサーバーに接続できない)バグのある旧式のseccompライブラリが含まれているからです。このオプションにより、この問題を上書きすることができます。
LEAPS Centerのインストール処理が開始されます。
たとえば、Ubuntu (Linux) の場合:
docker run -d -p 80:8080/tcp --name leaps_center -v $PWD/leaps_center/:/app/data/ -e LEAPS_CENTER_HOME=/app/data/ leapslabs/leaps_center:latest sh -c "cd /app &&  java -jar leaps-center-web.jar"

Unable to find image 'leapslabs/leaps_center:latest' locally
latest: Pulling from leapslabs/leaps_center
a458657ccc71: Pull complete
Digest: sha256:a19b127656d41d8607f043c2c83924e5b9a5cbd4dc23cfbed070be3b9cfc6b9a
Status: Downloaded newer image for leapslabs/leaps_center:latest
320d3768289874e063619f75faca7a24dd75a08884df8cd8fb2cc9b54c6f0a46
インストールが成功したことを確認し、実行する:
たとえば、Ubuntu (Linux) の場合:
docker ps

CONTAINER ID   IMAGE                    COMMAND                  CREATED          STATUS                          PORTS     NAMES
b1145b72db35   leapslabs/leaps_center:latest   "sh -c 'cd /app &&  …"   37 seconds ago   11 seconds ago                            leaps_center
ウェブブラウザを開き、次の http://localhost:80;LEAPS Centerアプリケーションがウェブブラウザにロードされます。
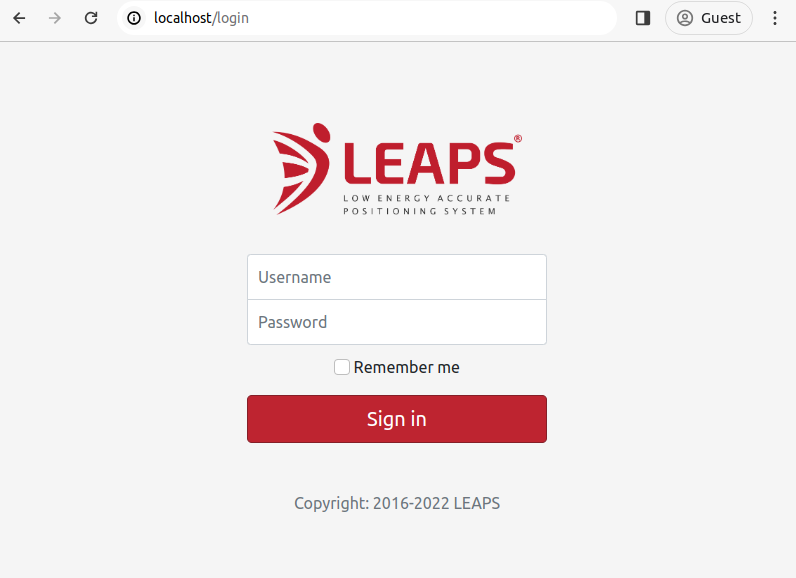
これでLEAPS CenterのPCへのインストールと起動は完了です。
設定ファイル
leaps-center-web.conf
JAVA_OPTS="-Xms256m -Xmx512m -Xss256k"アプリケーション.特性
leaps-center-history.properties
leaps-center-web.properties
この設定ファイルは、アプリケーションのロギングを制御する。
#
#     LEAPS - Low Energy Accurate Positioning System - LEAPS Center.
#
#     Copyright (c) 2016-2026, LEAPS.
#
#     Licensed under the Apache License, Version 2.0 (the "License");
#     you may not use this file except in compliance with the License.
#     You may obtain a copy of the License at
#
#     http://www.apache.org/licenses/LICENSE-2.0
#
#     Unless required by applicable law or agreed to in writing, software
#     distributed under the License is distributed on an "AS IS" BASIS,
#     WITHOUT WARRANTIES OR CONDITIONS OF ANY KIND, either express or implied.
#     See the License for the specific language governing permissions and
#     limitations under the License.

#default WINDOWNS("user.home"/leaps-center-log/leaps-center-web.log), UNIX(/var/log/leaps-center-web.log)

# Logging file
#logging.file.name=/app/data/log/leaps-center-web.log

# Level log TRACE < DEBUG < INFO < WARN < ERROR < OFF, default is OFF
logging.level.root=OFF
この設定ファイルはノードの位置履歴ロギングを制御します。
#
#       LEAPS - Low Energy Accurate Positioning System - LEAPS Center.
#
#       Copyright (c) 2016-2026, LEAPS.
#
#       Licensed under the Apache License, Version 2.0 (the "License");
#       You may not use this file except in compliance with the License.
#       You may obtain a copy of the License at
#
#       http://www.apache.org/licenses/LICENSE-2.0
#
#       Unless required by applicable law or agreed to in writing, software
#       distributed under the License is distributed on an "AS IS" BASIS,
#       WITHOUT WARRANTIES OR CONDITIONS OF ANY KIND, either express or implied.
#       See the License for the specific language governing permissions and
#       limitations under the License.
#

# history enabled (default false)
history.enabled=false
history.position.enabled=true
history.zone.enabled=true

# use node position message timestamp (default true)
history.use.position.timestamp=false

# =======================================================================================================
# Export Options
# =======================================================================================================

# add headers (default false)
history.export.headers=false

# maximum number of records (default 1000000)
history.export.max.lines=1000000

# compress export file (default true)
history.export.compress=true

# number of decimal places for x, y, z values (default 4)
history.export.position.decimal.places=2

# format network id to hex value (default true)
history.export.hex.network.id=true

# format node  ID to hex value (default true)
history.export.hex.node.id=true

# =======================================================================================================
# Position History Options
# =======================================================================================================

# interval time to add a history record (default 10000)
history.node.position.interval.time=10000

# minimun quality value (default 0)
history.node.position.min.quality=0

# =======================================================================================================
# Heatmap Options
# =======================================================================================================
# maximum number of records for heatmap (default 100000)
heatmap.max.results=100000

# =======================================================================================================
# Purge Options
# =======================================================================================================

# time to purge database records in days (default 30 days)
history.purge.time=30

# backup purged records to a file in /history folder (default false)
history.purge.backup.records=true

# max number of backup files (default 10)
history.purge.max.backup.files=5

# =======================================================================================================
# DBMS (SQLITE, POSTGRESQL, MY_SQL, ORACLE, SQL_SERVER or CUSTOM)
# =======================================================================================================

# History - SQLite Database Example (default).
# history.dbms=SQLITE
# history.db.jdbc.url=jdbc:sqlite:leaps-center-history.db
# history.db.username=
# history.db.password=

# History - PostgreSQL Database Example
# history.dbms=POSTGRESQL
# history.db.jdbc.url=jdbc:postgresql://localhost:5432/leaps_center_history
# history.db.username=leaps_center
# history.db.password=pwd
この設定ファイルはleaps_centerアプリケーションをコントロールします。
#
#       LEAPS - Low Energy Accurate Positioning System - LEAPS Center.
#
#       Copyright (c) 2016-2026, LEAPS.
#
#       Licensed under the Apache License, Version 2.0 (the "License");
#       you may not use this file except in compliance with the License.
#       You may obtain a copy of the License at
#
#       http://www.apache.org/licenses/LICENSE-2.0
#
#       Unless required by applicable law or agreed to in writing, software
#       distributed under the License is distributed on an "AS IS" BASIS,
#       WITHOUT WARRANTIES OR CONDITIONS OF ANY KIND, either express or implied.
#       See the License for the specific language governing permissions and
#       limitations under the License.
#

# database (SQLITE, POSTGRESQL, MY_SQL, ORACLE, SQL_SERVER or CUSTOM)
db.dbms=SQLITE

# History - SQLite Database Example.
# dbms=SQLITE
# db.jdbc.url=jdbc:sqlite:leaps-center-db
# db.username=
# db.password=

# History - PostgreSQL Database Example
# db.dbms=POSTGRESQL
# db.jdbc.url=jdbc:postgresql://localhost:5432/leaps_center
# db.username=postgres
# db.password=qwe123

# =======================================================================================================
# Network
# =======================================================================================================

# create the default network if it does not exist when starting. (default true)
network.create.default.network=true
network.create.default.floor.plan=false

# change the networkId via the gateway message.
network.change.network.id.via.gateway.message=false

network.default.id=1234
network.default.name=LEAPS

# network type, PANS or LEAPS
network.default.network.type=LEAPS

# PAN_ID or HOST
network.default.mqtt.connection.type=HOST

# WS or SSE
network.default.web.client.connection.type=SSE

# MQTT
mqtt.host=localhost
mqtt.ws.port=15675
mqtt.tcp.port=1883
mqtt.username=leaps
mqtt.password=leaps

mqtt.topic.prefix=leaps
mqtt.tag.topic.prefix=node
mqtt.anchor.topic.prefix=node

# define if the network id will be added in the topic prefix
mqtt.add.network.id.topic.prefix=true

# Enable/Disable MQTT TLS
# mqtt.tls=true
# mqtt.tls.host.name.verification.enabled=false
# CA_SIGNED_CERTIFICATE (signed by a publicly trusted CA), CA_FILE_CERTIFICATE (file certificate), SELF_SIGNED_CERTIFICATE (self signed file certificate);
# mqtt.tls.certificate.type=SELF_SIGNED_CERTIFICATE
# TLS Protocol: TLS_V1 (TLSv1), TLS_V1_1 (TLSv1.1), TLS_V1_2 (TLSv1.2), TLS_V1_3(TLSv1.3);
# mqtt.tls.protocol=TLS_V1_2
# mqtt.tls.certificate.file=/app/data/certs/cacert.pem

# mqtt.tls.client.certificate.file=/app/data/certs/leaps-center-broker-clientcert.pem
# mqtt.tls.client.key.file=/app/data/certs/leaps-center-broker-clientkey.pem
# mqtt.tls.client.password=

# =======================================================================================================
# Web server settings
# =======================================================================================================

# http session timeout
server.servlet.session.timeout=-1

# maximum number of http sessions per user (-1 is unlimited)
server.max.sessions.per.user=-1

# mod-jk/ajp connector configuration
tomcat.ajp.enabled=false
# tomcat.ajp.port=8009
# tomcat.ajp.secret.required=false
# tomcat.apr.enabled=false

# server port (2-65535), (default 8080)
server.port=8080

# enable / disable https
server.ssl.enabled=false
# keystore format
# server.ssl.key-store-type=PKCS12
# keystore location
# server.ssl.key-store=/usr/share/leaps_center/key-store.p12
# keystore alias
# server.ssl.key-alias=leaps_center
# keystore password
# server.ssl.key-store-password=password
# SSL protocol to use
# server.ssl.protocol=TLS
# Enabled SSL protocols
# server.ssl.enabled-protocols=TLSv1.2

#server.servlet.context-path=/leaps_center
server.sent.events.timeout=2
はじめに
デフォルトでは、ユーザー名は admin、パスワードは admin です。
LEAPS Server Docker
Start LEAPS Center, run:
docker start leaps_centerStop LEAPS Center, run:
docker stop leaps_centerRestart LEAPS Center, run:
docker restart leaps_centerRemove LEAPS Center, run
docker rm --force leaps_center
ネットワーク構成
To configure the network, go to the menu and select Networks. Then, click the Add button at the bottom right to create a new network.
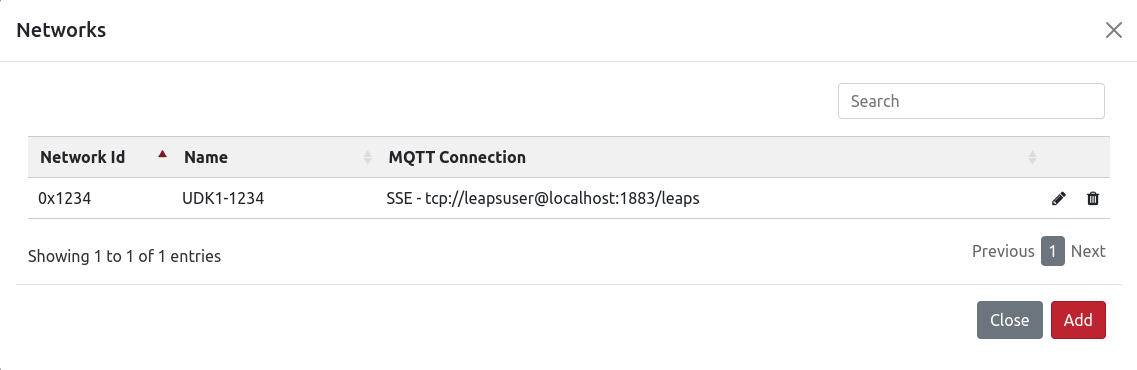
次に、必要な設定パラメータを入力する:
名前
ホスト
TCPポート
ユーザー名
トピックのプレフィックス
ネットワークタイプ
ネットワークIDがわからない場合は、LEAPS Manager やShellを使って見つけることができる。
すべて入力したら、Save ボタンをクリックして接続し、ネットワークIDを受け取ります。
最後に Test ボタンをクリックして接続を確認し、 Save ボタンをクリックして設定を保存します。
ノード構成
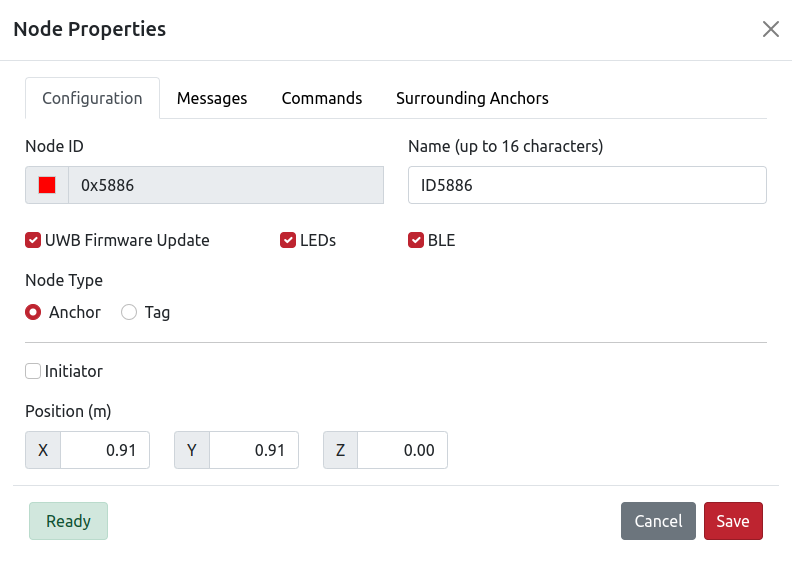
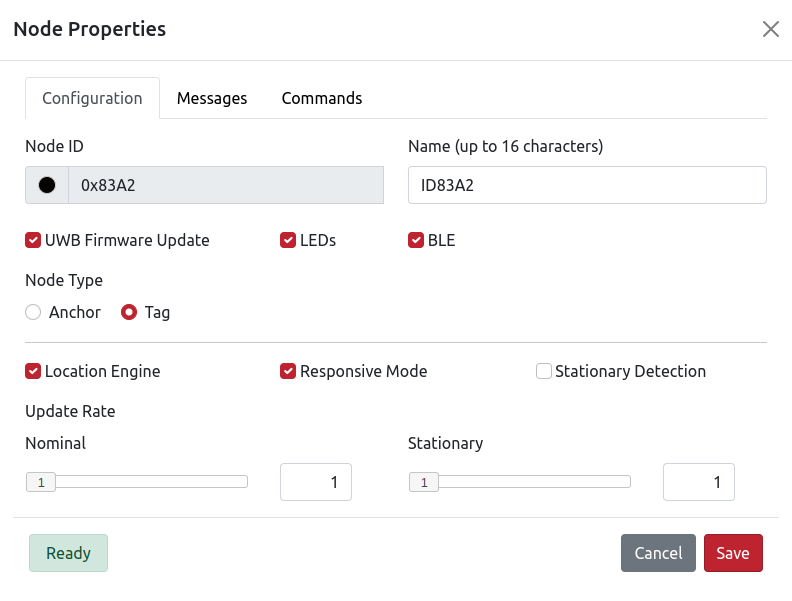
ノードを設定するには、あらかじめノードを特定のネットワークに割り当てる必要があります。
指定したノードのあるネットワークを選択すると、ネットワークの詳細が表示されます。次に、ノードの設定を開始します。
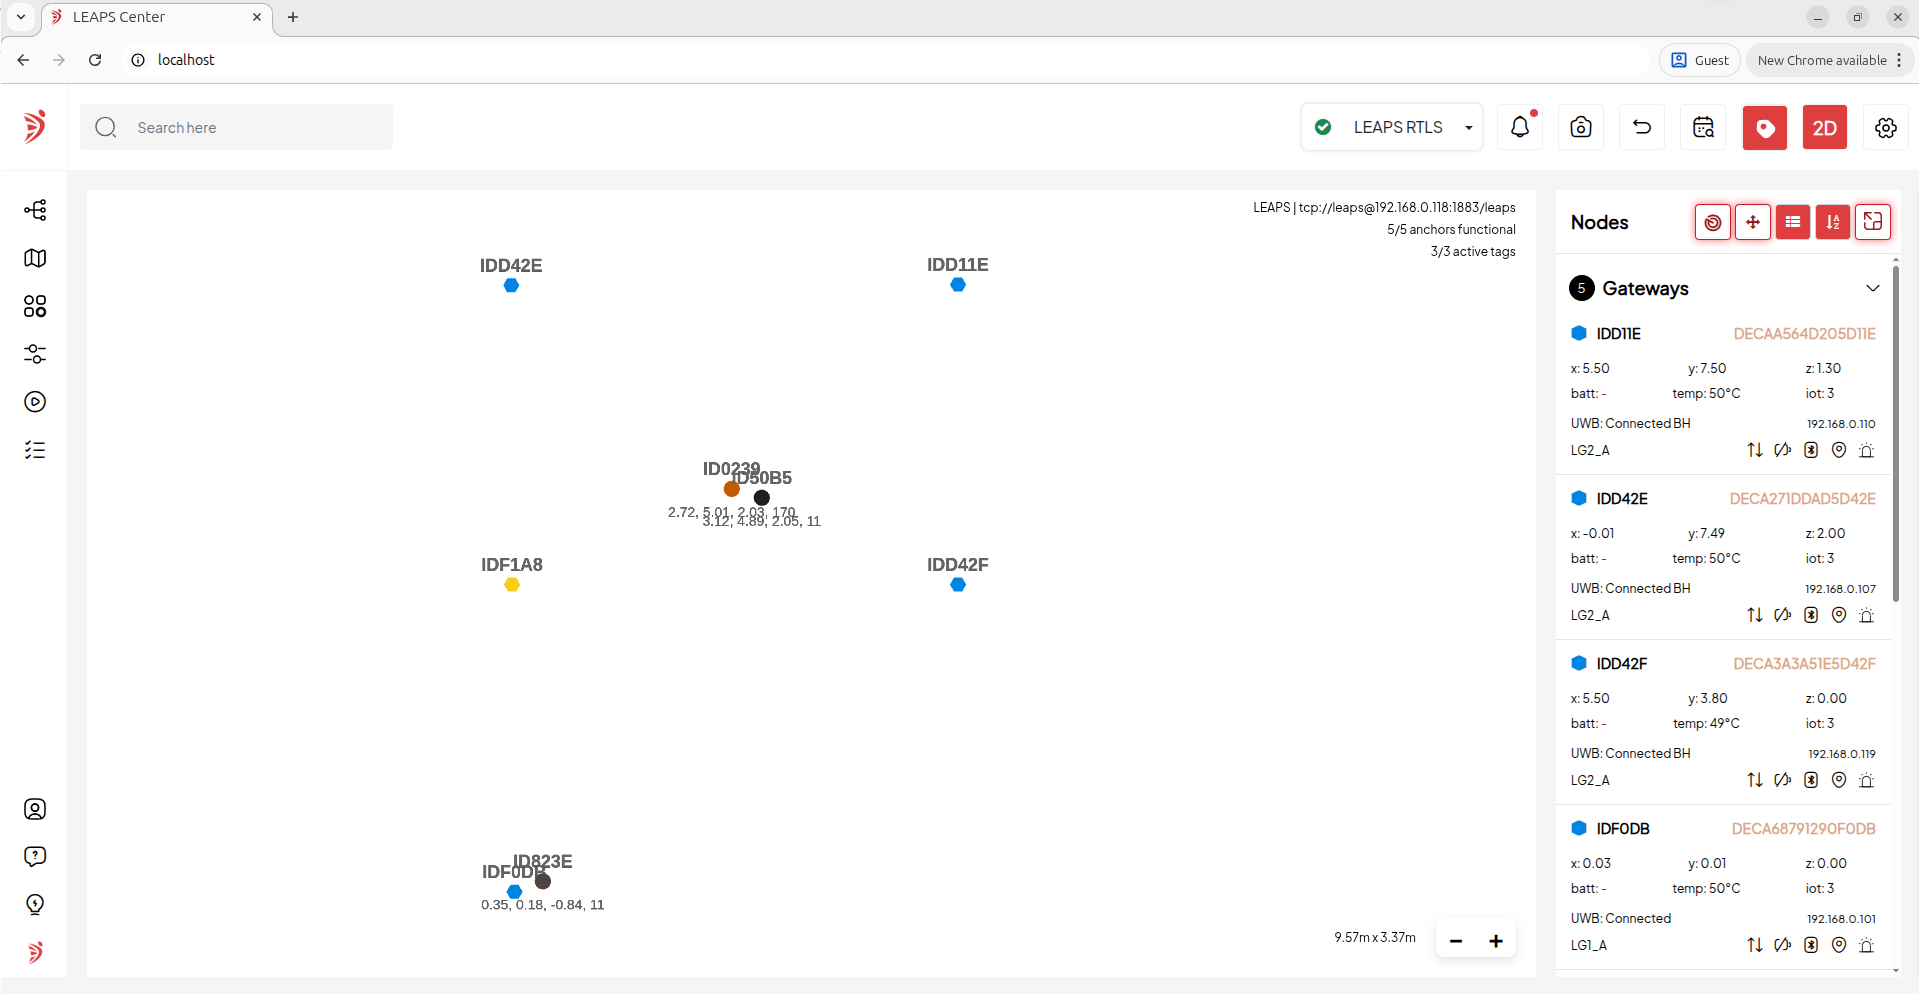
ゲートウェイ・ノード、アンカー・ノード、タグ・ノードとして設定可能なノードについては、以下を参照してください
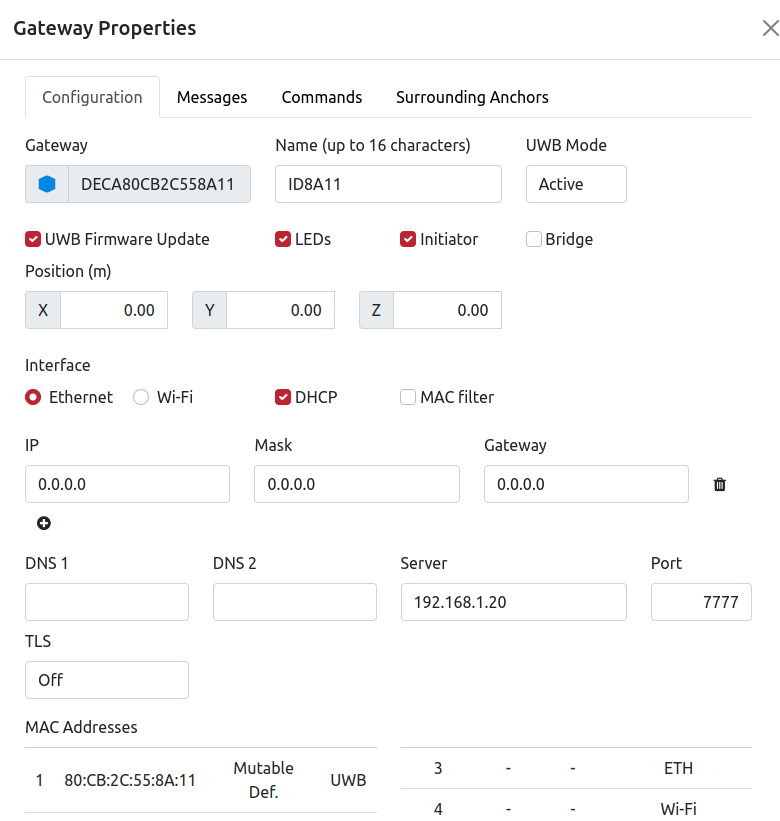
フロアプラン
フロアプランを設定するには、メニューから Floor Plans を選択してください。
Click the Add button in the bottom right. Then, import the Floor Plans you want to configure and fill in the corresponding parameters.
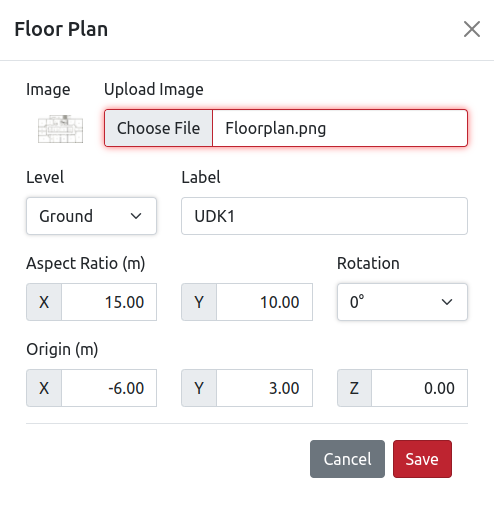
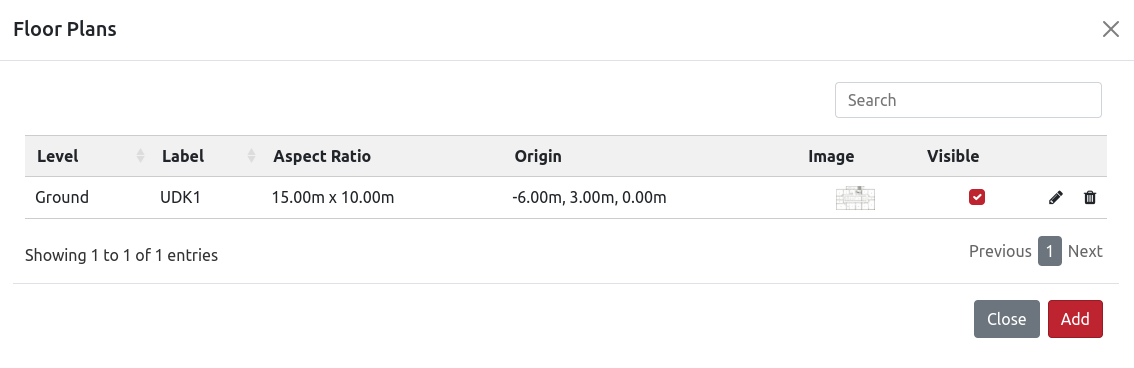
入力が終わったら Save ボタンをクリックして設定を保存します。 Visible チェックボックスを使用すると、マップ上で可視性を有効にすることができます。
ゾーン
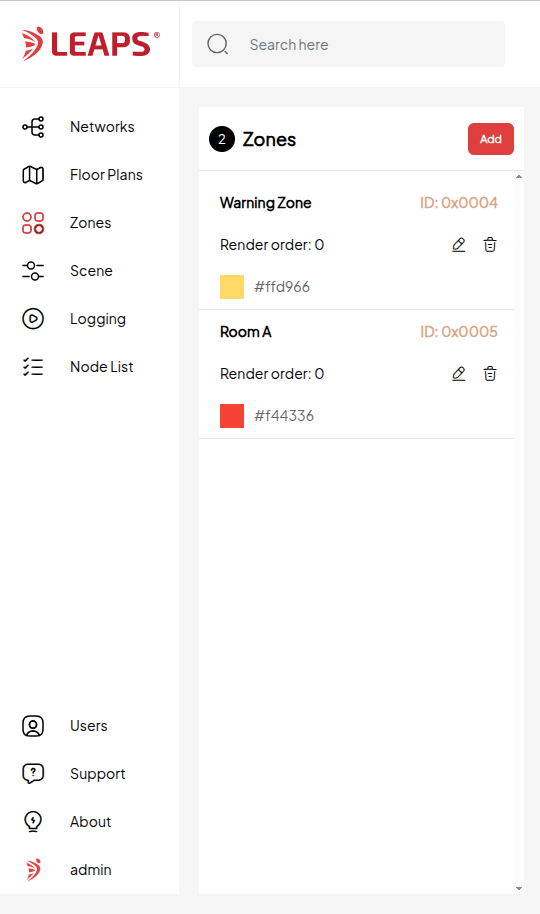
ゾーンを設定するには、メニューから Zones を選択してください。
Click the Add button in the bottom right. Then, fill in the corresponding parameters and add the configuration for Save.
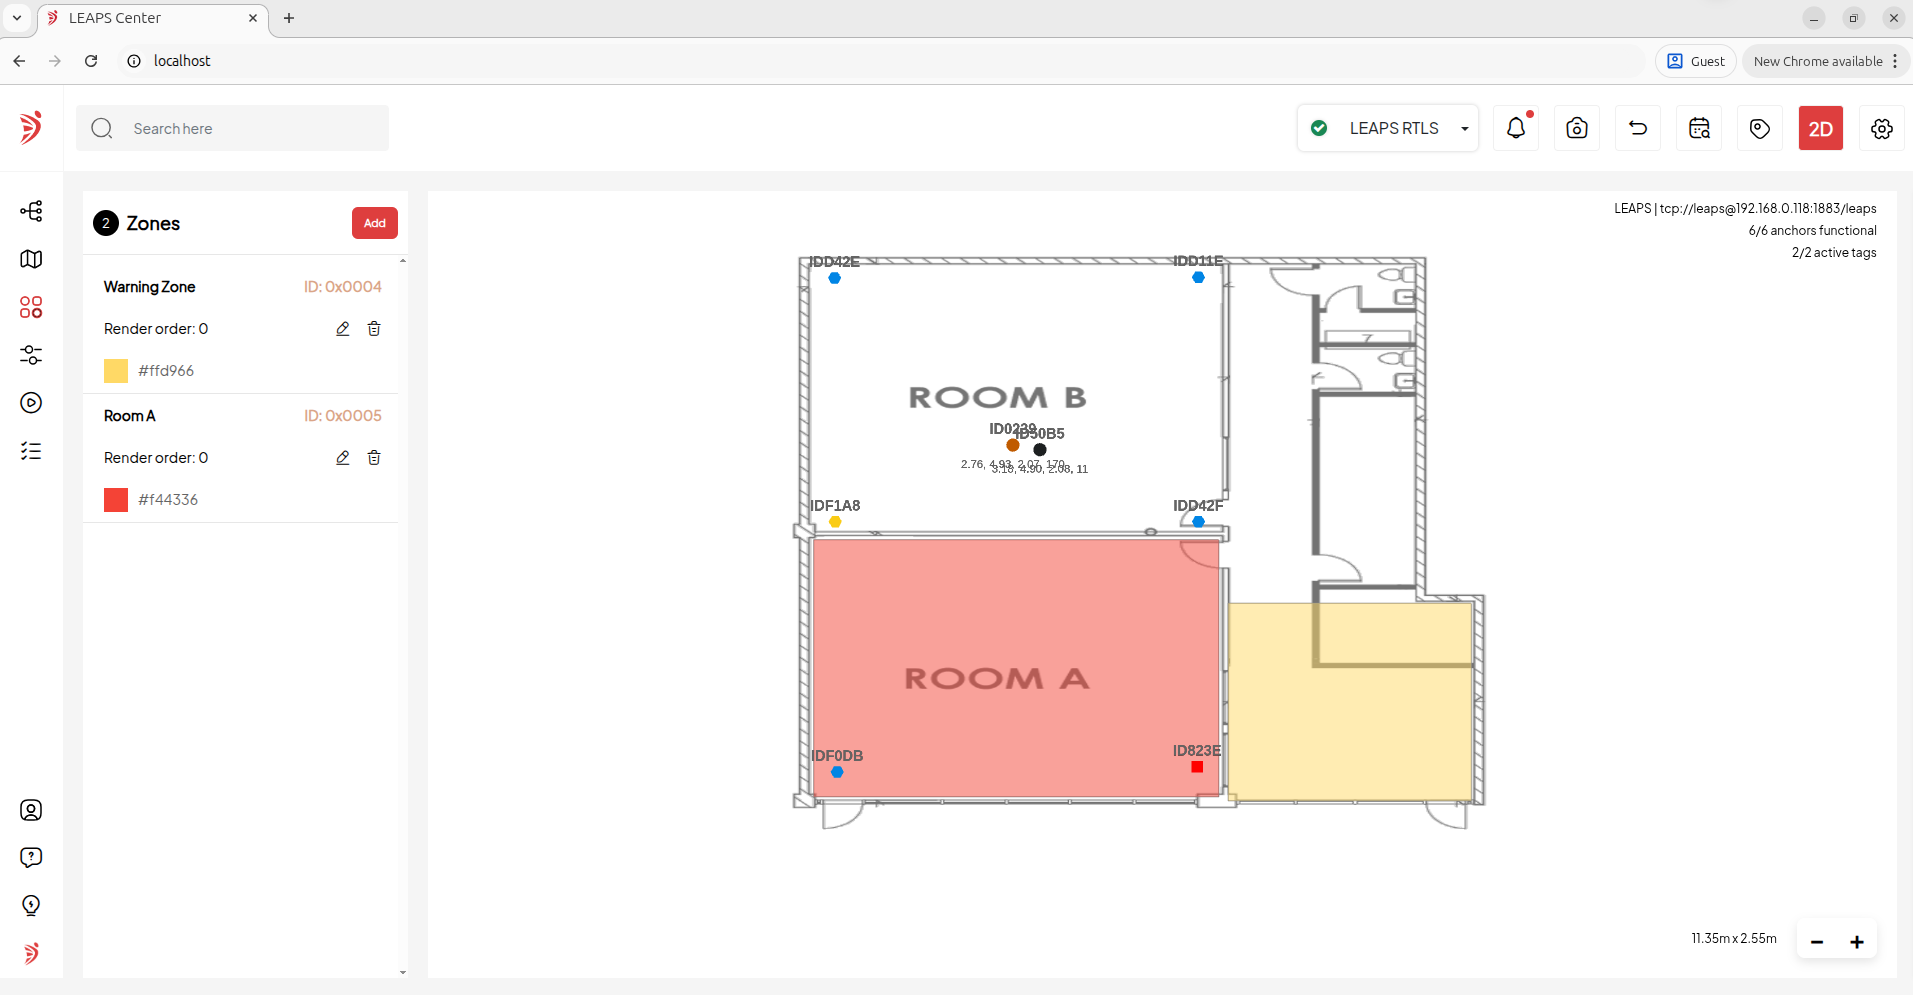
Once you’ve filled it in, click the Save button to save the configuration.
ユーザー
ユーザーを設定するには、メニューから Users を選択してください。
デフォルトでは、アプリケーションは管理者アカウントと共通アカウントをあらかじめ設定しています。
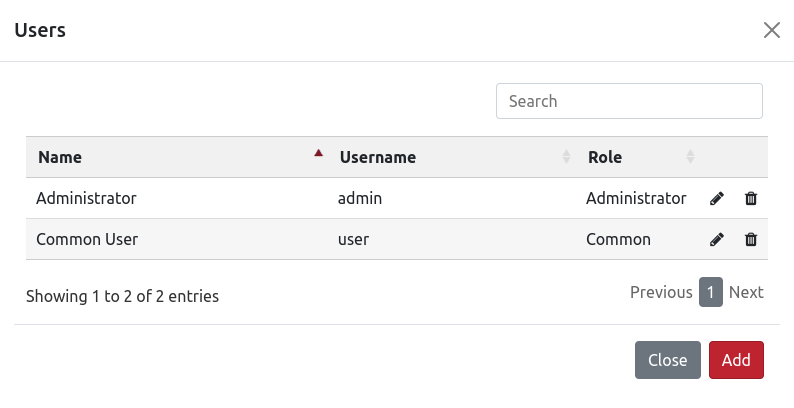
管理者または共通アカウントの場合。
API 認証
ユーザは /login に以下のパラメータを渡すシンプルな HTTP POST を行う必要があります (admin:admin を例にしています)。
ユーザー名: admin
パスワード: admin
remember-me: on
ログイン後、JSESSIONIDクッキーが生成され、ユーザはそれ以降のリクエストでそれを使用する必要があります。
注釈
これは必須ではありません。もしユーザがこれを使うと、レスポンスとして別のクッキー (クッキー REMEMBERME) が追加され、ユーザはそれ以降のリクエストでそれを使うことができます。
As the LEAPS Center performs a redirect after login and also when users are not authorized, it is necessary to properly set up the "follow redirects" parameter in user's client. The response code after login is 302, but users need to handle it manually because if the user is not authorized the status code is also 302. Users can make any request to a REST service, for example, and if the response status code is not 200 the user will not be authorized.
以下は、リクエストとネットワークへの問い合わせを行うJavaのコード例である:
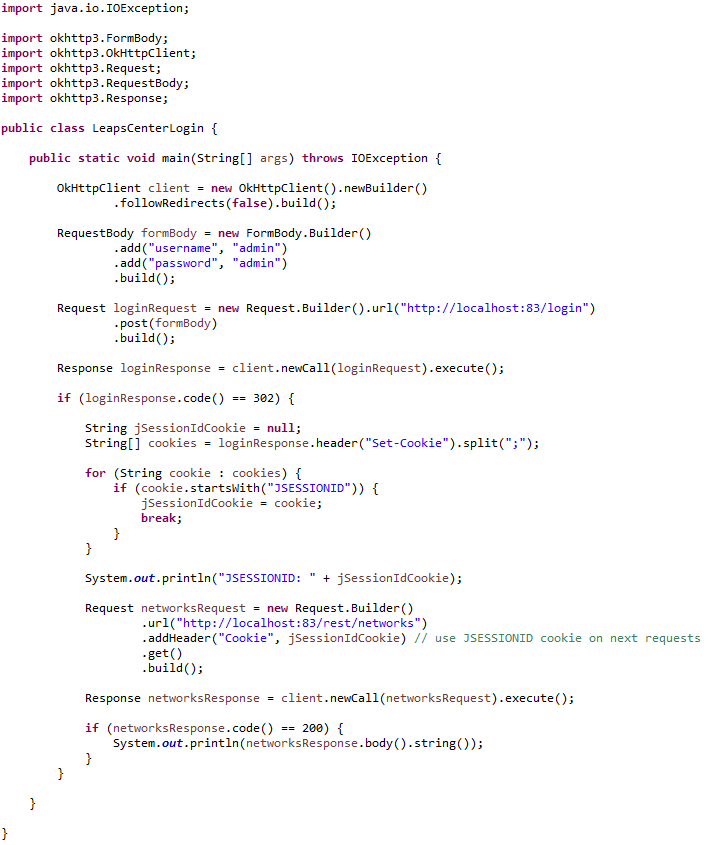
詳細については、以下の2つのビデオを参照してください。1つはPostmanを使用し、もう1つはJavaコードを使用します。
Postman
Java Client
トラブルシューティング
Use the following command
docker restart leaps_centerto restart LEAPS Center.Check the logs when LEAPS Center is running, open the docker desktop and select the leaps_center container.
Open via Safari: If the interactive floor plan fails to load when you open the app, a Safari experimental feature is likely causing a conflict. Go to Settings > Safari > Advanced > Experimental Features and disable ‘requestIdleCallback’.