LEAPS Center
LEAPS Center is a web application that provides device management, network management, and visualization of location and telemetry data for the whole network.
Key Features
The Grid in 2D and 3D provides real-time position updates and visualization of the devices in the network.
Other useful features include User Management, Zone Management, Zone History, Floorplan Management, Position History and Position Heatmap.
The LEAPS Center interconnects with the LEAPS Server via the MQTT Broker. It runs as a service on Linux and Windows platforms.
Installation
System Requirements
Docker’s system requirements vary based on the operating system.
For Linux, you need a 64-bit architecture, compatible kernel version, and specific kernel features.
On Windows, use Docker Desktop on Windows 10 with virtualization enabled
On macOS, use Docker Desktop with macOS 10.13 or newer. In terms of hardware, a minimum of 2GB RAM is recommended, along with sufficient CPU and disk space.
Note
Refer to Docker official documentation for up-to-date details.
Instructions
Install Docker on your PC
Install Docker Desktop on Linux
Additionally, you can refer to the following commands to install:
curl -fsSL https://get.docker.com -o get-docker.sh
sudo sh ./get-docker.sh
sudo usermod -aG docker $USER
Prepare the configuration package.
Create the leaps_center directory containing the Configuration files
leaps-center-web.conf
application.properties
leaps-center-history.properties
leaps-center-web.properties
Or you can download the LEAPS Center configuration package (LEAPS_CENTER_DOCKER.zip).
Open a command prompt or terminal window on your PC.
Navigate to the directory where you extracted from the LEAPS Center configuration package.
For example, on Ubuntu (Linux):
cd LEAPS_CENTER_DOCKER/
Install the LEAPS Center Docker packages, run:
docker run -d -p 80:8080/tcp --name some_name -v /path/to/data/data/:/app/data/ -e LEAPS_CENTER_HOME=/app/data/ leapslabs/leaps_center:tag sh -c "cd /app && java -jar leaps-center-web.jar"where
some_nameis the name you want to assign to your container andtagis the tag specifying theleaps-center-webversion you want.The leaps_center image must operate with an externally mounted folder that contains configuration files and space for application logs and configuration/node history databases.
The option
-v /path/to/data/:/app/data/mount the folder located in/path/to/data/to internal/app/datafolder. The data folder must contain the files described below.
Recommended run options
--user $(id -u):$(id -g)Run the instance under a specific user and group.
--restart unless-stoppedRestart the instance automatically in case the server crashes.Optional run options
--security-opt seccomp=unconfinedThis option is needed on a 32bit Raspberry Pi image (Raspbian), as it contains an obsolete seccomp library with a bug that negatively affects the Docker image (it won’t be able to connect to the MQTT server). This option allows us to override this issue.
The LEAPS Center installation process will begin.
For example, on Ubuntu (Linux):
docker run -d -p 80:8080/tcp --name leaps_center -v $PWD/leaps_center/:/app/data/ -e LEAPS_CENTER_HOME=/app/data/ leapslabs/leaps_center:latest sh -c "cd /app &&  java -jar leaps-center-web.jar"

Unable to find image 'leapslabs/leaps_center:latest' locally
latest: Pulling from leapslabs/leaps_center
a458657ccc71: Pull complete
Digest: sha256:a19b127656d41d8607f043c2c83924e5b9a5cbd4dc23cfbed070be3b9cfc6b9a
Status: Downloaded newer image for leapslabs/leaps_center:latest
320d3768289874e063619f75faca7a24dd75a08884df8cd8fb2cc9b54c6f0a46
Verify that the installation is successful, run:
For example, on Ubuntu (Linux):
docker ps

CONTAINER ID   IMAGE                    COMMAND                  CREATED          STATUS                          PORTS     NAMES
b1145b72db35   leapslabs/leaps_center:latest   "sh -c 'cd /app &&  …"   37 seconds ago   11 seconds ago                            leaps_center
Open a web browser and enter the following http://localhost:80; The LEAPS Center application will load in a web browser.
So, you have successfully installed and started LEAPS Center on your PC.
Configuration files
leaps-center-web.conf
JAVA_OPTS="-Xms256m -Xmx512m -Xss256k"application.properties
leaps-center-history.properties
leaps-center-web.properties
This configuration file controls application logging.
spring.main.banner-mode=OFF

logging.level.root=OFF
logging.level.global.leaps.center.mqtt=OFF
logging.level.global.leaps.center.init=OFF
logging.level.global.leaps.center.service=OFF
logging.level.global.leaps.center.history.filter=OFF
logging.level.global.leaps.center.history.service=OFF
logging.level.global.leaps.center.history=OFF
logging.level.global.leaps.center.web.component=OFF
logging.level.global.leaps.center.web.rest=OFF
logging.level.global.leaps.center.web.sse=OFF
logging.level.global.leaps.center.web=OFF
logging.level.global.leaps.center=OFF
This configuration file controls the node position history logging.
#
#       LEAPS - Low Energy Accurate Positioning System - LEAPS Center.
#
#       Copyright (c) 2016-2021, LEAPS.
#
#       Licensed under the Apache License, Version 2.0 (the "License");
#       You may not use this file except in compliance with the License.
#       You may obtain a copy of the License at
#
#       http://www.apache.org/licenses/LICENSE-2.0
#
#       Unless required by applicable law or agreed to in writing, software
#       distributed under the License is distributed on an "AS IS" BASIS,
#       WITHOUT WARRANTIES OR CONDITIONS OF ANY KIND, either express or implied.
#       See the License for the specific language governing permissions and
#       limitations under the License.
#

# history enabled (default false)
history.enabled=false
history.position.enabled=true
history.zone.enabled=true

# use node position message timestamp (default true)
history.use.position.timestamp=false

# =======================================================================================================
# Export Options
# =======================================================================================================

# add headers (default false)
history.export.headers=false

# maximum number of records (default 1000000)
history.export.max.lines=1000000

# compress export file (default true)
history.export.compress=true

# number of decimal places for x, y, z values (default 4)
history.export.position.decimal.places=2

# format network id to hex value (default true)
history.export.hex.network.id=true

# format node  ID to hex value (default true)
history.export.hex.node.id=true

# =======================================================================================================
# Position History Options
# =======================================================================================================

# interval time to add a history record (default 10000)
history.node.position.interval.time=10000

# minimun quality value (default 0)
history.node.position.min.quality=0

# =======================================================================================================
# Heatmap Options
# =======================================================================================================
# maximum number of records for heatmap (default 100000)
heatmap.max.results=100000

# =======================================================================================================
# Purge Options
# =======================================================================================================

# time to purge database records in days (default 30 days)
history.purge.time=30

# backup purged records to a file in /history folder (default false)
history.purge.backup.records=true

# max number of backup files (default 10)
history.purge.max.backup.files=5

# =======================================================================================================
# DBMS (SQLITE, POSTGRESQL, MY_SQL, ORACLE, SQL_SERVER or CUSTOM)
# =======================================================================================================

# History - SQLite Database Example (default).
# history.dbms=SQLITE
# history.db.jdbc.url=jdbc:sqlite:leaps-center-history.db
# history.db.username=
# history.db.password=

# History - PostgreSQL Database Example
# history.dbms=POSTGRESQL
# history.db.jdbc.url=jdbc:postgresql://localhost:5432/leaps_center_history
# history.db.username=leaps_center
# history.db.password=pwd

# History - Oracle Database Example
# Important! To use Oracle DBMS is mandatory to change global.leaps.center.history.entity.NetworkNodeHistory.id @Id generation strategy to GenerationType.AUTO or GenerationType.SEQUENCE. Oracle does not support GenerationType.IDENTITY.
# history.dbms=ORACLE
# history.db.hibernate.dialect=org.hibernate.dialect.Oracle10gDialect
# history.db.jdbc.url=jdbc:oracle:thin:@127.0.0.1:1521/XE
# history.db.username=leaps_center
# history.db.password=pwd

# History - MySQL Database Example
# history.dbms=MY_SQL
# history.db.jdbc.url=jdbc:mysql://localhost:3306/leaps_center
# history.db.username=leaps_center
# history.db.password=pwd

# History - SQL Server Database Example
# TODO: It needs to be tested.
# history.dbms=SQL_SERVER
# history.db.jdbc.url=jdbc:sqlserver://localhost:1433;databaseName=leaps_center_history;integratedSecurity=true
# history.db.jdbc.url=jdbc:jtds:sqlserver://localhost:1433/leaps_center_history;instance=SQLEXPRESS;
# history.db.username=leaps_center
# history.db.password=pwd

# History - Custom Database
# history.dbms=CUSTOM

# Hibernate Dialect
# history.db.hibernate.dialect=org.hibernate.dialect.PostgreSQLDialect

# JDBC driver class
# history.db.jdbc.driver.class=org.postgresql.Driver
This configuration file controls leaps_center application.
#
#       LEAPS - Low Energy Accurate Positioning System - LEAPS Center.
#
#       Copyright (c) 2016-2021, LEAPS.
#
#       Licensed under the Apache License, Version 2.0 (the "License");
#       you may not use this file except in compliance with the License.
#       You may obtain a copy of the License at
#
#       http://www.apache.org/licenses/LICENSE-2.0
#
#       Unless required by applicable law or agreed to in writing, software
#       distributed under the License is distributed on an "AS IS" BASIS,
#       WITHOUT WARRANTIES OR CONDITIONS OF ANY KIND, either express or implied.
#       See the License for the specific language governing permissions and
#       limitations under the License.
#

# database (SQLITE, POSTGRESQL, MY_SQL, ORACLE, SQL_SERVER or CUSTOM)
db.dbms=SQLITE

# History - SQLite Database Example.
# dbms=SQLITE
# db.jdbc.url=jdbc:sqlite:leaps-center-db
# db.username=
# db.password=

# History - PostgreSQL Database Example
# db.dbms=POSTGRESQL
# db.jdbc.url=jdbc:postgresql://localhost:5432/leaps_center
# db.username=postgres
# db.password=qwe123

# History - Oracle Database Example
# Important! To use Oracle DBMS is mandatory to change global.leaps.center.entity.NetworkNodeHistory.id @Id generation strategy to GenerationType.AUTO or GenerationType.SEQUENCE. Oracle does not support GenerationType.IDENTITY.
# db.dbms=ORACLE
# db.hibernate.dialect=org.hibernate.dialect.Oracle10gDialect
# db.jdbc.url=jdbc:oracle:thin:@127.0.0.1:1521/XE
# db.username=leaps_center
# db.password=q1w2e3r4t5

# History - MySQL Database Example
# db.dbms=MY_SQL
# db.jdbc.url=jdbc:mysql://localhost:3306/leaps_center
# db.username=root
# db.password=qwe123

# History - SQL Server Database Example
# db.dbms=SQL_SERVER
# db.jdbc.url=jdbc:sqlserver://localhost:1433;databaseName=leaps_center_history;integratedSecurity=true
# db.jdbc.url=jdbc:jtds:sqlserver://localhost:1433/leaps_center_history;instance=SQLEXPRESS;
# db.username=leaps_center
# db.password=qwe123

# History - Custom Database
# db.dbms=CUSTOM

# Hibernate Dialect
# db.hibernate.dialect=org.hibernate.dialect.PostgreSQLDialect

# JDBC driver class
# history.db.jdbc.driver.class=org.postgresql.Driver
# db.jdbc.url=jdbc:postgresql://localhost:5432/leaps_center
# db.username=postgres
# db.password=qwe123
# db.jdbc.driver.class=
# db.hibernate.dialect=

# show sql (default false)
# db.jpa.show-sql=false

# format sql (default false)
# db.jpa.format-sql=false

# =======================================================================================================
# network
# =======================================================================================================

# enable the registration of networks with mqtt connection type = HOST. (default true)
network.mqtt.connection.by.host.enabled=true

# enable the registration of networks with mqtt connection type = PAN_ID. (default false)
network.mqtt.connection.by.network.id.enable=false

# enable the registration of networks with web client connection by websocket. (default false)
network.web.client.connection.by.web.socket=false

# create the default network if it does not exist when starting. (default true)
network.create.default.network=true
# network.create.default.floor.plan=true

network.default.id=
network.default.name=Default

# PAN_ID or HOST
network.default.mqtt.connection.type=HOST

# WS or SSE
network.default.web.client.connection.type=SSE

# MQTT
mqtt.host=
mqtt.ws.port=15675
mqtt.tcp.port=1883
mqtt.username=dwmuser
mqtt.password=dwmuser
# Enable/Disable TLS
#mqtt.tls=
# CA_SIGNED_CERTIFICATE (signed by a publicly trusted CA), CA_FILE_CERTIFICATE (file certificate);
#mqtt.tls.certificate.type=CA_SIGNED_CERTIFICATE
# TLS Protocol: TLS_V1 (TLSv1), TLS_V1_1 (TLSv1.1), TLS_V1_2 (TLSv1.2), TLS_V1_3(TLSv1.3);
#mqtt.tls.protocol=TLS_V1_2
#mqtt.tls.certificate.file=/user/.../leaps-center.crt
mqtt.topic.prefix=dwm
mqtt.tag.topic.prefix=node
mqtt.anchor.topic.prefix=node

# =======================================================================================================
# floorplan settings
# =======================================================================================================
# size in pixels (default 2048)
floorplan.max.image.dimension.size=2048

# =======================================================================================================
# scene settings
# =======================================================================================================
# size in cm (default 50cm)
scene.grid.size=50
# color in int (default 0xD8D8D8)
scene.grid.color=0xD8D8D8
# max grid visibility distance in meters (default 100)
scene.grid.max.visibility.distance=100
# zoom min in meters (default 2)
scene.zoom.min=2
# zoom max in meters (default 100)
scene.zoom.max=100

# =======================================================================================================
# web server settings
# =======================================================================================================

# http session timeout
server.servlet.session.timeout=120m

# maximum number of http sessions per user (-1 is unlimited)
server.max.sessions.per.user=-1

# mod-jk/ajp connector configuration
tomcat.ajp.enabled=false
# tomcat.ajp.port=8009
# tomcat.ajp.secret.required=false
# tomcat.apr.enabled=false

# server port (2-65535)
server.port=8080

# enable / disable https
server.ssl.enabled=false
# keystore format
# server.ssl.key-store-type=PKCS12
# keystore location
# server.ssl.key-store=D:\\Leaps\\tls\\springboot.p12
# keystore alias
# server.ssl.key-alias=springboot
# keystore password
# server.ssl.key-store-password=password
# SSL protocol to use
# server.ssl.protocol=TLS
# Enabled SSL protocols
# server.ssl.enabled-protocols=TLSv1.2
Getting Started
By default, a login account with the user name is admin and password is admin.
LEAPS Server Docker
Start LEAPS Center, run:
docker start leaps_centerStop LEAPS Center, run:
docker stop leaps_centerRestart LEAPS Center, run:
docker restart leaps_centerRemove LEAPS Center, run
docker rm --force leaps_center
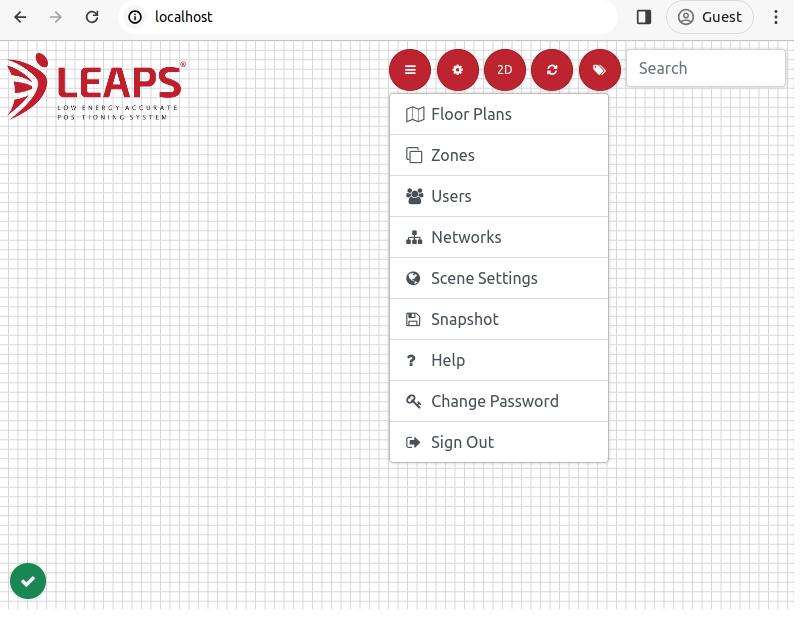
Network Configurations
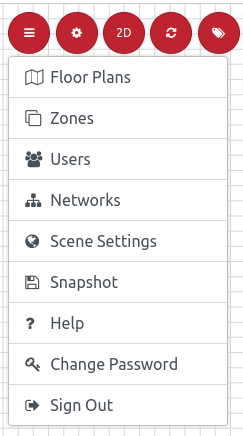
To configure the network, go to the menu and select the Networks.
The Network management dialog will pop up. A localhost network will already be set up by default with network ID 0x1234.
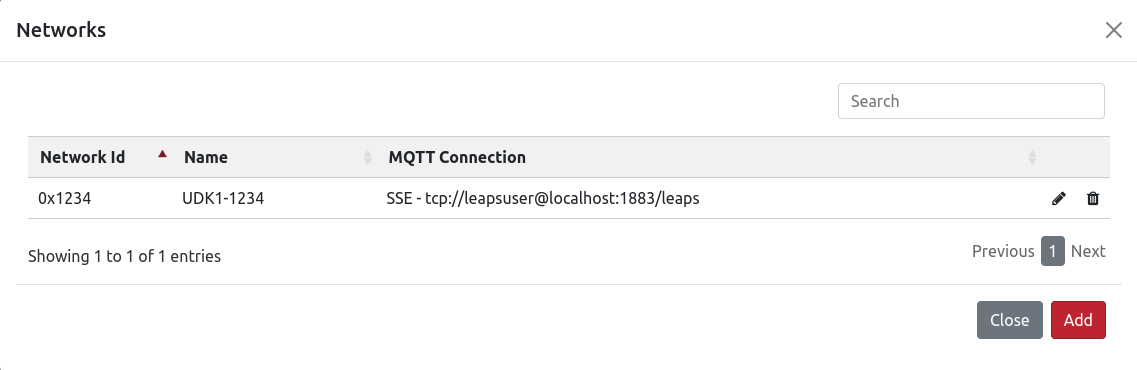
To create a new network, click the Add button in the bottom right.
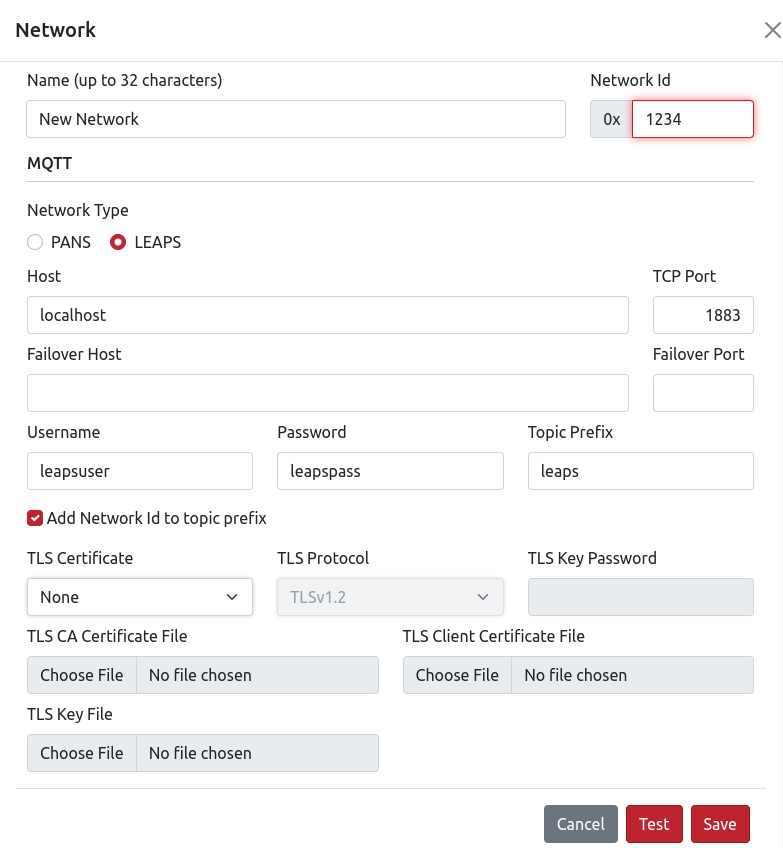
Now, fill in the required configuration parameters:
Name
Network Type
Host
TCP Port
Username
Topic Prefix
Once you’ve filled in everything, click the Save button to connect and receive the network ID.
If you don’t know the network ID, you can use LEAPS Manager or Shell to find it.
Finally, you can click the Test button to check the connection and then click the Save button to save your configuration.
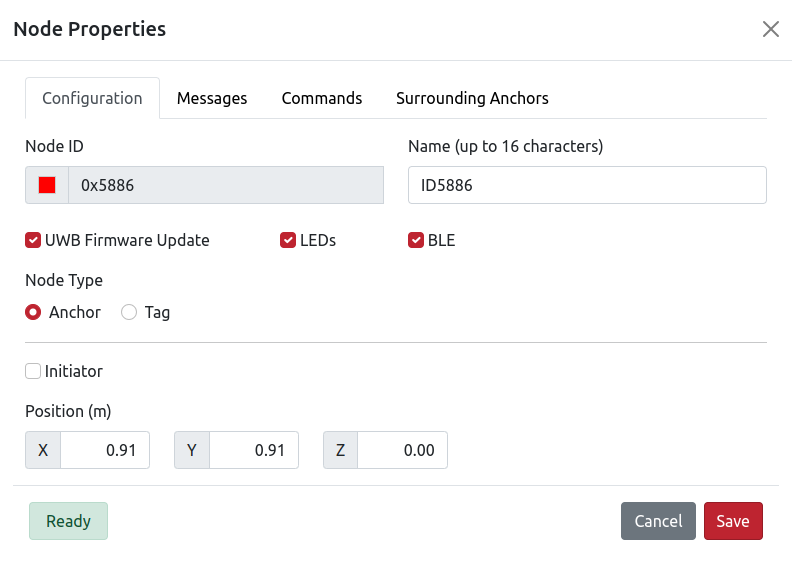
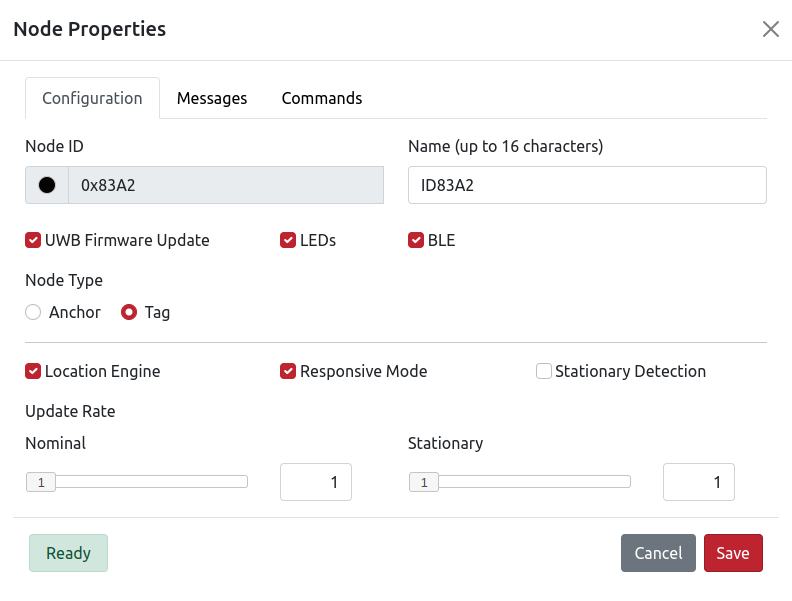
Node Configurations
To configure a node, you need to assign the node to a specific network in advance.
Select the network with the specified node to view network details. Then, you can start configure the node.
For a node that can be configured as a gateway, anchor, or tag node, please refer to the details below

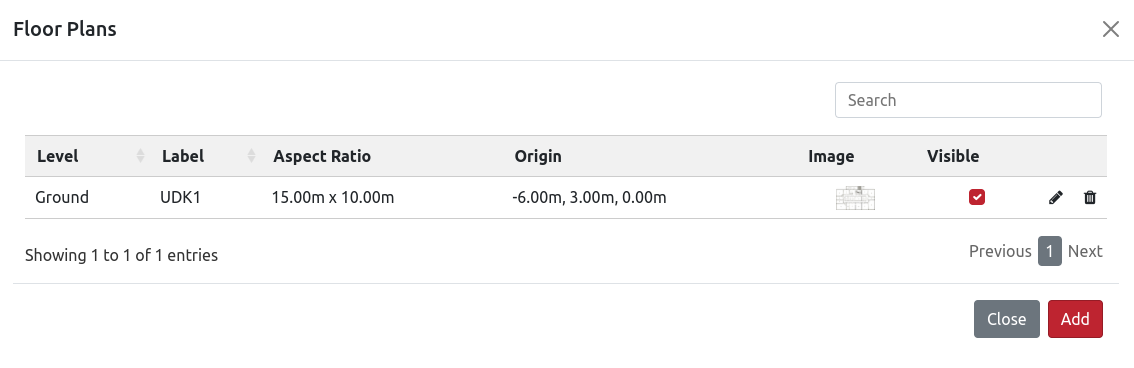
Floor Plans
To configure the floor plans, go to the menu and select the Floor Plans.
Click the Add button in the bottom right.
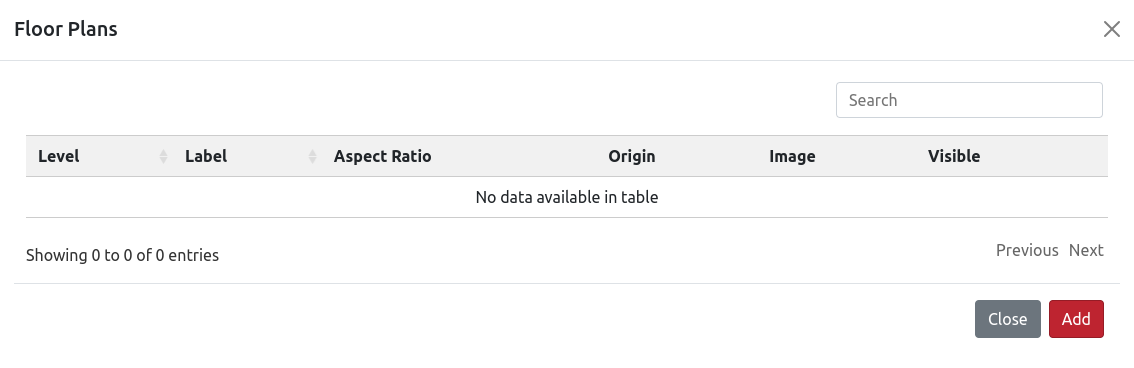
Then, import the Floor Plans you want to configure and fill in the corresponding parameters.

Once you’ve filled it in, click the Save button to save the configuration. Use the Visible checkbox to enable visibility on the map.
Zones
To configure the zones, go to the menu and select the Zones.
Click the Add button in the bottom right.
Then, fill in the corresponding parameters and add the configuration for Save.
Users
To configure the users, go to the menu and select the Users.
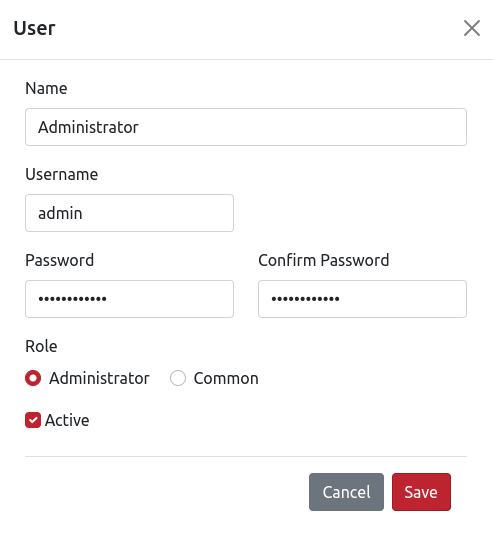
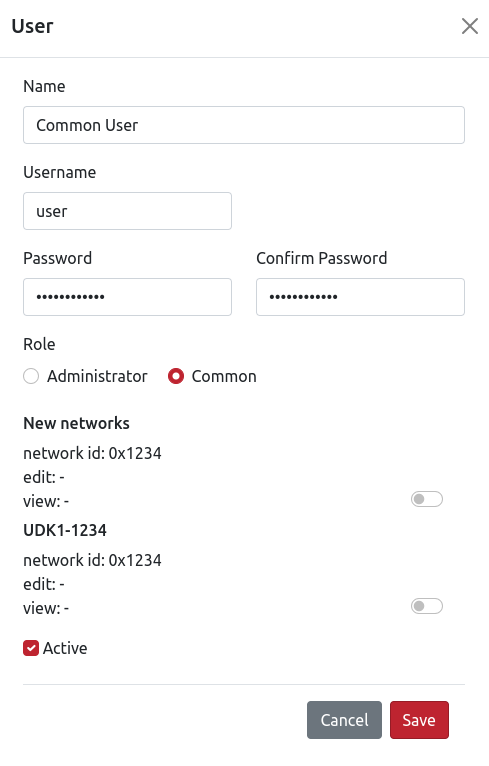
By default, the application has pre-configured an Admin account and a common account.
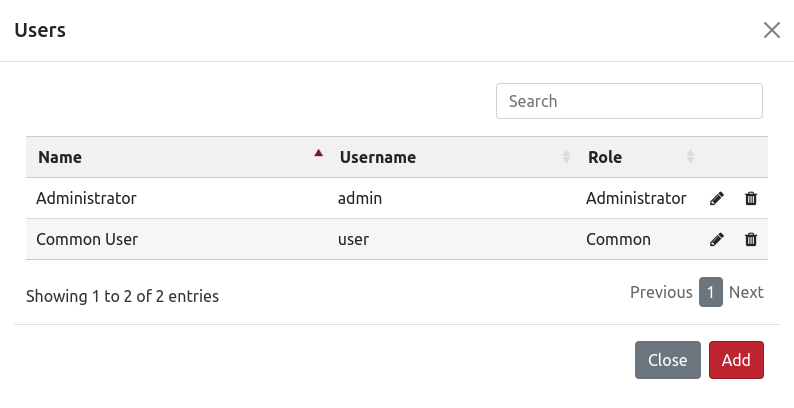
For accounts that are admin or common.
API Authorization
Users need to make a simple HTTP POST to /login passing the following parameters (using admin:admin as example).
username: admin
password: admin
remember-me: on
After login, the JSESSIONID cookie is generated and users need to use it in the subsequent requests.
Note
This is not mandatory and if users use it another cookie is added (cookie REMEMBERME) in response and users can use it in the subsequent requests.
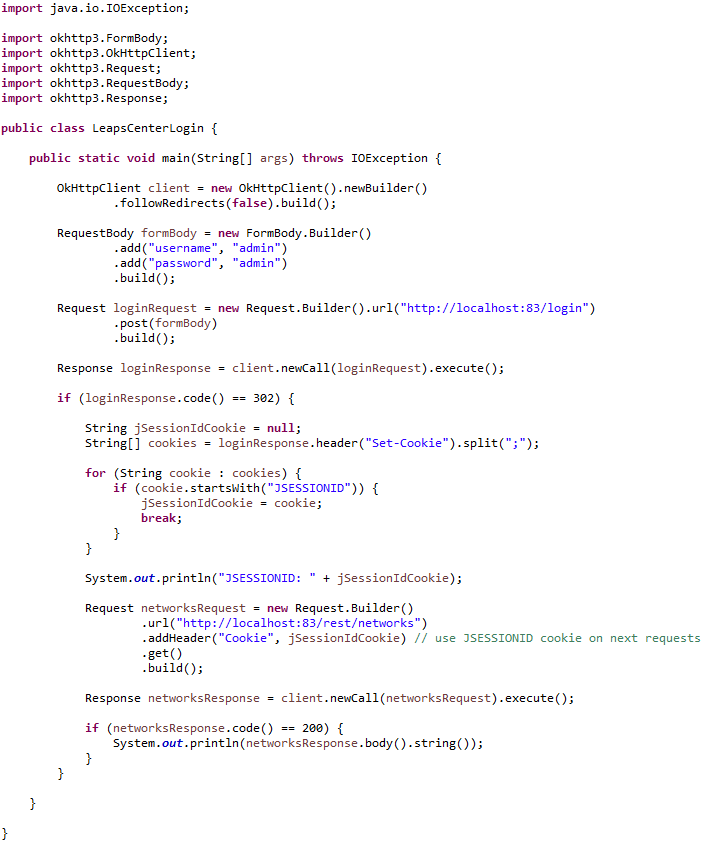
As the LEAPS Center performs a redirect after login and also when users are not authorized, it is necessary to properly set up the “follow redirects” parameter in user’s client. The response code after login is 302, but users need to handle it manually because if the user is not authorized the status code is also 302. Users can make any request to a REST service, for example, and if the response status code is not 200 the user will not be authorized.
Below is an example of code in Java to make the request and query the networks:
For more detail, please refer two below videos, one using Postman and the other with Java code
Postman
Java Client
Troubleshooting
Use the following command
docker restart leaps_centerto restart LEAPS Center.Check the logs when LEAPS Center is running, open the docker desktop and select the leaps_center container.
Open via Safari: If the interactive floor plan fails to load when you open the app, a Safari experimental feature is likely causing a conflict. Go to Settings > Safari > Advanced > Experimental Features and disable ‘requestIdleCallback’.