固件更新
本节提供有关如何更新固件的说明。我们支持多种方式,例如通过 SEGGER J-Link, OpenOCD 或 Serial-COM。
注解
在更新过程中保持连接,并使用正确的 装置 和 界面。
LEAPS UWBS 还支持通过BLE进行固件更新,有关更多详细信息,请参阅 通过BLE进行固件更新。
更多详细信息,请在下面选择您要使用的方法:
准备设置
至少一个设备。
要更新的二进制文件. (.hex 或 .bin)
已安装 SEGGER J-Link。
关于如何通过 SEGGER J-Link 更新的分步说明
安装世纪佳缘 J-Link。
找到名为
JLink_Windows_V766_x86_64.exe的Windows下载文件。
双击该文件,启动安装程序。
出现提示时,输入管理密码。
请阅读并接受许可条款。
接受默认的安装目标文件夹,通常位于
C:\Program Files (x86)\SEGGER\JLink继续接受默认USB驱动程序。
安装完成后,你会发现系统文件夹中安装了一个文件夹和一组驱动程序文件。 请注意,每次新安装时,这些文件都会被覆盖。
找到名为
JLink_macOSX_V766_x86_64.pkg的 macOS 下载文件。
双击该文件,启动安装程序。
请阅读并接受许可条款。
根据提示输入管理密码。 在应用程序文件夹中写入内容需要此密码。
安装完成后,你会在以下位置找到一个文件夹:
/Applications/SEGGER/JLink_V766/。 请记住,每个版本都会有不同的文件夹。 这个文件夹会储存与应用程序相关的所有可执行文件和程序库。访问 GNU/Linux 版的 SEGGER 下载站点,并找到所需的软件包. 选择 32/64 位版本。
最好下载。tgz文件,并保存到你的电脑里。
打开终端窗口。
例如,在Ubuntu (Linux)上,要安装64位.tgz文件,请使用以下命令:
mkdir -p ~/opt/SEGGER
cd ~/opt/SEGGER
tar xf ~/Downloads/JLink_Linux_V766_x86_64.tgz
chmod a-w ~/opt/SEGGER/JLink_Linux_V766_x86_64
ls -l ~/opt/SEGGER/JLink_Linux_V766_x86_64
执行上述命令后:
将在`~/opt/SEGGER`创建一个文件夹。
下载的.tgz文件内容将被解压缩到`~/opt/SEGGER`文件夹。
JLink_Linux_V766_x86_64 文件的权限将被修改。
可以通过检查 ~/opt/SEGGER/JLink_Linux_V766_x86_64 文件夹的内容来验证安装。
请注意,每次新安装时,系统文件夹中的现有文件都会被覆盖。
打开SEGGER J-Link,然后闪存二进制文件。
确保安装了最新的 J-Link 软件和文档包。
将J-Link连接到电脑
将目标系统连接到J-Link
启动J-Flash Lite
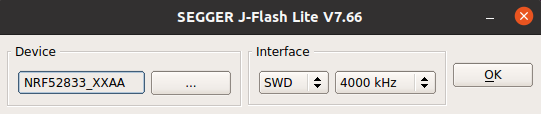
选择设备, 调试接口和通信速度
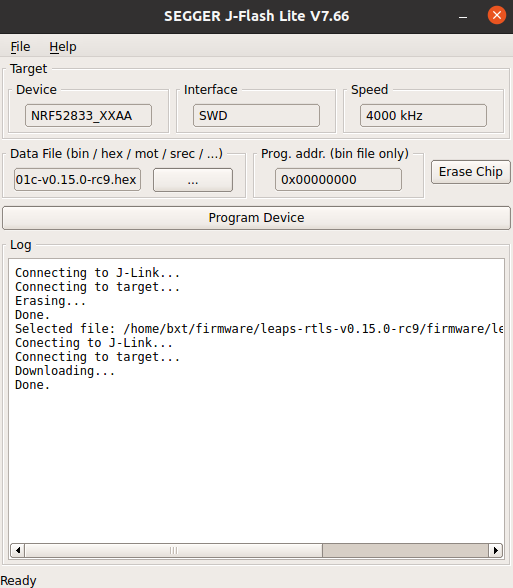
选择文件并点击编程设备或点击擦除芯片
J-Flash Lite执行请求的操作
确保安装了最新的 J-Link 软件和文档包。
将J-Link连接到 PC。
将目标系统连接到J-Link
启动 J-Link Commander。
输入以下命令:
J-Link> device <devicename> // 有关已知设备的列表,请参阅此处
J-Link> r
J-Link> h
J-Link> loadbin <PathToBinFile>, <programmingaddress>
J-Link Commander 执行 flash下载,并在成功后打印出时间统计。
更新完成后,电路板会自动复位。
准备设置
至少一个设备。
一个软件包包含一个脚本和一个二进制文件,用于更新。
Installed OpenOCD.
关于如何通过OpenOCD(片上开放调试器)进行更新的分步说明
安装OpenOCD调试器
下载 xPack OpenOCD软件包 对于Windows。
解压缩到
C:\xpack-openocd-0.11.0-1文件夹。添加路径:
C:\xpack-openocd-0.11.0-1\bin到你的 Windows 用户路径环境变量。
下载 xPack OpenOCD软件包 适用于macOS。
解压缩包并安装到本地。
例如,要安装xpack-openocd-0.11.0-1-linux-arm.tar.gz文件,请使用以下命令:
mkdir -p ~/.local/xPacks/openocd
cd ~/.local/xPacks/openocd
tar -zxvf ~/Downloads/xpack-openocd-0.11.0-1-linux-arm.tar.gz (with PC’s AMD core, using … linux-x64.tar.gz with PC’s Intel core)
....
sudo chmod -R -w xpack-openocd-0.11.0-1/
~/.local/xPacks/openocd/xpack-openocd-0.11.0-1/bin/openocd --version
export PATH="~/.local/xPacks/openocd/xpack-openocd-0.11.0-1/bin/:$PATH"
cd ~
source .bashrc
下载 xPack OpenOCD软件包 对于GNU/Linux。
解压缩包并安装到本地。
例如,在Ubuntu(Linux)上,要安装xpack-openocd-0.11.0-1-Linux-arm.tar.gz文件,请使用以下命令:
mkdir -p ~/.local/xPacks/openocd
cd ~/.local/xPacks/openocd
tar -zxvf ~/Downloads/xpack-openocd-0.11.0-1-linux-arm.tar.gz (with PC’s AMD core, using … linux-x64.tar.gz with PC’s Intel core)
....
sudo chmod -R -w xpack-openocd-0.11.0-1/
~/.local/xPacks/openocd/xpack-openocd-0.11.0-1/bin/openocd --version
export PATH="~/.local/xPacks/openocd/xpack-openocd-0.11.0-1/bin/:$PATH"
cd ~
source .bashrc
检查OpenOCD版本
openocd --version
xPack OpenOCD, x86_64 Open On-Chip Debugger 0.11.0-00155-ge392e485e (2021-03-15-16:43)
Licensed under GNU GPL v2
For bug reports, read
  http://openocd.org/doc/doxygen/bugs.html
下载软件包并将其解压缩到您的PC。
UDK板示例:使用WinZip或7-Zip等程序提取下载的 待定义 文件。
打开你喜欢的终端应用程序。
在 linux 或 macOS 上,类似 Terminal 应用程序。
在Windows中,类似 Powershell 应用程序。
导航到包含解压缩软件包的文件夹。
cd 到 /path/to/LEAPS-UWBS-Firmware-OpenOCD。
使用电缆将设备连接到电脑。
UDK板示例:使用USB-C数据线将设备的 USB-C数据端口2 连接到PC。
执行脚本自动更新固件。
在 Windows 上,使用 udk-leaps-uwbs-firmware.bat 命令。
在macOS上,使用 udk-leaps-uwbs-firmware.sh 命令。
在GNU/Linux上,使用 udk-leaps-uwbs-firmware.sh 命令。
例如,在 Ubuntu (Linux) 上:
./udk-leaps-uwbs-firmware.sh
xPack OpenOCD, x86_64 Open On-Chip Debugger 0.11.0-00155-ge392e485e (2021-03-15-16:43)
Licensed under GNU GPL v2
For bug reports, read
  http://openocd.org/doc/doxygen/bugs.html
DEPRECATED! use 'adapter speed' not 'adapter_khz'
set_test_mode
Info : Using CMSIS-DAPv2 interface with VID:PID=0x0d28:0x0204, serial=01100E003602002e003f4146570120313238
Info : CMSIS-DAP: SWD Supported
Info : CMSIS-DAP: FW Version = 2.1.0
Info : CMSIS-DAP: Serial# = 01100E003602002e003f4146570120313238
Info : CMSIS-DAP: Interface Initialised (SWD)
Info : SWCLK/TCK = 1 SWDIO/TMS = 1 TDI = 0 TDO = 0 nTRST = 0 nRESET = 1
Info : CMSIS-DAP: Interface ready
Info : high-speed (adapter speed 10000) may be limited by adapter firmware.
Info : clock speed 10000 kHz
Info : SWD DPIDR 0x2ba01477
Info : nrf52.cpu: hardware has 6 breakpoints, 4 watchpoints
Info : starting gdb server for nrf52.cpu on 3333
Info : Listening on port 3333 for gdb connections
target halted due to debug-request, current mode: Thread
xPSR: 0x01000000 pc: 0x000031ec msp: 0x20003488
target halted due to debug-request, current mode: Thread
xPSR: 0x01000000 pc: 0xfffffffe msp: 0xfffffffc
Info : nRF52840-CKAA(build code: D0) 1024kB Flash, 256kB RAM
auto erase enabled
wrote 1048576 bytes from file leaps-rtls-all-2ab-v0.14-rc25.hex in 38.776192s (26.408 KiB/s)
更新完成后,电路板会自动复位。
Install LEAPS-COM tool
Follow instructions in section describing how to install LEAPS-COM.
You will need
At least one device connected via the USB port or the serial port, alternatively, the device advertises on the BLE interface if enabled.
The firmware binary included in the package.
The python3 installed on you system.
Connect USB data cable to the USB port. Execute following command to update Firmware and Extended-Loader on the available devices that are connected on the USB interface.
$ python3 -m leapscom --usb --main main.bin --eldr eldr.bin
In order to update only certain devices you need to specify serial number.
$ python3 -m leapscom --usb 630D46F2D51482FC 7E1C5859C2ECF343 --main main.bin --eldr eldr.bin
Before update, make sure that BLE is enabled on the devices (see section Discovering devices for more details). Execute following command to update Firmware and Extended-Loader of all the devices that are advertising on the BLE interface.
$ python3 -m leapscom --ble --main main.bin --eldr eldr.bin
In order to update only certain devices you need to specify the BLE address.
$ python3 -m leapscom --ble FE:40:B4:BC:D3:42 E0:05:86:49:A9:40 --main main.bin --eldr eldr.bin
Connect USB data cable to the Serial port. Execute following command to update Firmware and Extended-Loader over the serial ports.
$ python3 -m leapscom --dev /dev/ttyACM0 /dev/ttyACM1 /dev/ttyACM2 --main main.bin --eldr eldr.bin
验证固件并确认成功
打开你喜欢的终端应用程序,
在GNU/Linux或macOS上,如 终端 应用程序。
在Windows中,类似 Powershell 应用程序。
例如,在 Ubuntu (Linux) 上,打开 minicom 并按下双回车键:
minicom -b 115200 -D /dev/ttyACM0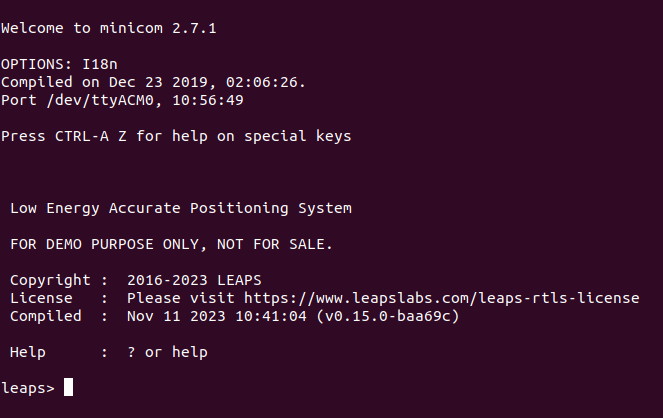
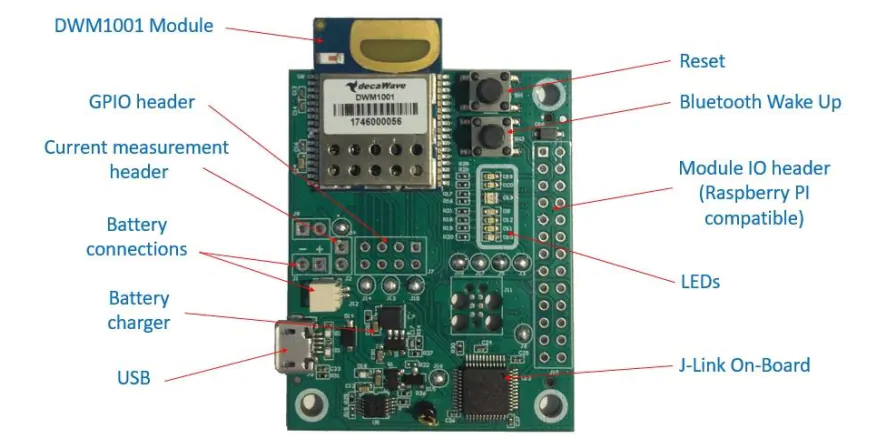
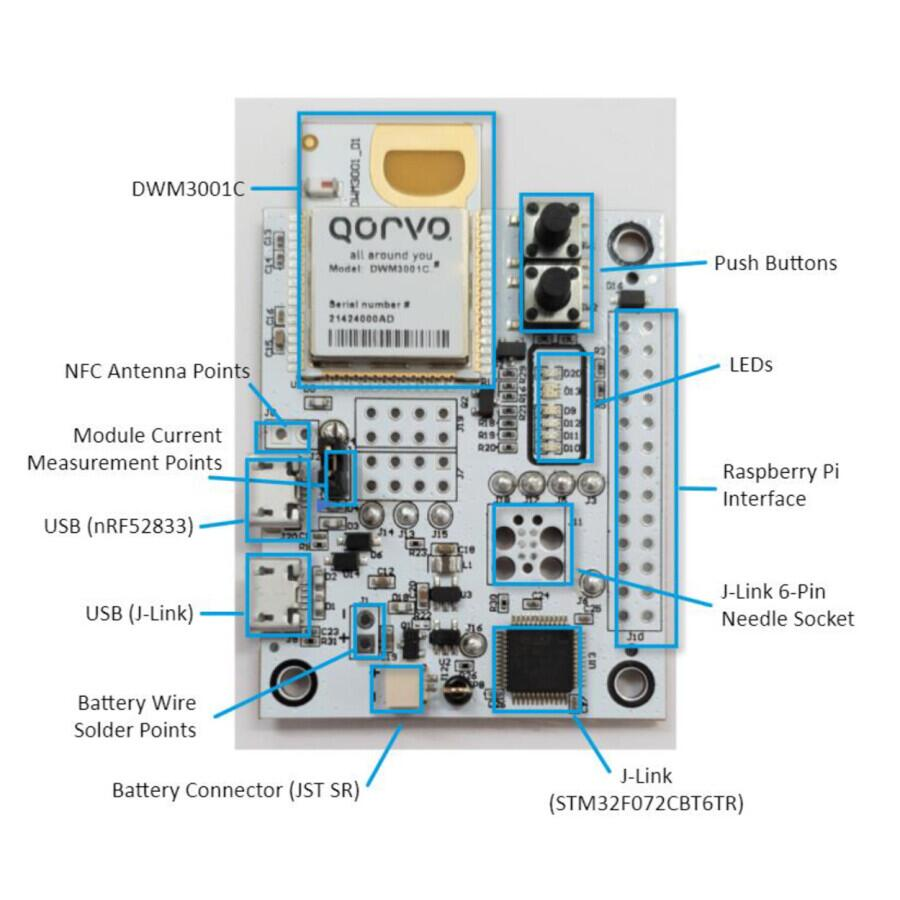
对于连接,让我们首先看一下 DWM1001-DEV 的主要组件的概述以及 DWM3001CDK 开发工具包。
注解
有关UDK套件,请参阅 硬件接口 一节中的详细信息