Starting with SDK
Note
Please note, that development of the third-party application is out of scope of the UDK1 offering and hence is not a part of the pre-paid UDK1 support.
This section offers comprehensive guidance on selecting and launching LEAPS example project, designed for the Zephyr RTOS platform. These examples facilitate a deeper understanding of UWB (Ultra-Wideband) technology and the UDK1 kit’s Hardware Interfaces.
Armed with this knowledge, users can confidently develop custom applications on the UDK1 kit.
The guidance follows these steps:
Set up development environment for Zephyr RTOS on Linux, macOS, or Windows.
Acquire the UDK1’s SDK which is Zephyr based example application package.
Connecting devices to host PC and required tools.
Select the example, build, flash, and run an example application.
Zephyr’s Getting Started Guide
Follow this guide to:
Set up a command-line Zephyr development environment on Ubuntu, macOS, or Windows (instructions for other Linux distributions are discussed in installation_linux)
Install the Zephyr’s SDK package (including required tool chains)
Select and Update OS
Click the operating system you are using.
This guide covers Ubuntu version 20.04 LTS and later.
sudo apt update
sudo apt upgrade
On macOS Mojave or later, select System Preferences >*Software Update*. Click Update Now if necessary.
On other versions, see this Apple support topic.
Select Start > Settings > Update & Security > Windows Update. Click Check for updates and install any that are available.
Install dependencies
Next, you’ll install some host dependencies using your package manager.
The current minimum required version for the main dependencies are:
Tool |
Min. Version |
|---|---|
3.20.5 |
|
3.10 |
|
1.4.6 |
If using an Ubuntu version older than 22.04, it is necessary to add extra repositories to meet the minimum required versions for the main dependencies listed above. In that case, download, inspect and execute the Kitware archive script to add the Kitware APT repository to your sources list. A detailed explanation of
kitware-archive.shcan be found here kitware third-party apt repository:wget https://apt.kitware.com/kitware-archive.sh sudo bash kitware-archive.sh
Use
aptto install the required dependencies:sudo apt install --no-install-recommends git cmake ninja-build gperf \ ccache dfu-util device-tree-compiler wget minicom \ python3-dev python3-pip python3-setuptools python3-tk python3-wheel xz-utils file \ make gcc gcc-multilib g++-multilib libsdl2-dev libmagic1
Verify the versions of the main dependencies installed on your system by entering:
cmake --version
python3 --version
dtc --version
Check those against the versions in the table in the beginning of this section. Refer to the installation_linux page for additional information on updating the dependencies manually.
Install Homebrew:
/bin/bash -c "$(curl -fsSL https://raw.githubusercontent.com/Homebrew/install/HEAD/install.sh)"
After the Homebrew installation script completes, follow the on-screen instructions to add the Homebrew installation to the path.
On macOS running on Apple Silicon, this is achieved with:
(echo; echo 'eval "$(/opt/homebrew/bin/brew shellenv)"') >> ~/.zprofile
source ~/.zprofile
On macOS running on Intel, use the command for Apple Silicon, but replace
/opt/homebrew/with/usr/local/.
Use
brewto install the required dependencies:brew install cmake ninja gperf python3 ccache qemu dtc libmagic wget openocd minicom
Add the Homebrew Python folder to the path, in order to be able to execute
pythonandpipas wellpython3andpip3.(echo; echo 'export PATH="'$(brew --prefix)'/opt/python/libexec/bin:$PATH"') >> ~/.zprofile source ~/.zprofile
Note
Due to issues finding executables, the Zephyr Project doesn’t currently support application flashing using the Windows Subsystem for Linux (WSL) (WSL).
Therefore, we don’t recommend using WSL when getting started.
These instructions must be run in a cmd.exe command prompt terminal window.
In modern version of Windows (10 and later) it is recommended to install the Windows Terminal application from the Microsoft Store. The required commands differ on PowerShell.
These instructions rely on Chocolatey. If Chocolatey isn’t an option, you can install dependencies from their respective websites and ensure the command line tools are on your PATH environment variable.
Open a
cmd.exeterminal window as Administrator. To do so, press the Windows key, typecmd.exe, right-click the Command Prompt search result, and choose Run as Administrator.Disable global confirmation to avoid having to confirm the installation of individual programs:
choco feature enable -n allowGlobalConfirmation
Use
chocoto install the required dependencies:choco install cmake --installargs 'ADD_CMAKE_TO_PATH=System' choco install ninja gperf python311 git dtc-msys2 wget 7zip unzip
Warning
As of November 2023, Python 3.12 is not recommended for Zephyr development on Windows, as some required Python dependencies may be difficult to install.
Close the terminal window.
Install West
West is a swiss-army knife command line tool for Zephyr, to install it, please execute following commands:
Use
aptto install Pythonvenvpackage:sudo apt install python3-venv
Create a new virtual environment:
python3 -m venv ~/udk1-sdk/.venv
Activate the virtual environment:
source ~/udk1-sdk/.venv/bin/activate
Once activated your shell will be prefixed with
(.venv). The virtual environment can be deactivated at any time by runningdeactivate.Note
Remember to activate the virtual environment every time you start working.
Install west
pip install west
Install west, and make sure ~/.local/bin is on your PATH environment variable:
pip3 install --user -U west
echo 'export PATH=~/.local/bin:"$PATH"' >> ~/.bashrc
source ~/.bashrc
Create a new virtual environment:
python3 -m venv ~/udk1-sdk/.venv
Activate the virtual environment:
source ~/udk1-sdk/.venv/bin/activate
Once activated your shell will be prefixed with
(.venv). The virtual environment can be deactivated at any time by runningdeactivate.Note
Remember to activate the virtual environment every time you start working.
Install west
pip install west
Install west
pip3 install -U west
Open a
cmd.exeterminal window as a regular userCreate a new virtual environment:
cd %HOMEPATH%
python -m venv udk1-sdk\.venv
Activate the virtual environment:
udk1-sdk\.venv\Scripts\activate.bat
Once activated your shell will be prefixed with
(.venv). The virtual environment can be deactivated at any time by runningdeactivate.Note
Remember to activate the virtual environment every time you start working.
Install west
pip install west
Open a
cmd.exeterminal window as a regular userInstall west
pip3 install -U west
Install the Zephyr SDK
Note
If you want to uninstall the SDK, you may simply remove the directory where you installed it.
Download and verify the Zephyr SDK bundle:
cd ~
wget https://github.com/zephyrproject-rtos/sdk-ng/releases/download/v0.14.2/zephyr-sdk-0.14.2_linux-x86_64.tar.gz
wget -O - https://github.com/zephyrproject-rtos/sdk-ng/releases/download/v0.14.2/sha256.sum | shasum --check --ignore-missing
If your host architecture is 64-bit ARM (for example, Raspberry Pi), replace
x86_64withaarch64in order to download the 64-bit ARM Linux SDK.Extract the Zephyr SDK bundle archive:
tar xvf zephyr-sdk-0.14.2_linux-x86_64.tar.gz
Note
It is recommended to extract the Zephyr SDK bundle at one of the following locations:
$HOME$HOME/.local$HOME/.local/opt$HOME/bin/opt/usr/local
The Zephyr SDK bundle archive contains the
zephyr-sdk-<version>directory and, when extracted under$HOME, the resulting installation path will be$HOME/zephyr-sdk-<version>.Run the Zephyr SDK bundle setup script:
cd zephyr-sdk-0.14.2
./setup.sh
Note
You only need to run the setup script once after extracting the Zephyr SDK bundle.
You must rerun the setup script if you relocate the Zephyr SDK bundle directory after the initial setup.
Install udev rules, which allow you to flash most Zephyr boards as a regular user:
sudo cp ~/zephyr-sdk-0.14.2/sysroots/x86_64-pokysdk-linux/usr/share/openocd/contrib/60-openocd.rules /etc/udev/rules.d
sudo udevadm control --reload
Download and verify the Zephyr SDK bundle:
cd ~
curl -L -O https://github.com/zephyrproject-rtos/sdk-ng/releases/download/v0.14.2/zephyr-sdk-0.14.2_macos-x86_64.tar.gz
curl -L https://github.com/zephyrproject-rtos/sdk-ng/releases/download/v0.14.2/sha256.sum | shasum --check --ignore-missing
If your host architecture is 64-bit ARM (Apple Silicon, also known as M1), replace
x86_64withaarch64in order to download the 64-bit ARM macOS SDK.Extract the Zephyr SDK bundle archive:
tar xvf zephyr-sdk-0.14.2_macos-x86_64.tar.gz
Note
It is recommended to extract the Zephyr SDK bundle at one of the following locations:
$HOME$HOME/.local$HOME/.local/opt$HOME/bin/opt/usr/local
The Zephyr SDK bundle archive contains the
zephyr-sdk-<version>directory and, when extracted under$HOME, the resulting installation path will be$HOME/zephyr-sdk-<version>.Run the Zephyr SDK bundle setup script:
cd zephyr-sdk-0.14.2
./setup.sh
Note
You only need to run the setup script once after extracting the Zephyr SDK bundle.
You must rerun the setup script if you relocate the Zephyr SDK bundle directory after the initial setup.
Open a
cmd.exeterminal window as a regular userDownload the Zephyr SDK bundle:
cd %HOMEPATH%
wget https://github.com/zephyrproject-rtos/sdk-ng/releases/download/v0.14.2/zephyr-sdk-0.14.2_windows-x86_64.zip
Extract the Zephyr SDK bundle archive:
unzip zephyr-sdk-0.14.2_windows-x86_64.zip
Note
It is recommended to extract the Zephyr SDK bundle at one of the following locations:
%HOMEPATH%%PROGRAMFILES%
The Zephyr SDK bundle archive contains the
zephyr-sdk-<version>directory and, when extracted under%HOMEPATH%, the resulting installation path will be%HOMEPATH%\zephyr-sdk-<version>.Run the Zephyr SDK bundle setup script:
cd zephyr-sdk-0.14.2
setup.cmd
Note
You only need to run the setup script once after extracting the Zephyr SDK bundle.
You must rerun the setup script if you relocate the Zephyr SDK bundle directory after the initial setup.
Install UDK1-SDK package
Note
The UDK1 SDK is also a Zephyr-based example application. For a deeper understanding, please refer to this example-application page.
Caution
The published udk1-sdk repository will be provided soon. Please stay tuned!
The first step is to initialize the workspace folder udk1-sdk where the leaps-udk1-examples and all Zephyr modules will be cloned.
Please follow these instructions:
Open the Terminal
Initialize
udk1-sdkworkspace for theleaps-udk1-exampleswith main revision.west init -m <udk1-sdk repository> --mr main udk1-sdkClone the Zephyr source (version 3.1.0) and its modules.
cd udk1-sdk
west update
Export a Zephyr CMake package. This allows CMake to automatically load boilerplate code required for building Zephyr applications.
west zephyr-exportZephyr’s scripts/requirements.txt file declares additional Python dependencies. Install them with pip.
pip install -r ./zephyr/scripts/requirements.txtSet up $ZEPHYR_BASE environment..
source zephyr/zephyr-env.sh
Open the Terminal
Initialize
udk1-sdkworkspace for theleaps-udk1-exampleswith main revision.west init -m <udk1-sdk repository> --mr main udk1-sdkCaution
The published
udk1-sdk repositorywill be provided soon. Please stay tuned!Clone the Zephyr source (version 3.1.0) and its modules.
cd udk1-sdk
west update
Export a Zephyr CMake package. This allows CMake to automatically load boilerplate code required for building Zephyr applications.
west zephyr-exportZephyr’s scripts/requirements.txt file declares additional Python dependencies. Install them with pip.
pip install -r ./zephyr/scripts/requirements.txtSet up $ZEPHYR_BASE environment..
source zephyr/zephyr-env.sh
Open a
cmd.exeterminal window as a regular userInitialize
udk1-sdkworkspace for theleaps-udk1-exampleswith main revision.west init -m <udk1-sdk repository> --mr main udk1-sdkClone the Zephyr source (version 3.1.0) and its modules.
cd udk1-sdk
west update
Export a Zephyr CMake package. This allows CMake to automatically load boilerplate code required for building Zephyr applications.
west zephyr-exportZephyr’s scripts/requirements.txt file declares additional Python dependencies. Install them with pip.
pip install -r zephyr/scripts/requirements.txtSet up $ZEPHYR_BASE environment..
cd zephyr
zephyr-env.cmd
Device Setup
Before executing the example application, ensure that the devices are connected and open the Console window by following these steps:
Use a USB-C data cable to connect the USB-C Data Port 2 of devices to host PC.
Install the OpenOCD tool by referring to the OpenOCD tab in the Programming/Upgrading firmware section. This section also includes other solutions for flashing the firmware.
Execute the following commands to open minicom (on Linux and macOs), or Tera Term (on Windows) to access the connected serial port and ready to view the printed messages from the examples.
Open the Terminal
Execute the command below with ttyACM<X> (0 is default port for 1st connected device)
minicom -b 115200 -D /dev/ttyACM0Note
Please verify all the connected device (ttyACM<X>) that you intend to re-flash by using the following command
ls ../../dev/When successfully connected to device
Welcome to minicom 2.8

OPTIONS: I18n
Port /dev/ttyACM0, 04:49:57

Press CTRL-A Z for help on special keys
Open the Terminal
Execute the command below with /dev/tty.usb<xxx> (modem1410 is example)
minicom -b 115200 -D /dev/tty.usbmodem1410Note
Please verify the connected device (tty.usb<xxx>) that you intend to re-flash by using the following command
ls ../../dev/When successfully connected to device
Welcome to minicom 2.8

OPTIONS:
Compiled on Jan  4 2021, 00:04:46.
Port /dev/tty.usbmodem1410, 19:42:45

Press Meta-Z for help on special keys
Open the Tera Term tool
Goto Setup > Serial Port
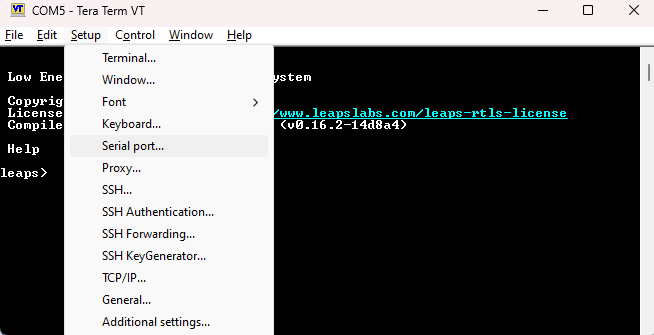
Select connected port of device (e.g. Port 5 is connecting to device)
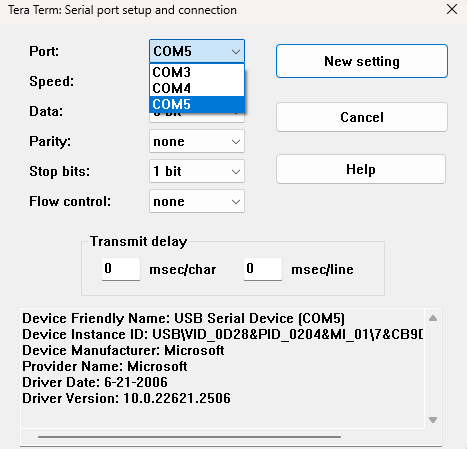
Select the Speed as 115200
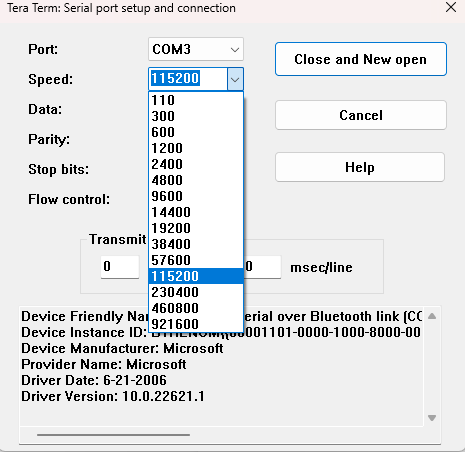
Select Close and New Open (or New Open)
Coordinated Examples Execution
In the UDK1-SDK package, at @yourdir/udk1-sdk/leaps-udk1-examples/app/006_ex_uwb location, various examples are available. Achieving collaborative Ultra-Wideband operation requires pairing two examples as outlined in the table below.
Example 1 |
Example 2 |
|---|---|
ex_01a_simple_tx/simple_tx.c |
ex_02a_simple_rx/simple_rx.c |
ex_01b_tx_sleep/tx_sleep_idleRC.c |
ex_02a_simple_rx/simple_rx.c |
ex_01b_tx_sleep/tx_sleep.c |
ex_02a_simple_rx/simple_rx.c |
ex_01c_tx_sleep_auto/tx_sleep_auto.c |
ex_02a_simple_rx/simple_rx.c |
ex_01d_tx_timed_sleep/tx_timed_sleep.c |
ex_02a_simple_rx/simple_rx.c |
ex_01e_tx_with_cca/tx_with_cca.c |
ex_02a_simple_rx/simple_rx.c |
ex_01g_simple_tx_sts_sdc/simple_tx_sts_sdc.c |
ex_02g_simple_rx_sts_sdc/simple_rx_sts_sdc.c |
ex_01h_simple_tx_pdoa/simple_tx_pdoa.c |
ex_02h_simple_rx_pdoa/simple_rx_pdoa.c |
ex_01i_simple_tx_aes/simple_tx_aes.c |
ex_02i_simple_rx_aes/simple_rx_aes.c |
ex_02a_simple_rx/simple_rx_nlos.c |
ex_01a_simple_tx/simple_tx.c |
ex_02c_rx_diagnostics/rx_diagnostics.c |
ex_01a_simple_tx/simple_tx.c |
ex_02d_rx_sniff/rx_sniff.c |
ex_01a_simple_tx/simple_tx.c |
ex_02e_rx_dbl_buff/double_buffer_rx.c |
ex_01a_simple_tx/simple_tx.c |
ex_02f_rx_with_crystal_trim/rx_with_xtal_trim.c |
ex_01a_simple_tx/simple_tx.c |
ex_03a_tx_wait_resp/tx_wait_resp.c |
ex_03b_rx_send_resp/rx_send_resp.c |
ex_03d_tx_wait_resp_interrupts/tx_wait_resp_int.c |
ex_03b_rx_send_resp/rx_send_resp.c |
ex_05a_ds_twr_init/ds_twr_initiator.c |
ex_05b_ds_twr_resp/ds_twr_responder.c |
ex_05a_ds_twr_init/ds_twr_initiator_sts.c |
ex_05b_ds_twr_resp/ds_twr_responder_sts.c |
ex_05c_ds_twr_init_sts_sdc/ds_twr_sts_sdc_initiator.c |
ex_05d_ds_twr_resp_sts_sdc/ds_twr_sts_sdc_responder.c |
ex_06a_ss_twr_initiator/ss_twr_initiator_sts_no_data.c |
ex_06b_ss_twr_responder/ss_twr_responder_sts_no_data.c |
ex_06a_ss_twr_initiator/ss_twr_initiator_sts.c |
ex_06b_ss_twr_responder/ss_twr_responder_sts.c |
ex_06a_ss_twr_initiator/ss_twr_initiator.c |
ex_06b_ss_twr_responder/ss_twr_responder.c |
ex_06e_AES_ss_twr_initiator/ss_aes_twr_initiator.c |
ex_06f_AES_ss_twr_responder/ss_aes_twr_responder.c |
ex_07a_ack_data_tx/ack_data_tx.c |
ex_07b_ack_data_rx/ack_data_rx.c |
ex_15_le_pend/le_pend_rx.c |
ex_15_le_pend/le_pend_tx.c |
For detailed instructions, please refer to the description provided in each example’s source *.c file.
For example: ex_01h_simple_tx_pdoa/simple_tx_pdoa.c
*  @file    simple_tx_pdoa.c
*  @brief   Simple TX PDOA example code, companion to Simple RX PDOA example.
*           See note 7 regarding information on calibrating the system
Build and run the example
This section guide you on how to build and re-flash the software.
Note
If any issues occur within the Zephyr environment, please refer to the Troubleshooting Installation section.
Ensure complete Device Setup guideline.
Go into the examples directory
cd leaps-udk1-examples(Optional) Clean the old build directory
rm -rf build/Build the example
This section guides you on how to build the example by selecting one expected example
Execute the below command to show the menu, with $BOARD is leaps_lc14 or leaps_lc13
west build -t menuconfig -b $BOARD -s appSelect the Sample Application and press Enter
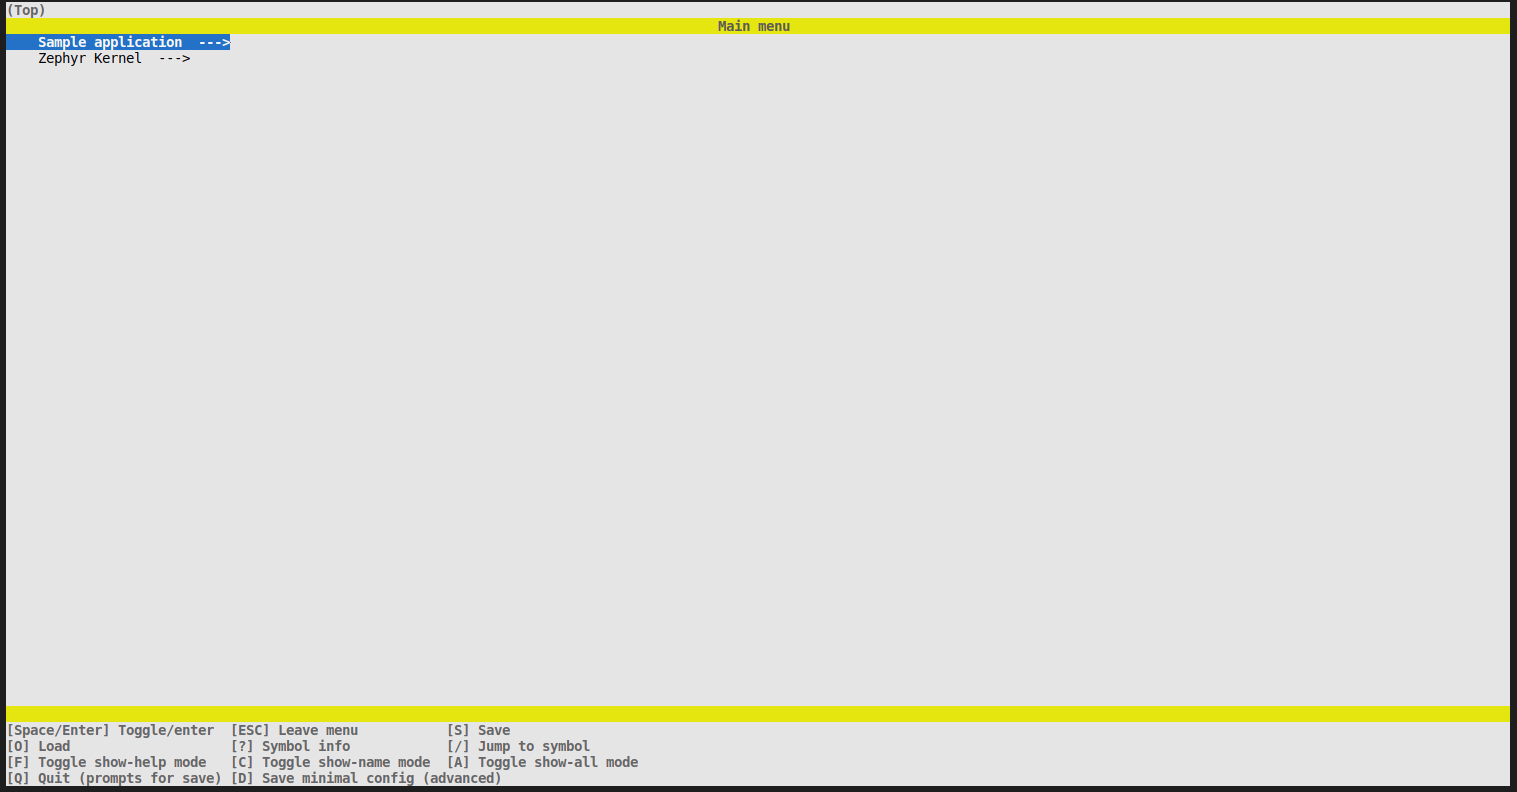
You will see the default Example, press enter if you want to select another example
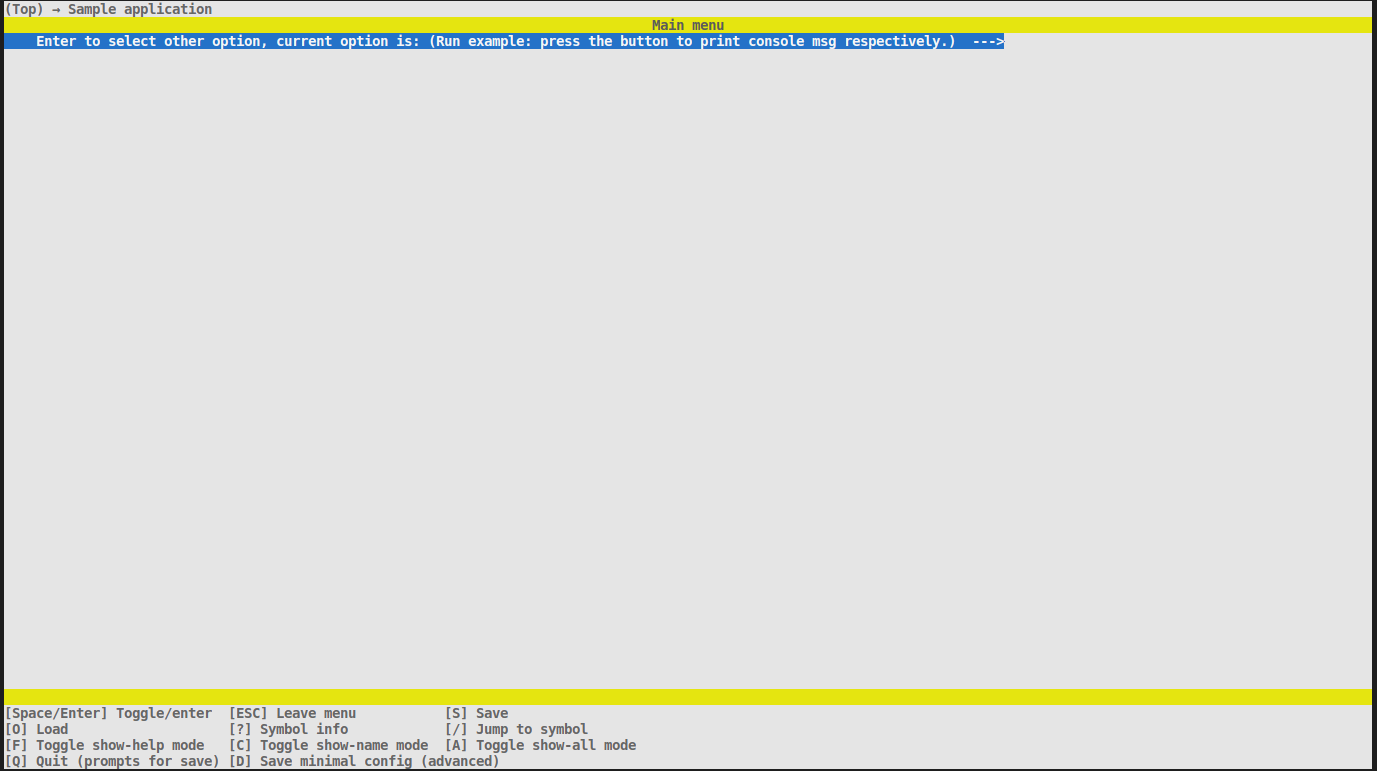
Select the Example by scrolling up or down then press Enter
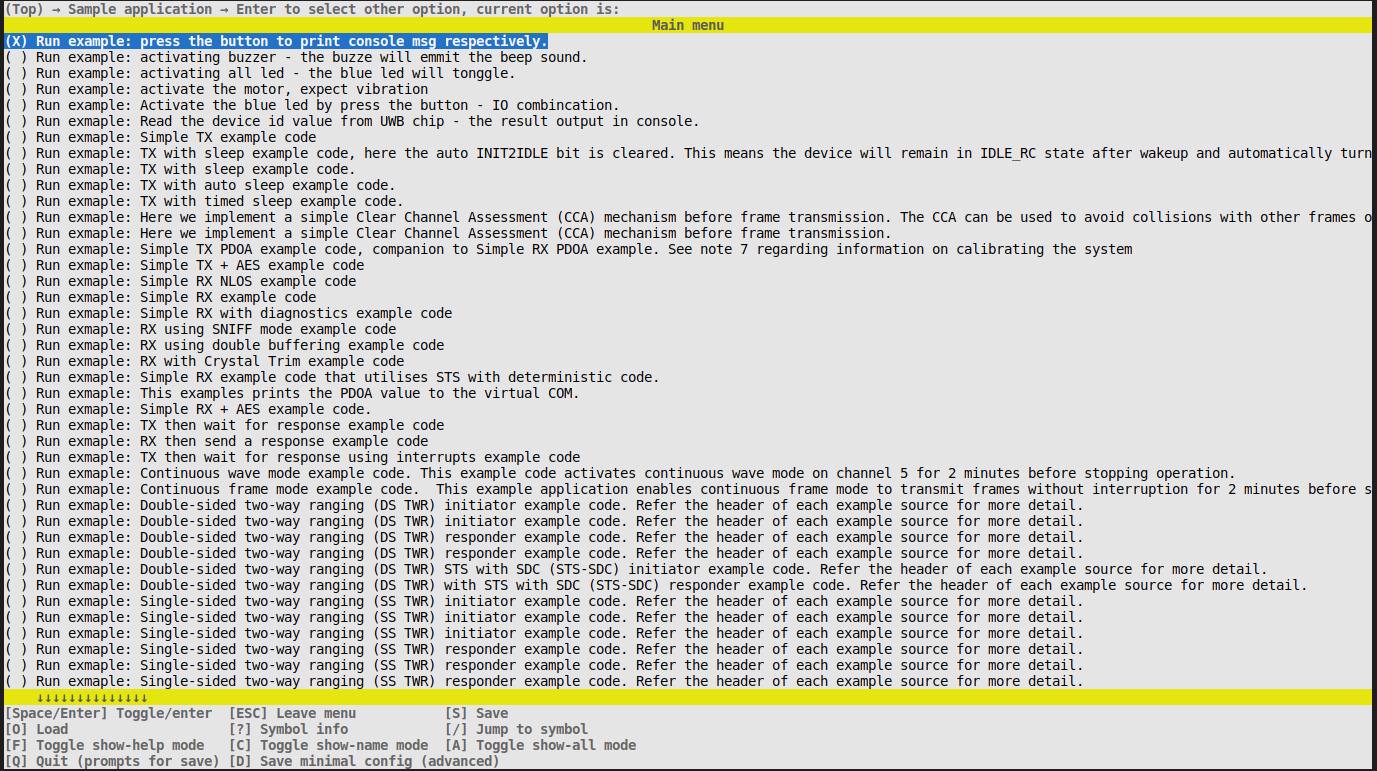
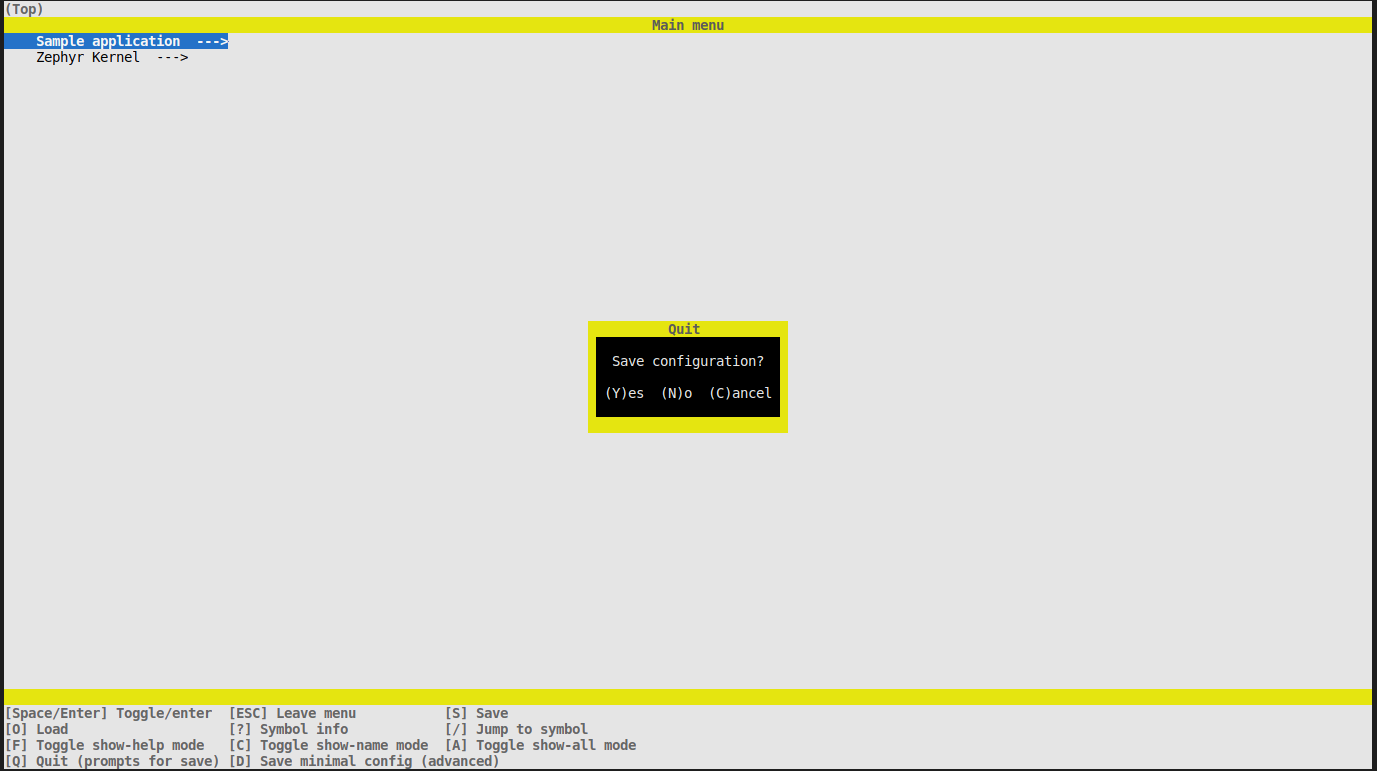
Press ESC and Y to save the selection
Build the example
west buildBuild the example Successfully
[169/179] Linking C executable zephyr/zephyr_pre0.elf [173/179] Linking C executable zephyr/zephyr_pre1.elf [179/179] Linking C executable zephyr/zephyr.elf Memory region Used Size Region Size %age Used FLASH: 31268 B 1 MB 2.98% SRAM: 8568 B 256 KB 3.27% IDT_LIST: 0 GB 2 KB 0.00%This section guides you on how to build the example with default example
Execute the below command, with $BOARD is leaps_lc14 or leaps_lc13
west build -b $BOARD -s appBuild the example Successfully
[169/179] Linking C executable zephyr/zephyr_pre0.elf

[173/179] Linking C executable zephyr/zephyr_pre1.elf

[179/179] Linking C executable zephyr/zephyr.elf
Memory region         Used Size  Region Size  %age Used
           FLASH:       31268 B         1 MB      2.98%
            SRAM:        8568 B       256 KB      3.27%
        IDT_LIST:          0 GB         2 KB      0.00%
And then re-flash the hex file to the device:
west flashSuccessfully, re-flashed Firmware
Open On-Chip Debugger 0.11.0+dev-00245-gaf169e805 (2022-05-14-14:24)
Licensed under GNU GPL v2
For bug reports, read
        http://openocd.org/doc/doxygen/bugs.html
DEPRECATED! use 'adapter speed' not 'adapter_khz'
exit_debug_mode
Info : Using CMSIS-DAPv2 interface with VID:PID=0x0d28:0x0204, serial=01100E003602002e00354146570120313238
Info : CMSIS-DAP: SWD  Supported
Info : CMSIS-DAP: FW Version = 2.1.0
Info : CMSIS-DAP: Serial# = 01100E003602002e00354146570120313238
Info : CMSIS-DAP: Interface Initialised (SWD)
Info : SWCLK/TCK = 1 SWDIO/TMS = 1 TDI = 0 TDO = 0 nTRST = 0 nRESET = 1
Info : CMSIS-DAP: Interface ready
Info : clock speed 10000 kHz
Info : SWD DPIDR 0x2ba01477
Info : nrf52.cpu: hardware has 6 breakpoints, 4 watchpoints
Info : starting gdb server for nrf52.cpu on 3333
Info : Listening on port 3333 for gdb connections
    TargetName         Type       Endian TapName            State
--  ------------------ ---------- ------ ------------------ ------------
 0* nrf52.cpu          cortex_m   little nrf52.cpu          running

target halted due to debug-request, current mode: Thread
xPSR: 0x01000000 pc: 0x0000243c msp: 0x20001838
Info : nRF52840-CKAA(build code: D0) 1024kB Flash, 256kB RAM
Warn : Adding extra erase range, 0x00007a24 .. 0x00007fff
auto erase enabled
wrote 31268 bytes from file @/udk1-sdk/zephyr/zephyr.hex in     1.151423s             (26.519 KiB/s)

target halted due to debug-request, current mode: Thread
xPSR: 0x01000000 pc: 0x0000243c msp: 0x20001838
verified 31268 bytes in 0.092640s (329.611 KiB/s)
Example output when running the TEST_BUTTONS example by pressing the button C, B and A, respectively.
*** Booting Zephyr OS build 5db7528340ec  ***
PRESS BUTTON EXAMPLE
Button C is pressed at 24778
Button C is released at 28996
Button B is pressed at 76012
Button B is released at 81454
Button A is pressed at 104172
Button A is released at 109917
Ensure complete Device Setup guideline.
Go into the examples directory
cd leaps-udk1-examples(Optional) Clean the old build directory
rm -rf build/Build the example
This section guides you on how to build the example with selecting one expect example
Execute the below command to show the menu, with $BOARD is leaps_lc14 or leaps_lc13
west build -t menuconfig -b $BOARD -s appSelect the Sample Application and press Enter
You will see the default Example, press enter if you want to select another example
Select the Example by croll up/down then press Enter
Press ESC and Y to save the selection
Build the example
west buildBuild the example Successfully
[169/179] Linking C executable zephyr/zephyr_pre0.elf [173/179] Linking C executable zephyr/zephyr_pre1.elf [179/179] Linking C executable zephyr/zephyr.elf Memory region Used Size Region Size %age Used FLASH: 31268 B 1 MB 2.98% SRAM: 8568 B 256 KB 3.27% IDT_LIST: 0 GB 2 KB 0.00%This section guides you on how to build the example with default example
Execute the below command, with $BOARD is leaps_lc14 or leaps_lc13
west build -b $BOARDBuild the example Successfully
[169/179] Linking C executable zephyr/zephyr_pre0.elf

[173/179] Linking C executable zephyr/zephyr_pre1.elf

[179/179] Linking C executable zephyr/zephyr.elf
Memory region         Used Size  Region Size  %age Used
           FLASH:       31268 B         1 MB      2.98%
            SRAM:        8568 B       256 KB      3.27%
        IDT_LIST:          0 GB         2 KB      0.00%
And then re-flash the hex file to the device:
west flashSuccessfully, re-flashed Firmware
Open On-Chip Debugger 0.11.0+dev-00245-gaf169e805 (2022-05-14-14:24)
Licensed under GNU GPL v2
For bug reports, read
        http://openocd.org/doc/doxygen/bugs.html
DEPRECATED! use 'adapter speed' not 'adapter_khz'
exit_debug_mode
Info : Using CMSIS-DAPv2 interface with VID:PID=0x0d28:0x0204, serial=01100E003602002e00354146570120313238
Info : CMSIS-DAP: SWD  Supported
Info : CMSIS-DAP: FW Version = 2.1.0
Info : CMSIS-DAP: Serial# = 01100E003602002e00354146570120313238
Info : CMSIS-DAP: Interface Initialised (SWD)
Info : SWCLK/TCK = 1 SWDIO/TMS = 1 TDI = 0 TDO = 0 nTRST = 0 nRESET = 1
Info : CMSIS-DAP: Interface ready
Info : clock speed 10000 kHz
Info : SWD DPIDR 0x2ba01477
Info : nrf52.cpu: hardware has 6 breakpoints, 4 watchpoints
Info : starting gdb server for nrf52.cpu on 3333
Info : Listening on port 3333 for gdb connections
    TargetName         Type       Endian TapName            State
--  ------------------ ---------- ------ ------------------ ------------
 0* nrf52.cpu          cortex_m   little nrf52.cpu          running

target halted due to debug-request, current mode: Thread
xPSR: 0x01000000 pc: 0x0000243c msp: 0x20001838
Info : nRF52840-CKAA(build code: D0) 1024kB Flash, 256kB RAM
Warn : Adding extra erase range, 0x00007a24 .. 0x00007fff
auto erase enabled
wrote 31268 bytes from file @/udk1-sdk/zephyr/zephyr.hex in     1.151423s             (26.519 KiB/s)

target halted due to debug-request, current mode: Thread
xPSR: 0x01000000 pc: 0x0000243c msp: 0x20001838
verified 31268 bytes in 0.092640s (329.611 KiB/s)
Example output when running the TEST_BUTTONS example by pressing the button C, B and A, respectively.
*** Booting Zephyr OS build 5db7528340ec  ***
PRESS BUTTON EXAMPLE
Button C is pressed at 24778
Button C is released at 28996
Button B is pressed at 76012
Button B is released at 81454
Button A is pressed at 104172
Button A is released at 109917
Ensure complete Device Setup guideline.
Go into the examples directory
cd leaps-udk1-examples(Optional) Clean the old build directory and press Y
rd /s buildBuild the example
This section guides you on how to build the example by selecting one expected example
Execute the below command to show the menu, with $BOARD is leaps_lc14 or leaps_lc13
west build -t menuconfig -b $BOARD -s app
Select the Sample Application and press Enter
You will see the default Example, press enter if you want to select another example
Select the Example by scrolling up or down then press Enter
Press ESC and Y to save the selection
Build the example
west build
Build the example Successfully
[152/158] Linking C executable zephyr\zephyr_pre1.elf←[K1.dir/dev_handles.c.obj←[Kj←[K [158/158] Linking C executable zephyr\zephyr.elf←[Kr_final.dir/dev_handles.c.obj←[Kj←[K Memory region Used Size Region Size %age Used FLASH: 32668 B 1 MB 3.12% SRAM: 4496 B 248 KB 1.77% IDT_LIST: 0 GB 2 KB 0.00%This section guides you on how to build the example with default example
Execute the below command, with $BOARD is leaps_lc14 or leaps_lc13
west build -b $BOARD -s appBuild the example Successfully
[1/161] Generating include/generated/version.h
-- Zephyr version: 3.1.0 (@/udk1-sdk/zephyr), build: zephyr-v3.1.0
[151/161] Linking C executable zephyr\zephyr_pre0.elf

[155/161] Linking C executable zephyr\zephyr_pre1.elf

[161/161] Linking C executable zephyr\zephyr.elf
Memory region         Used Size  Region Size  %age Used
           FLASH:       91160 B         1 MB      8.69%
            SRAM:        5056 B       248 KB      1.99%
        IDT_LIST:          0 GB         2 KB      0.00%
And then re-flash the hex file to the device:
west flashSuccessfully, re-flashed Firmware
-- west flash: rebuilding
ninja: no work to do.
-- west flash: using runner openocd
-- runners.openocd: Flashing file: D:/01_Work/udk1-sdk/udk1-sdk/leaps-udk1-examples/build/zephyr/zephyr.hex
xPack Open On-Chip Debugger 0.12.0-01004-g9ea7f3d64-dirty (2023-01-30-15:04)
Licensed under GNU GPL v2
For bug reports, read
        http://openocd.org/doc/doxygen/bugs.html
DEPRECATED! use 'adapter speed' not 'adapter_khz'
exit_debug_mode
Info : Using CMSIS-DAPv2 interface with VID:PID=0x0d28:0x0204, serial=01100E003602002d00184146570120313238
Info : CMSIS-DAP: SWD supported
Info : CMSIS-DAP: Atomic commands supported
Info : CMSIS-DAP: Test domain timer supported
Info : CMSIS-DAP: FW Version = 2.1.0
Info : CMSIS-DAP: Serial# = 01100E003602002d00184146570120313238
Info : CMSIS-DAP: Interface Initialised (SWD)
Info : SWCLK/TCK = 1 SWDIO/TMS = 1 TDI = 0 TDO = 0 nTRST = 0 nRESET = 1
Info : CMSIS-DAP: Interface ready
Info : clock speed 10000 kHz
Info : SWD DPIDR 0x2ba01477
Info : [nrf52.cpu] Cortex-M4 r0p1 processor detected
Info : [nrf52.cpu] target has 6 breakpoints, 4 watchpoints
Info : starting gdb server for nrf52.cpu on 3333
Info : Listening on port 3333 for gdb connections
    TargetName         Type       Endian TapName            State
--  ------------------ ---------- ------ ------------------ ------------
 0* nrf52.cpu          cortex_m   little nrf52.cpu          running

[nrf52.cpu] halted due to debug-request, current mode: Thread
xPSR: 0x01000000 pc: 0x00002e10 msp: 0x20002b10
Info : nRF52840-CKAA(build code: D0) 1024kB Flash, 256kB RAM
Warn : Adding extra erase range, 0x00007f9c .. 0x00007fff
auto erase enabled
wrote 32668 bytes from file D:/01_Work/udk1-sdk/udk1-sdk/leaps-udk1-examples/build/zephyr/zephyr.hex in 1.178412s (27.072 KiB/s)

[nrf52.cpu] halted due to debug-request, current mode: Thread
xPSR: 0x01000000 pc: 0x00002a5c msp: 0x20002850
verified 32668 bytes in 0.099523s (320.552 KiB/s)
Example output when running the TEST_BUTTONS example by pressing the button C, B and A, respectively.
*** Booting Zephyr OS build 5db7528340ec  ***
PRESS BUTTON EXAMPLE
Button C is pressed at 24778
Button C is released at 28996
Button B is pressed at 76012
Button B is released at 81454
Button A is pressed at 104172
Button A is released at 109917