Infrastructure-less proximity Demo
Prepare for setup
LEAPS Manager application installed.
At least two LC14 or LC13 devices.
Batteries or USB-C cables for powering the devices.
Optional: Putty, Teraterm, minicom or your favorite terminal application installed on your computer.
Setup time: less than 2 minutes
Overview
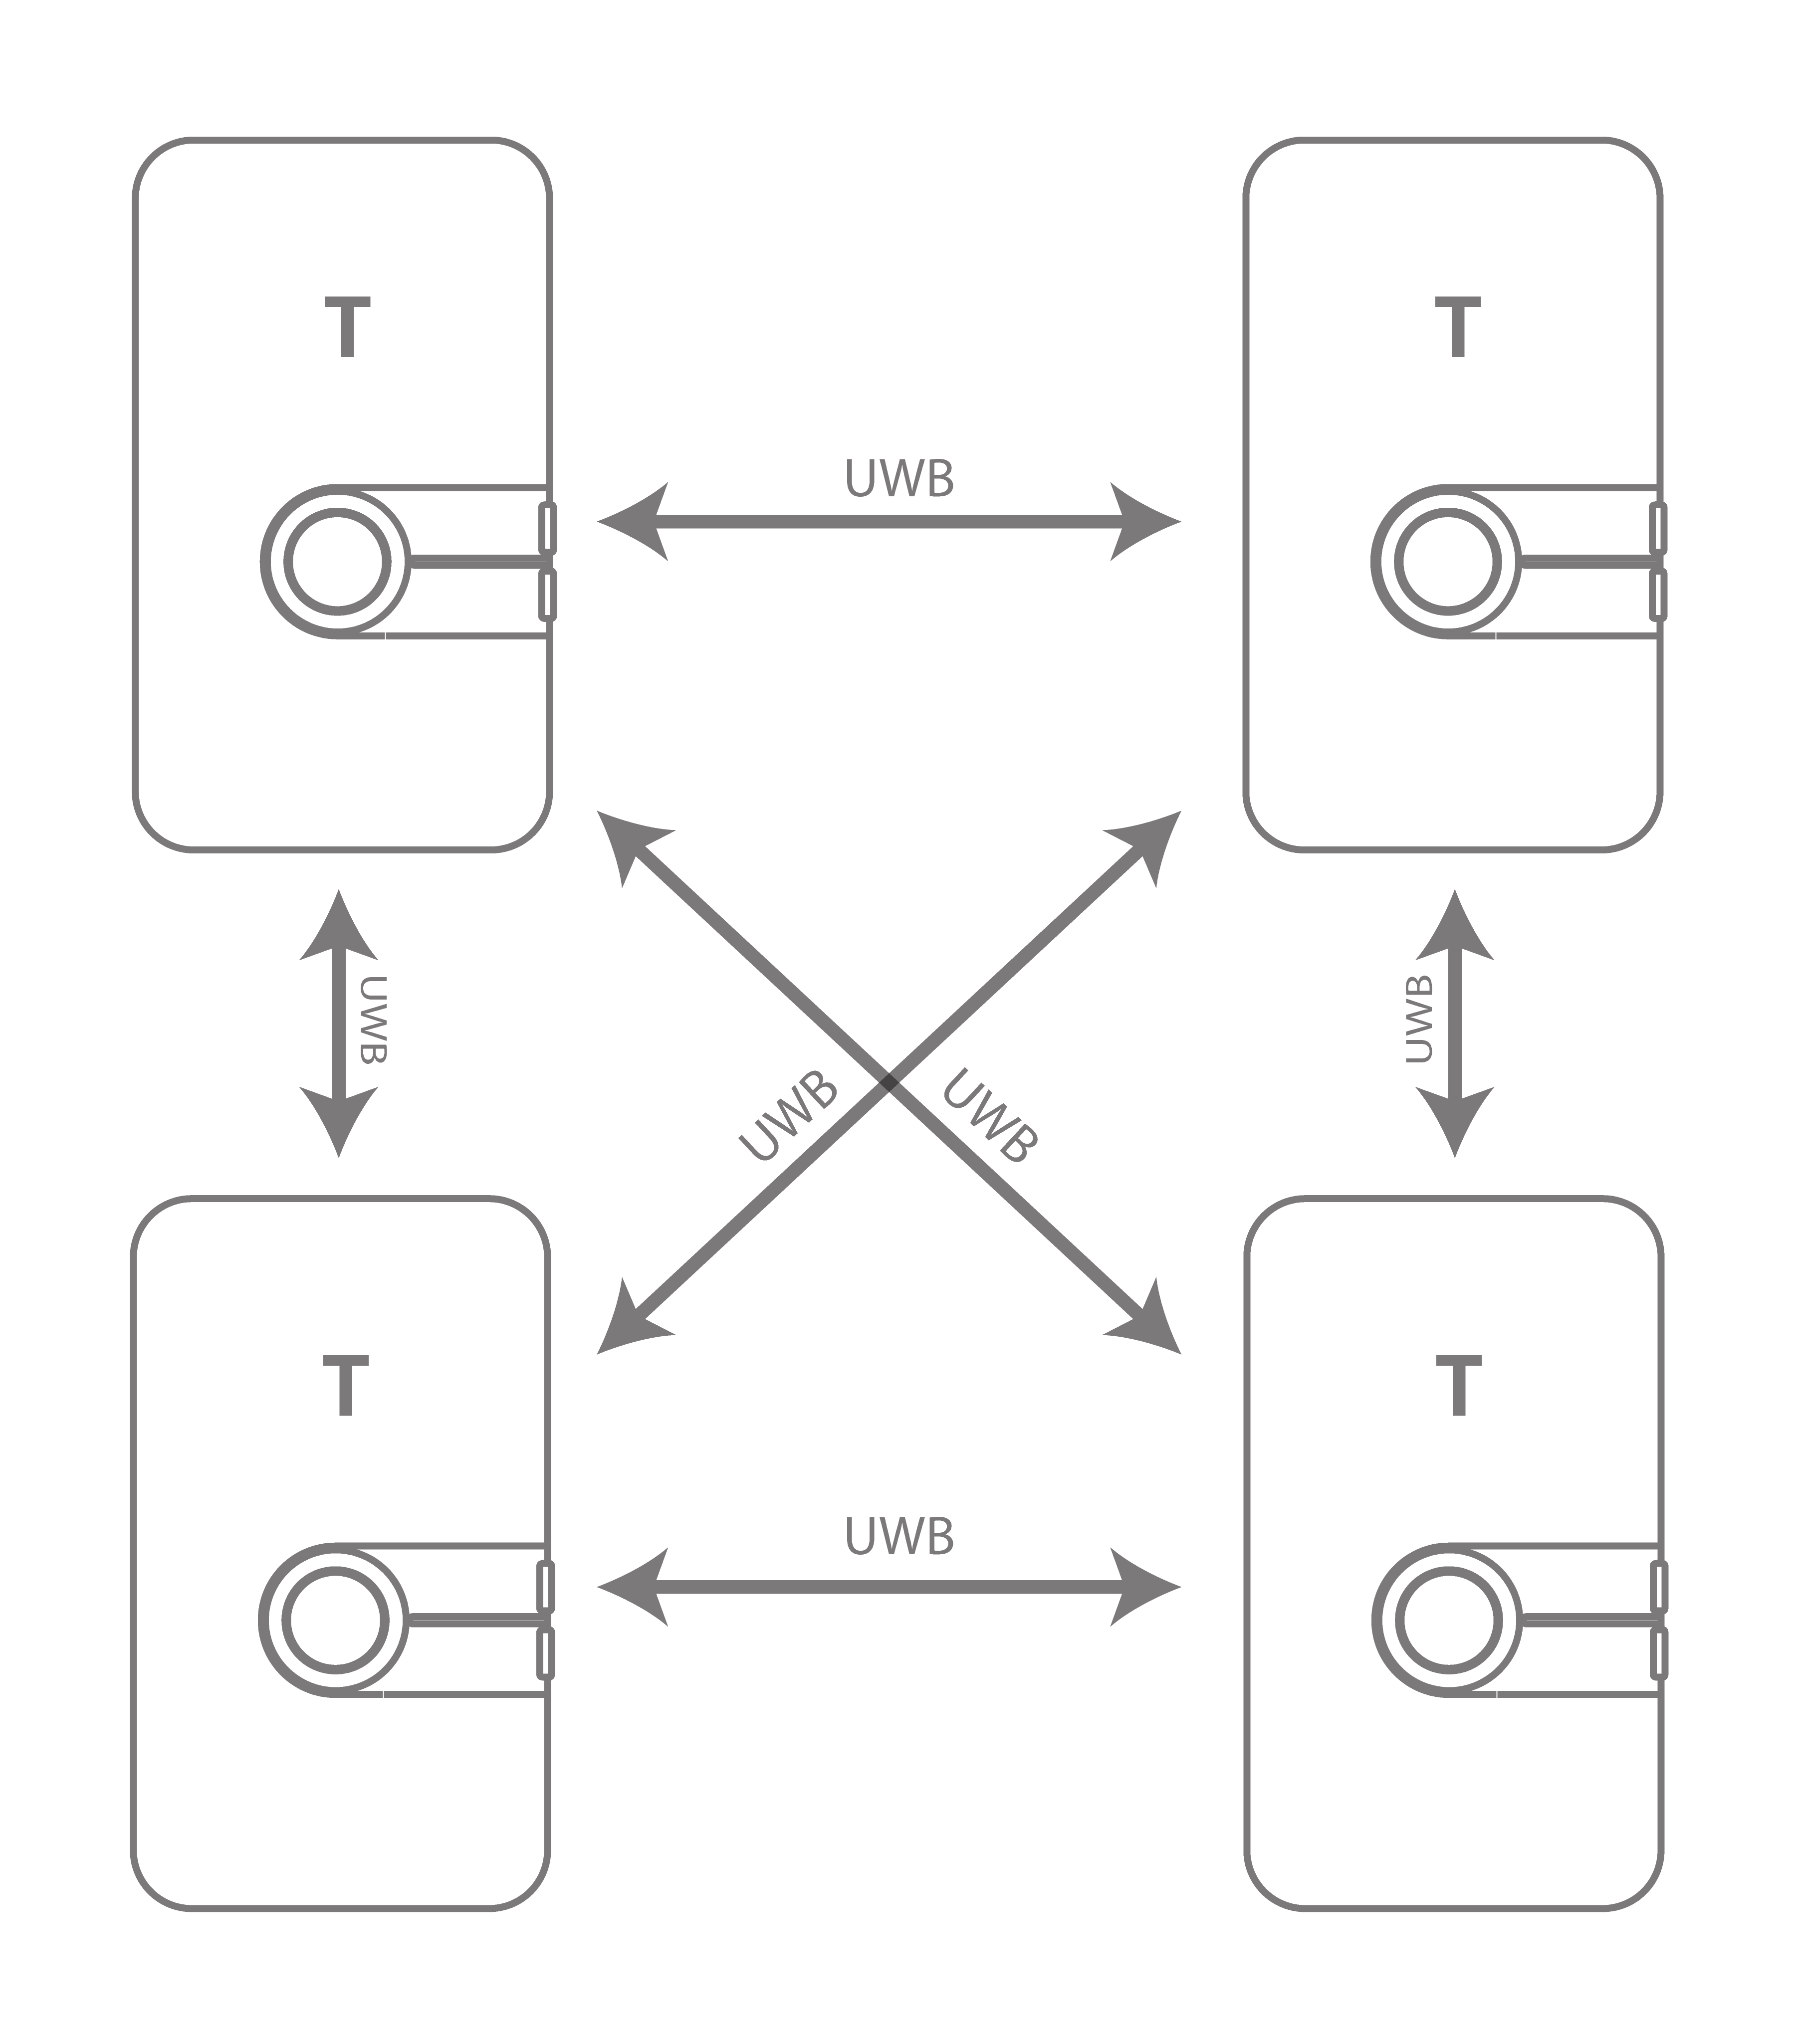
This demo demonstrates infrastructure-less proximity detection between the nodes based on Two Way Ranging (TWR) measurement technique. Alarm is triggered by every node when nodes are in close proximity. The alarm uses LED, haptic motor or buzzer the threshold is configurable.
Typical applications: Collision avoidance, social distancing, swarm coordination.
Setup instructions
Power ON the devices.
The devices will function as independent Tags using Bluetooth to discover the surrounding devices and using UWB to measure distances to the discovered devices.
Configure using the Demo Selector in the LEAPS Manager:
2.1. Open the LEAPS Manager and select the Demo Selector from the main page.
2.2. Select the Infrastructure-less Proximity.
2.3. A list of discovered devices via Bluetooth will appear on the list. Swipe down to update the list if needed.
2.4. Select the devices that will be used for the demo. The nodes on the top side indicate the amount of devices needed for the demo.
2.5. Press SAVE to configure the device(s) into the LEAPS RTLS mode, Tag-Mesh networking profile.
2.6. Please check visually that the RED LED blinks when the device starts.
The devices are configured for the Infrastructure-less proximity Demo.
By default, when the devices come within 2.5 meters of each other, an alarm will activate (indicated by a RED LED and buzzer). The intensity of the alarm will increase as the devices get closer.
Initially, the device will emit a low-intensity beep and will blink the RED LED. You can adjust the volume of the beeping using the up and down buttons, and vibration is also enabled.
In the demonstration outlined below, the device has two proximity thresholds: the first threshold is set at 0.2 meters, and the second at 0.5 meters.
Please refer to the LEAPS Manager for more details on how to use the application to configure and visualize the nodes and network.
Advanced setup
Get ready for the advanced setup! We’ll tap into the terminal’s power to help you configure your device like a pro. Just follow these steps and you’ll be all set.
Use a USB-C Data Cable to connect the USB-C Data Port 1 or USB-C Data Port 2 of devices to your PC.
Connect to a serial port using your desired terminal application, such as Putty, Teraterm, Minicom, or your favortie terminal application. We need to configure the baud rate to 115200.
For example use Minicom, on Ubuntu (Linux):
minicom -b 115200 -D /dev/ttyACM0
Press double enter on the shell console to access the command line control system
For example open /dev/ttyACM0 and press double enter, on Ubuntu (Linux):
minicom -b 115200 -D /dev/ttyACM0

  Welcome to minicom 2.7.1

  OPTIONS: I18n
  Compiled on Dec 23 2019, 02:06:26.
  Port /dev/ttyACM0, 16:02:57

  Press CTRL-A Z for help on special keys


  Low Energy Accurate Positioning System

  FOR DEMO PURPOSE ONLY, NOT FOR SALE.

  Copyright :  2016-2023 LEAPS
  License   :  Please visit https://www.leapslabs.com/leaps-rtls-license
  Compiled  :  Jan  6 2024 09:38:07 (v0.15.0-ab84fb)

  Help      :  ? or help

  leaps>
Configure each device by following steps:
Reset devices to default, run the frst command. (optional)
$ leaps> frst
frst ok
(Monitor and wait for the device to reset successfully. Then press double enter to access the command line control system.)
Use the command nps 4 to configure profile 4 (support Tag Mesh Proximity) for each device.
$ leaps> nps 4
nps: ok
Use the nis command to configure all devices in a network.
$ leaps> nis 0x1234
nis: ok
Use the command nmt to update tag mode.
$ leaps> nmt(Then monitor and wait for the device to configure successfully. Then press double enter to access the command line control system again.)
Use the si command to verify configurations such as mode, profile and network.
leaps> si
[000028.754 INF] release: LEAPS RTLS v0.15.0-ab84fb
[000028.754 INF] sys: main main_ver=x02000001 cfg_ver=x01040000 batt=none board=LC14_B
[000028.754 INF] uwb: ch9 prf64 plen128 pac8 txcode9 rxcode9 baud6800 phrmodeext phrratestd sfdtypeieee4a sfdto10
[000028.754 INF] uwb: tx_pwr=x34/xC6C6C6C6 sts:shr:phr:data=22.6:22.6:22.6:22.6[dB] cpl=FCC/ETSI pgcnt=236 temp=5
[000028.755 INF] uwb: lna=1 pa=0 rf1=1 rf2=0 xtaltrim=32 tx_delay=16431 rx_delay=16431
[000028.755 INF] uwb: panid=x1234 addr=xDECAED5BC8B1468D
[000028.758 INF] mode: tn (act,twr,np,le)
[000028.774 INF] uwbmac: connected prof=4 (manual)
[000028.774 INF] uwbmac: bh disconnected
[000028.774 INF] cfg: sync=0 fwup=1 ble=1 leds=1 le=1 lp=0 uab=1 stat_det=1 (sens=2) mode=0 upd_rate_norm=1 upd_D
[000028.802 INF] enc: off
[000028.802 INF] ble: addr=F3:D9:66:75:93:EB
leaps>
mode: tn
panid=x1234
prof=4
Please check visually that the RED LED blinks when the device starts.
Note
In this example, we will configure 2 tags.
After configuring the device, it will scan all devices via BLE. If the device is within the allowable distance, it will automatically reactivate UWB and measure the distance to each other.
Use the ln command to show all devices. This can be used with all UDK1 devices.
$ leaps> ln [000005.713 INF] TN: cnt=2 size=100 [000005.713 INF] 0) id=468D dist=0.40,xDD [000005.713 INF] 1) id=4F2E dist=0.00,xBD [000005.713 INF]$ leaps> ln [000033.319 INF] TN: cnt=2 size=100 [000033.319 INF] 0) id=468D dist=0.00,x00 [000033.320 INF] 1) id=4F2E dist=0.44,x66 [000033.320 INF]
By default, when the devices come within 2.5 meters of each other, an alarm will activate (indicated by a RED LED and buzzer). The intensity of the alarm will increase as the devices get closer.
Initially, the device will emit a low-intensity beep and will blink the RED LED. You can adjust the volume of the beeping using the up and down buttons, and vibration is also enabled.
Users can view and configure this distance through 2 commands: dacg command and, dacs command.
For example, to view and configure 2 thresholds 0.2 meter and, 0.5 meter. Run the following command:
To view:
$ leaps> dacg
dacg: thold_1=200 thold_2=500 mincon=2 minnocon=2 opt=7
To configure:
$ leaps> dacs 200 500 2 2 7
dacs: ok
In the GIF Image below, the device is configured with thresholds 1 is 0.2 meter and, thresholds 2 is 0.5 meter.
After the configuration, you can open the shell console for the Tag and view the Tag position using the les command.
$ leaps> les
  leaps> POS[NaN,NaN,Nan,0] 4F2E[0.00,0.00,0.00,100]=0.54
  POS[NaN,NaN,Nan,0] 4F2E[0.00,0.00,0.00,100]=0.57
  POS[NaN,NaN,Nan,0] 4F2E[0.00,0.00,0.00,100]=0.58
  POS[NaN,NaN,Nan,0] 4F2E[0.00,0.00,0.00,100]=0.59
  POS[NaN,NaN,Nan,0] 4F2E[0.00,0.00,0.00,100]=0.51
  POS[NaN,NaN,Nan,0] 4F2E[0.00,0.00,0.00,100]=0.47
  POS[NaN,NaN,Nan,0] 4F2E[0.00,0.00,0.00,100]=0.43
  POS[NaN,NaN,Nan,0] 4F2E[0.00,0.00,0.00,100]=0.40
  POS[NaN,NaN,Nan,0] 4F2E[0.00,0.00,0.00,100]=0.35
  POS[NaN,NaN,Nan,0] 4F2E[0.00,0.00,0.00,100]=0.32
  POS[NaN,NaN,Nan,0] 4F2E[0.00,0.00,0.00,100]=0.31
  POS[NaN,NaN,Nan,0] 4F2E[0.00,0.00,0.00,100]=0.29
  POS[NaN,NaN,Nan,0] 4F2E[0.00,0.00,0.00,100]=0.27
  POS[NaN,NaN,Nan,0] 4F2E[0.00,0.00,0.00,100]=0.22
  POS[NaN,NaN,Nan,0] 4F2E[0.00,0.00,0.00,100]=0.19
  POS[NaN,NaN,Nan,0] 4F2E[0.00,0.00,0.00,100]=0.16
  POS[NaN,NaN,Nan,0] 4F2E[0.00,0.00,0.00,100]=0.14
  POS[NaN,NaN,Nan,0] 4F2E[0.00,0.00,0.00,100]=0.12
  POS[NaN,NaN,Nan,0] 4F2E[0.00,0.00,0.00,100]=0.09
  POS[NaN,NaN,Nan,0] 4F2E[0.00,0.00,0.00,100]=0.08
  POS[NaN,NaN,Nan,0] 4F2E[0.00,0.00,0.00,100]=0.05
  POS[NaN,NaN,Nan,0] 4F2E[0.00,0.00,0.00,100]=0.09
  POS[NaN,NaN,Nan,0] 4F2E[0.00,0.00,0.00,100]=0.11
  POS[NaN,NaN,Nan,0] 4F2E[0.00,0.00,0.00,100]=0.13
  POS[NaN,NaN,Nan,0] 4F2E[0.00,0.00,0.00,100]=0.15
  POS[NaN,NaN,Nan,0] 4F2E[0.00,0.00,0.00,100]=0.17
  POS[NaN,NaN,Nan,0] 4F2E[0.00,0.00,0.00,100]=0.19
  POS[NaN,NaN,Nan,0] 4F2E[0.00,0.00,0.00,100]=0.21
  POS[NaN,NaN,Nan,0] 4F2E[0.00,0.00,0.00,100]=0.23
  POS[NaN,NaN,Nan,0] 4F2E[0.00,0.00,0.00,100]=0.42
  POS[NaN,NaN,Nan,0] 4F2E[0.00,0.00,0.00,100]=0.51
  POS[NaN,NaN,Nan,0] 4F2E[0.00,0.00,0.00,100]=0.56
  POS[NaN,NaN,Nan,0] 4F2E[0.00,0.00,0.00,100]=0.60
  POS[NaN,NaN,Nan,0] 4F2E[0.00,0.00,0.00,100]=0.62
  POS[NaN,NaN,Nan,0] 4F2E[0.00,0.00,0.00,100]=0.64
  POS[NaN,NaN,Nan,0] 4F2E[0.00,0.00,0.00,100]=0.67
  POS[NaN,NaN,Nan,0] 4F2E[0.00,0.00,0.00,100]=0.69
  POS[NaN,NaN,Nan,0] 4F2E[0.00,0.00,0.00,100]=0.71
  POS[NaN,NaN,Nan,0] 4F2E[0.00,0.00,0.00,100]=0.73
  POS[NaN,NaN,Nan,0] 4F2E[0.00,0.00,0.00,100]=0.73
Now the system has been successfully set up and configured the system. Enjoy using it!
When Bluetooth Low Energy (BLE) and the LED are both off, users may erroneously perceive the board as non-functional. In this scenario, the only recourse for the user is to initiate a Factory Reset (frst) command.
Here are some tips for fixing some issues related to the installation process.
Please check the version. We recommend you use the latest official version.
Use the Reset devices to default feature in Demo Selector on the LEAPS Manager when you don’t know the current state of the devices. Refer to the following GIF Image.
Caution
Related to Profile 4
When the device is in Anchor or Initiator mode, users must not switch to profile 4.
Configured Update Rate value should be limited within <1; 10>.
Note
The distance thresholds are configurable via the API.
For any comments or questions about our products, we encourage you to visit our LEAPS Forum.
For detail of known limitation and issue list, please refer section Releases.