TWR RTLS and Data Telemetry Demo
Prepare for setup
LEAPS Manager application installed.
At least five LC14 devices.
Batteries or USB-C cables for powering the devices.
Recommended: clamp or tripod with a camera mount for attachment of the Anchor devices.
Recommended: A Raspberry Pi 3B or newer version or a PC, the data server, and the web application installation.
Optional: Putty, Teraterm, minicom, or your favorite terminal application installed on your computer.
For users, the recommended starting point is either the latest release.
Setup time: less than 5 minutes
Overview
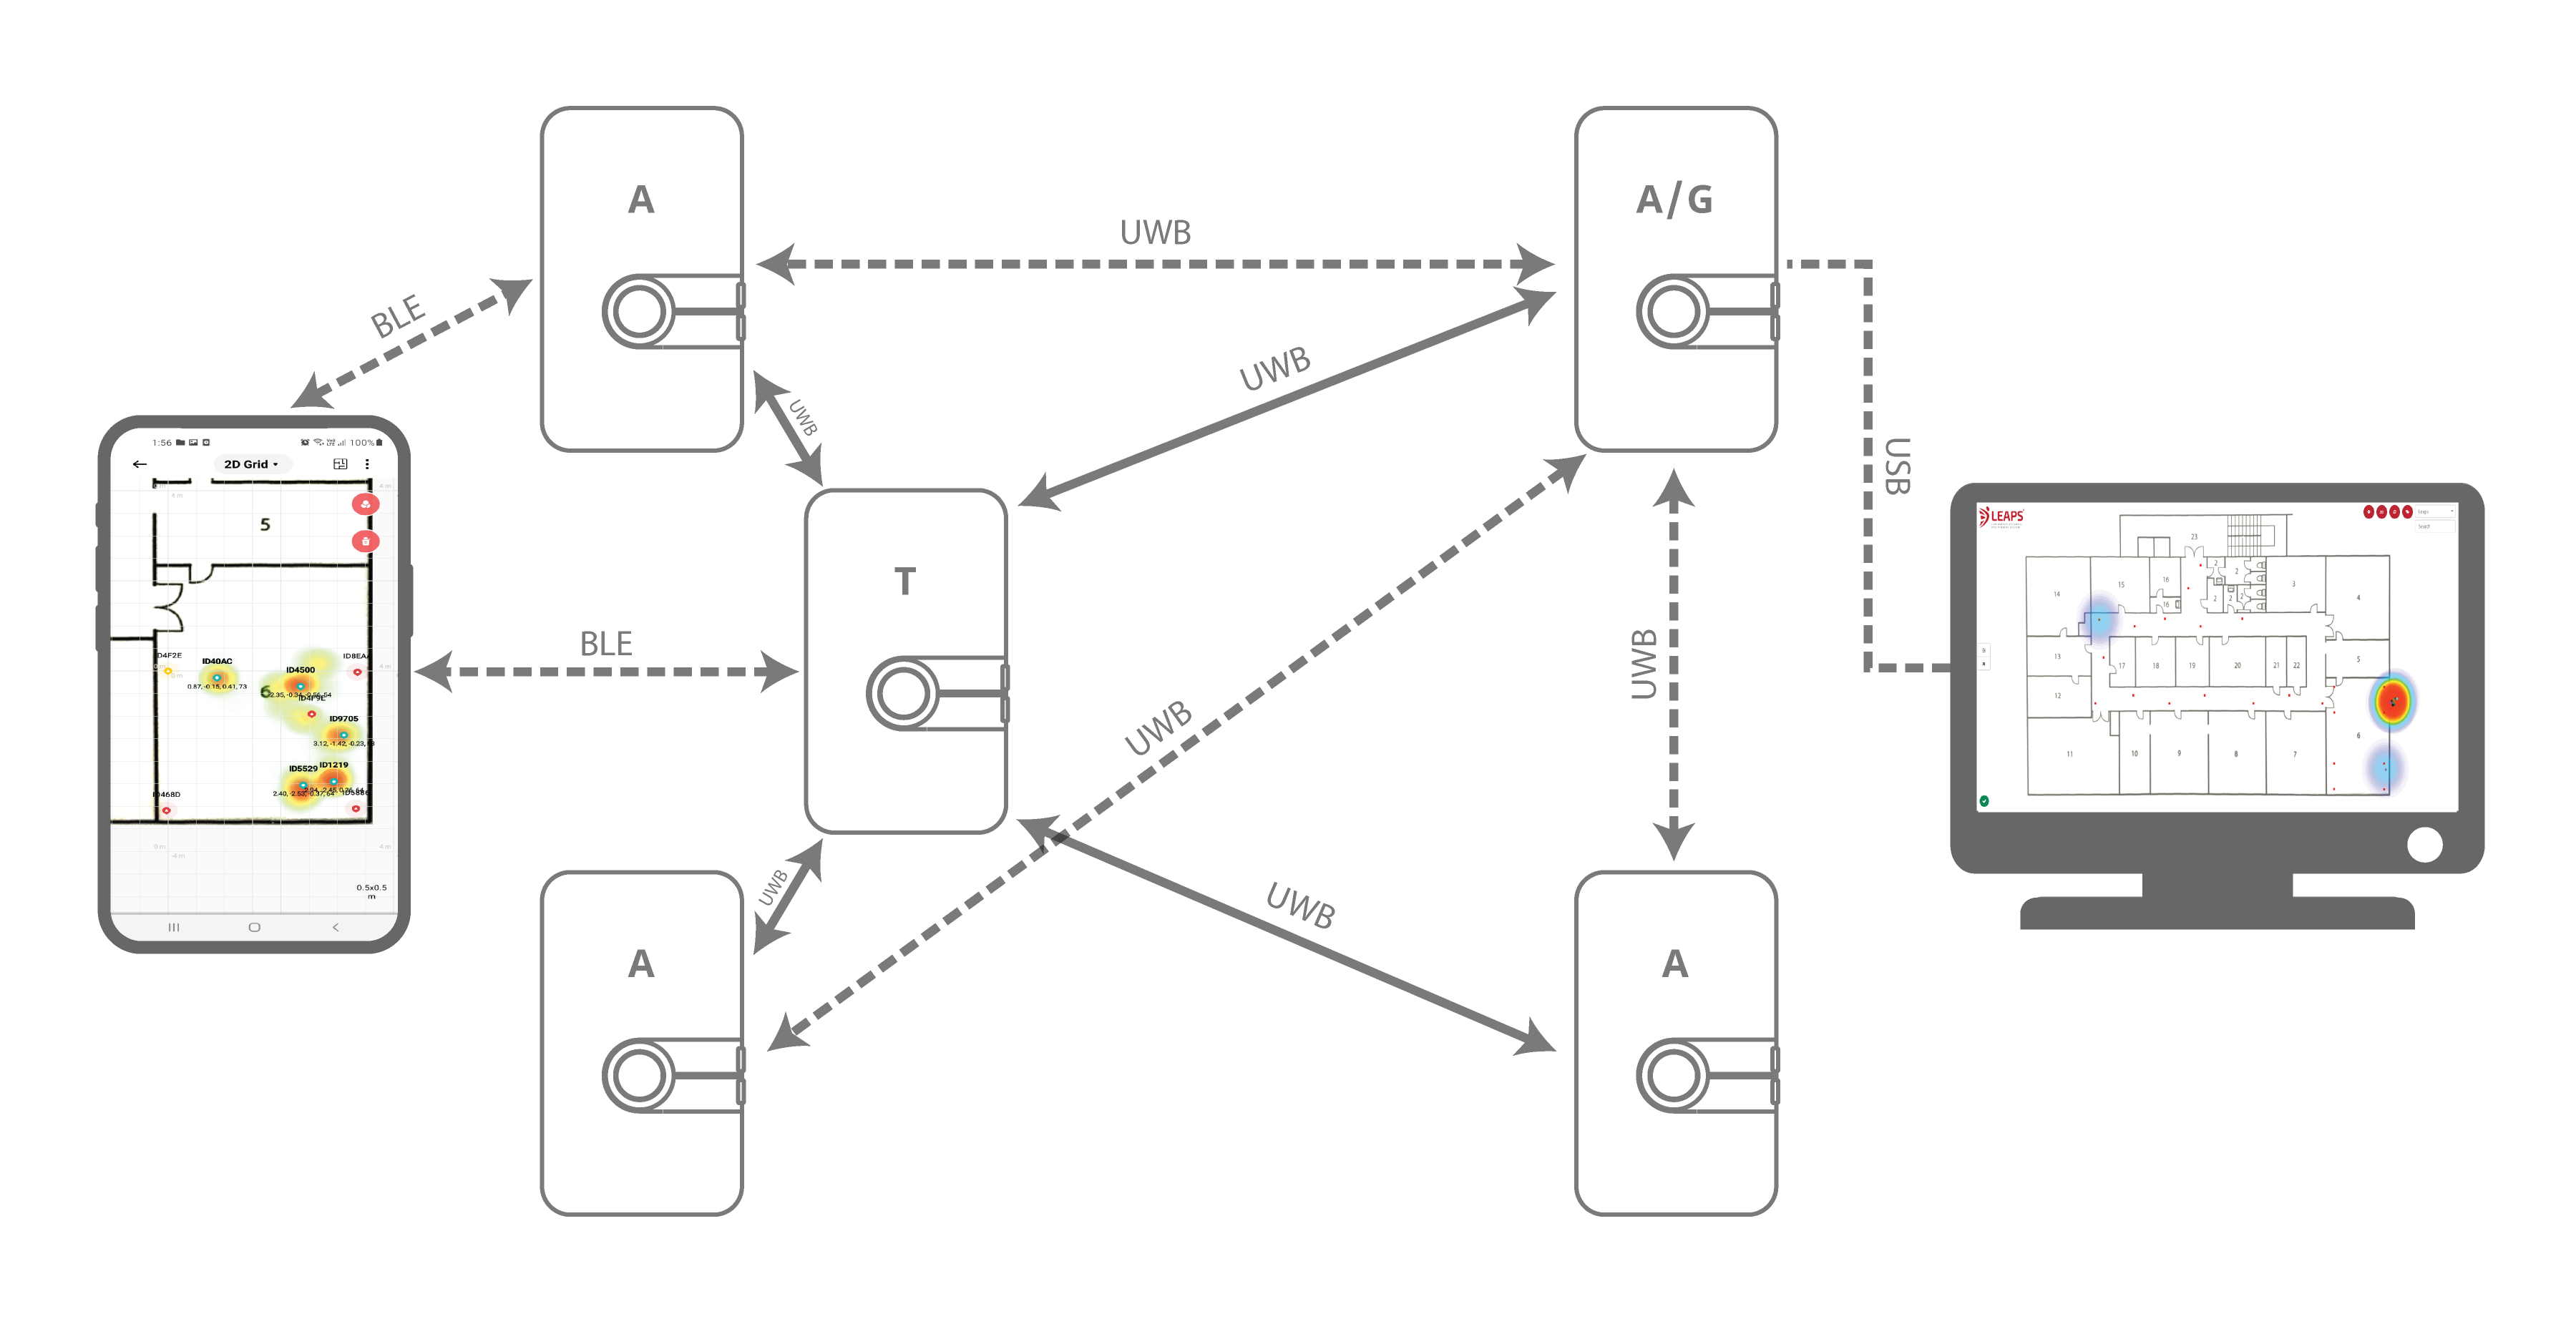
This setup demonstrates real-time navigation, tracking, and both ways of data telemetry using Two Way Ranging (TWR) technology. It demonstrates real-time navigation of an unlimited amount of Tags using DL-TDoA technology.
Typical applications: Indoor navigation, asset tracking, and real-time data telemetry supporting uplink and downlink.
Setup instructions
Power ON the devices.
The statically mounted devices will function as Anchors, providing location information to the Tags.
The moving devices will function as Tags configured in Two-Way Ranging measurement mode.
Configure using the Demo Selector in the LEAPS Manager:
2.1. Open the LEAPS Manager and select the Demo Selector from the main page.
2.2. Select the TWR RTLS And Data Telemetry.
2.3. A list of discovered devices via Bluetooth will appear on the list. Swipe down to update the list if needed.
2.4. Select the devices that will be used for the demo. The anchors and tags on the top side indicate the amount of devices needed for the demo.
2.5. Press the SAVE to configure the device(s) into the LEAPS RTLS mode, networking profile 2 (supports TWR+UL / DL-Data, DL-TDoA).
2.6. A pop-up window Anchor Configuration will appear to offer the options to configure the Anchor’s positions. select the Manual, Auto positioning or Keep current position depending on the need, then Press the OK.
2.7. Please check visually that the RED LED blinks when the device starts.

When the devices are configured successfully, the LEAPS Demo Network window will appear with a list of configured nodes.
Recommended: Use the alarm feature to identify the device, and move it to the correct physical location.
Open the Grid, located at the top drop-down menu (select Network Details), is for visualization of the devices and their positions.
Please refer to the LEAPS Manager for more details on how to use the application to configure and visualize the nodes and network.
Advanced setup
Get ready for the advanced setup! We’ll tap into the terminal’s power to help you configure your device like a pro. Just follow these steps and you’ll be all set.
Use a USB-C Data Cable to connect the USB-C Data Port 1 or USB-C Data Port 2 of devices to your PC.
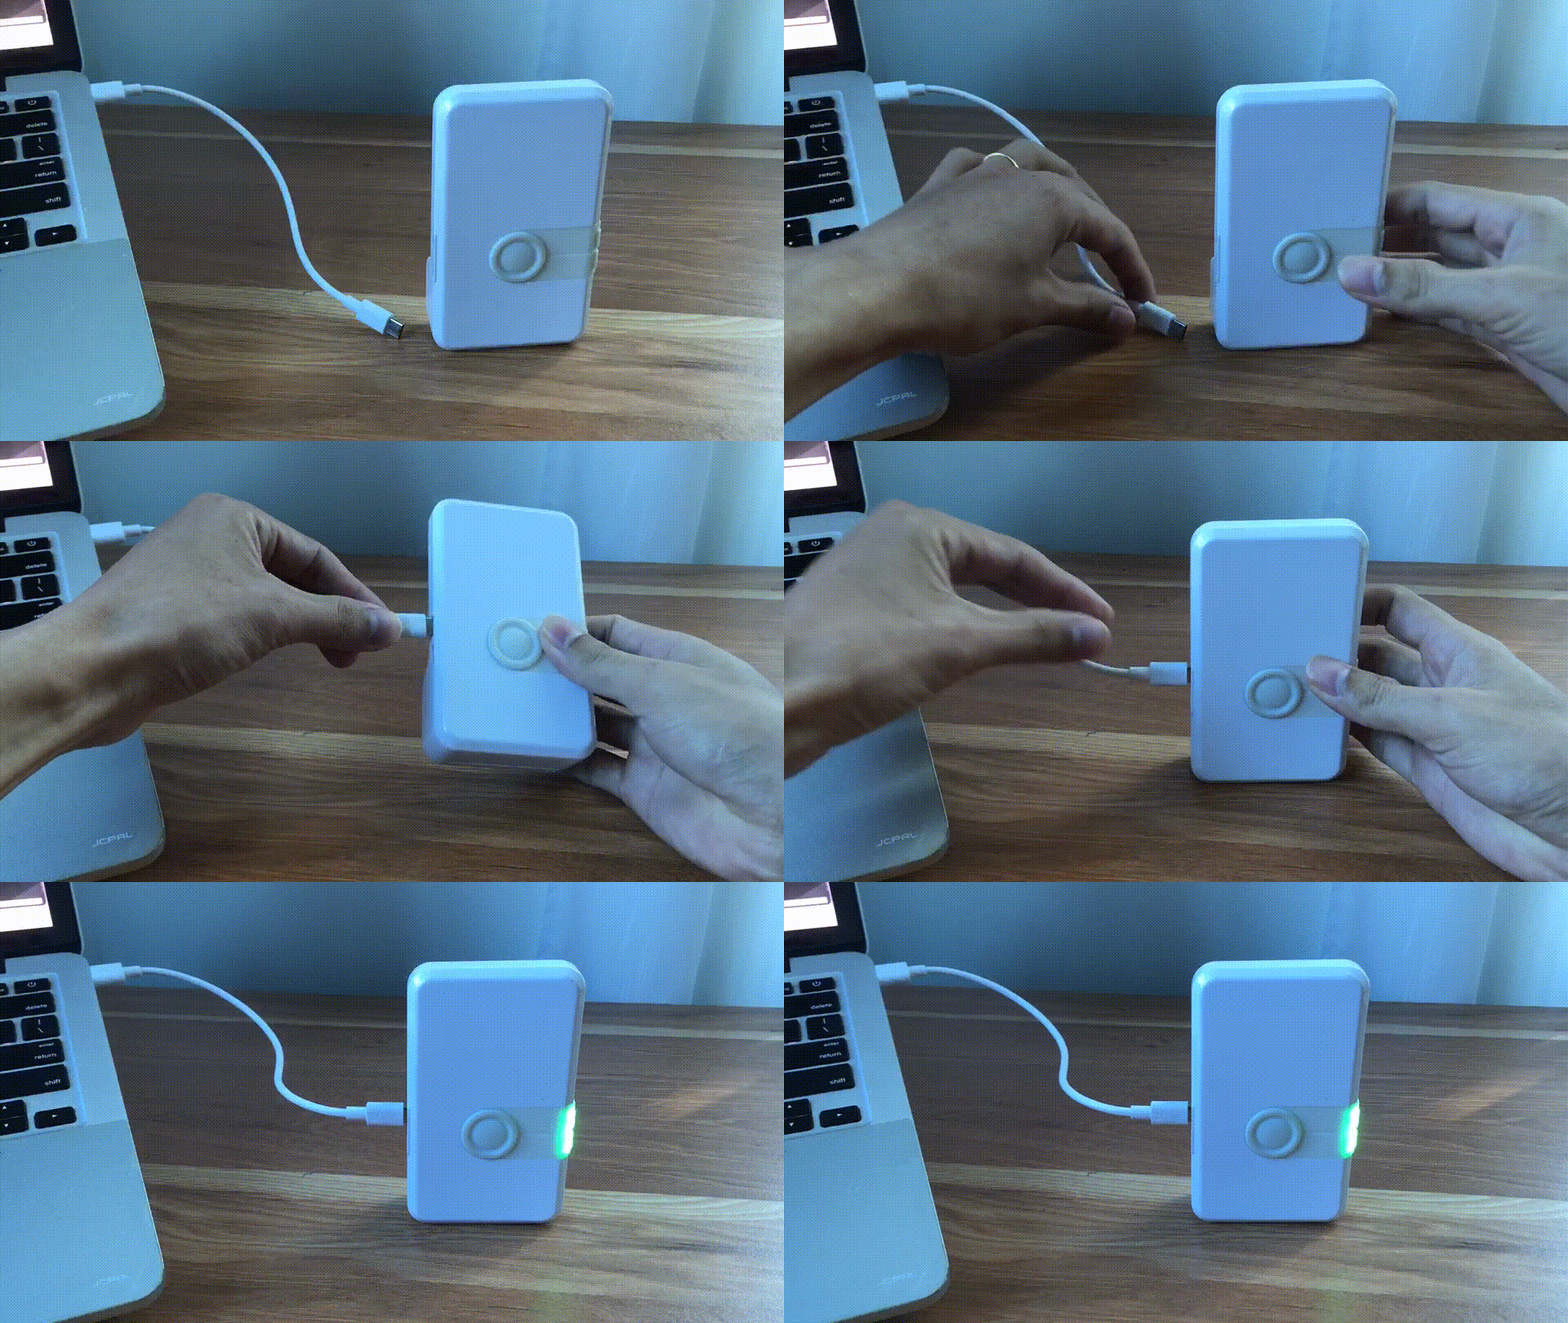
Connect to a serial port using your desired terminal application, such as Putty, Teraterm, Minicom, or your favorite terminal application. We need to configure the baud rate to 115200.
For example use Minicom, on Ubuntu (Linux):
minicom -b 115200 -D /dev/ttyACM0
Press Double enter on the shell console to access the command line control system.
For example open /dev/ttyACM0 and press double enter, on Ubuntu (Linux):
leaps@leaps:~$ minicom -b 115200 -D /dev/ttyACM0

  Low Energy Accurate Positioning System

  Copyright :  2016-2025 LEAPS
  License   :  Please visit https://www.leapslabs.com/leaps-rtls-license
  Compiled  :  Oct 15 2026 09:42:20 (v1.2.1-4f9295)

  Help      :  ? or help

  FOR DEMO PURPOSE ONLY, NOT FOR SALE.
  DEVICE RUNTIME IS LIMITED TO 48 HOURS. RESET THE DEVICE TO RECOVER IT.

  leaps>
Configure for each device, do the following steps:
Optional: Reset devices to default, run the
frstcommand.$ leaps> frst frst okMonitor and wait for the device to reset successfully. Then press double enter to access the command line control system.
Use the
nps 2command to configure profile 2 (supports TWR+UL / DL-Data, DL-TDoA) for each device.$ leaps> nps 2 nps: ok
Use the
niscommand to configure all devices in a network.$ leaps> nis 0x1234 nis: ok
Then, it is neccessary to reset the device to update the configuration. Use the
resetcommand to reset the device.$ leaps> reset reset ok
Note
In this example, we will configure an anchor with enable initiator, 3 anchors, and a tag.
Configure the mode for each anchor and tag.
To configure an anchor with enable initiator, use the
nmicommand to configure a device.$ leaps> nmiThen, the device will reset, and to access the command line control system again, press double enter.
To configure 3 anchors, use the
nmacommand to configure 3 devices to anchor mode, but do not enable initiator.$ leaps> nmaThen, the device will reset, and to access the command line control system again, press double enter.
To configure a tag, use the
nmtcommand to configure a device to tag mode$ leaps> nmtThen, the device will reset, and to access the command line control system again, press double enter.
Configure the actual position for each anchor.
To get the position use
pgcommand and to set the position usepscommand for each anchor.In this example, we will set up 4 anchors:
leaps> ps 0 7500 1550 ps: ok leaps> pg pg: x:0 y:7500 z:1550 qf:100 leaps>leaps> ps 5500 7500 1550 ps: ok leaps> pg pg: x:5500 y:7500 z:1550 qf:100 leaps>leaps> ps 5500 4000 1500 ps: ok leaps> pg pg: x:5500 y:4000 z:1500 qf:100 leaps>leaps> ps 0 4000 1550 ps: ok leaps> pg pg: x:0 y:4000 z:1550 qf:100 leaps>Note
The device must be configured to accurately reflect its actual physical location.
Additionally, LEAPS Manager can be used to visualize the devices and their locations.
Configuration for each tag allows the use of TWR technology for measurement.
To configure, use the
tcs mode 0command for a tag.$ leaps> tcs mode 0 tcs: ok
Then, it is neccessary to reset the device to update the configuration. Use the
resetcommand to reset the device.$ leaps> reset reset ok
By default normal update rate is 0.1 s/ 10 Hz and stationary update rate is 5.0 s/ 0.2 Hz. To increase speed, use
urscommand.
For example, configure normal update rate to 0.1 s/ 10 Hz and, stationary update rate is 0.1 s/ 10 Hz. Run the following command:
$ leaps> urs 1 1
urs: ok
Optional: In steps 5, 6, 7, 8 and, 9 can use the
si(System Information) command to verify whether the mode, profile, and network configurations are correct.
For example on 4 anchors and a tag:
mode: ani
panid=x1234
prof=2leaps> nps 2 nps: ok leaps> nis 0x1234 nis: ok leaps> nmi Low Energy Accurate Positioning System Copyright : 2016-2025 LEAPS License : Please visit https://www.leapslabs.com/leaps-rtls-license Compiled : Oct 15 2026 09:42:20 (v1.2.1-4f9295) Help : ? or help FOR DEMO PURPOSE ONLY, NOT FOR SALE. DEVICE RUNTIME IS LIMITED TO 48 HOURS. RESET THE DEVICE TO RECOVER IT. leaps> si [000034.064 INF] release: LEAPS RTLS v1.2.1-4f9295 (fira) [000034.064 INF] sys: main main_ver=x02070101 cfg_ver=x01040000 batt=empty:0mV:NoCharger board=LC14_B prod=LC14_B pwr_cnt=0 rst_cnt=2 [000034.065 INF] uwb: ch9 prf64 plen128 pac8 txcode11 rxcode11 baud6800 phrmodeext phrratestd sfdtypeieee4a sfdto129 stsmodeoff stslen64 pdoamodem0 [000034.066 INF] uwb: tx_pwr=x34/xC6C6C6C6 sts:shr:phr:data=22.6:22.6:22.6:22.6[dB] cpl=FCC/ETSI pgcnt=236 temp=25 [000034.067 INF] uwb: lna=1 pa=0 rf1=1 rf2=0 xtaltrim=32 tx_delay=16422 rx_delay=16422 [000034.070 INF] uwb: panid=x1234 panid_mask=xFFFF zone=255 addr=xDECAED5BC8B1468D [000034.089 INF] mode: ani (act,real) [000034.090 INF] uwbmac: connected prof=2 (manual) [000034.090 INF] uwbmac: bh disconnected [000034.091 INF] cfg: sync=0 fwup=1 ble=1 leds=1 init=1 uab=1 bh=auto bh_stat=off cr=0 upd_rate_stat=30 label=ID468D [000034.112 INF] enc: off [000034.113 INF] ble: addr=F3:D9:66:75:93:EB leaps>
mode: an
panid=x1234
prof=2leaps> nps 2 nps: ok leaps> nis 0x1234 nis: ok leaps> nma Low Energy Accurate Positioning System Copyright : 2016-2025 LEAPS License : Please visit https://www.leapslabs.com/leaps-rtls-license Compiled : Oct 15 2026 09:42:20 (v1.2.1-4f9295) Help : ? or help FOR DEMO PURPOSE ONLY, NOT FOR SALE. DEVICE RUNTIME IS LIMITED TO 48 HOURS. RESET THE DEVICE TO RECOVER IT. leaps> si [000070.732 INF] release: LEAPS RTLS v1.2.1-4f9295 (fira) [000070.732 INF] sys: main main_ver=x02070101 cfg_ver=x01040000 batt=empty:0mV:NoCharger board=LC14_B prod=LC14_B pwr_cnt=0 rst_cnt=2 [000070.733 INF] uwb: ch9 prf64 plen128 pac8 txcode11 rxcode11 baud6800 phrmodeext phrratestd sfdtypeieee4a sfdto129 stsmodeoff stslen64 pdoamodem0 [000070.734 INF] uwb: tx_pwr=x34/xCECECECE sts:shr:phr:data=23.4:23.4:23.4:23.4[dB] cpl=FCC/ETSI pgcnt=229 temp=25 [000070.735 INF] uwb: lna=1 pa=0 rf1=1 rf2=0 xtaltrim=32 tx_delay=16423 rx_delay=16423 [000070.737 INF] uwb: panid=x1234 panid_mask=xFFFF zone=255 addr=xDECAE4F84AA54F9E [000070.756 INF] mode: an (act,-) [000070.756 INF] uwbmac: connected prof=2 (manual) [000070.757 INF] uwbmac: bh disconnected [000070.757 INF] cfg: sync=0 fwup=1 ble=1 leds=1 init=0 uab=1 bh=auto bh_stat=off cr=0 upd_rate_stat=30 label=ID4F9E [000070.781 INF] enc: off [000070.781 INF] ble: addr=D8:70:8B:16:3B:EE leaps>
mode: an
panid=x1234
prof=2leaps> nps 2 nps: ok leaps> nis 0x1234 nis: ok leaps> nma Low Energy Accurate Positioning System Copyright : 2016-2025 LEAPS License : Please visit https://www.leapslabs.com/leaps-rtls-license Compiled : Oct 15 2026 09:42:20 (v1.2.1-4f9295) Help : ? or help FOR DEMO PURPOSE ONLY, NOT FOR SALE. DEVICE RUNTIME IS LIMITED TO 48 HOURS. RESET THE DEVICE TO RECOVER IT. leaps> si [000107.113 INF] release: LEAPS RTLS v1.2.1-4f9295 (fira) [000107.114 INF] sys: main main_ver=x02070101 cfg_ver=x01040000 batt=empty:0mV:NoCharger board=LC14_B prod=LC14_B pwr_cnt=0 rst_cnt=2 [000107.114 INF] uwb: ch9 prf64 plen128 pac8 txcode11 rxcode11 baud6800 phrmodeext phrratestd sfdtypeieee4a sfdto129 stsmodeoff stslen64 pdoamodem0 [000107.116 INF] uwb: tx_pwr=x34/xCECECECE sts:shr:phr:data=23.4:23.4:23.4:23.4[dB] cpl=FCC/ETSI pgcnt=238 temp=25 [000107.117 INF] uwb: lna=1 pa=0 rf1=1 rf2=0 xtaltrim=32 tx_delay=16417 rx_delay=16417 [000107.119 INF] uwb: panid=x1234 panid_mask=xFFFF zone=255 addr=xDECA229121E05886 [000107.138 INF] mode: an (act,-) [000107.139 INF] uwbmac: connected prof=2 (manual) [000107.139 INF] uwbmac: bh disconnected [000107.140 INF] cfg: sync=0 fwup=1 ble=1 leds=1 init=0 uab=1 bh=auto bh_stat=off cr=0 upd_rate_stat=30 label=ID5886 [000107.162 INF] enc: off [000107.163 INF] ble: addr=FD:3F:4A:2F:BD:F0 leaps>
mode: an
panid=x1234
prof=2leaps> nps 2 nps: ok leaps> nis 0x1234 nis: ok leaps> nma Low Energy Accurate Positioning System Copyright : 2016-2025 LEAPS License : Please visit https://www.leapslabs.com/leaps-rtls-license Compiled : Oct 15 2026 09:42:20 (v1.2.1-4f9295) Help : ? or help FOR DEMO PURPOSE ONLY, NOT FOR SALE. DEVICE RUNTIME IS LIMITED TO 48 HOURS. RESET THE DEVICE TO RECOVER IT. leaps> si [000155.283 INF] release: LEAPS RTLS v1.2.1-4f9295 (fira) [000155.284 INF] sys: main main_ver=x02070101 cfg_ver=x01040000 batt=empty:0mV:NoCharger board=LC14_B prod=LC14_B pwr_cnt=0 rst_cnt=2 [000155.284 INF] uwb: ch9 prf64 plen128 pac8 txcode11 rxcode11 baud6800 phrmodeext phrratestd sfdtypeieee4a sfdto129 stsmodeoff stslen64 pdoamodem0 [000155.285 INF] uwb: tx_pwr=x34/xEEEEEEEE sts:shr:phr:data=26.5:26.5:26.5:26.5[dB] cpl=FCC/ETSI pgcnt=245 temp=25 [000155.287 INF] uwb: lna=1 pa=0 rf1=1 rf2=0 xtaltrim=32 tx_delay=16427 rx_delay=16427 [000155.289 INF] uwb: panid=x1234 panid_mask=xFFFF zone=255 addr=xDECA7A20DFE04F2E [000155.307 INF] mode: an (act,-) [000155.308 INF] uwbmac: connected prof=2 (manual) [000155.309 INF] uwbmac: bh disconnected [000155.309 INF] cfg: sync=0 fwup=1 ble=1 leds=1 init=0 uab=1 bh=auto bh_stat=off cr=0 upd_rate_stat=30 label=ID4F2E [000155.331 INF] enc: off [000155.332 INF] ble: addr=C8:D9:F3:F1:7D:CE leaps>
By default configuration, the device will be in TWR mode. If it was in another mode, we would use the
tcs mode 0command.
mode: tn
panid=x1234
prof=2leaps> nps 2 nps: ok leaps> nis 0x1234 nis: ok leaps> tcs mode 0 tcs: ok leaps> urs 1 1 urs: ok leaps> nmt Low Energy Accurate Positioning System Copyright : 2016-2025 LEAPS License : Please visit https://www.leapslabs.com/leaps-rtls-license Compiled : Oct 15 2026 09:42:20 (v1.2.1-4f9295) Help : ? or help FOR DEMO PURPOSE ONLY, NOT FOR SALE. DEVICE RUNTIME IS LIMITED TO 48 HOURS. RESET THE DEVICE TO RECOVER IT. leaps> si [000004.581 INF] release: LEAPS RTLS v1.2.1-4f9295 (fira) [000004.581 INF] sys: main main_ver=x02070101 cfg_ver=x01040000 batt=empty:0mV:NoCharger board=LC14_B prod=LC14_B pwr_cnt=0 rst_cnt=2 [000004.582 INF] uwb: ch9 prf64 plen128 pac8 txcode11 rxcode11 baud6800 phrmodeext phrratestd sfdtypeieee4a sfdto129 stsmodeoff stslen64 pdoamodem0 [000004.583 INF] uwb: tx_pwr=x34/xAEAEAEAE sts:shr:phr:data=20.3:20.3:20.3:20.3[dB] cpl=FCC/ETSI pgcnt=238 temp=25 [000004.584 INF] uwb: lna=1 pa=0 rf1=1 rf2=0 xtaltrim=39 tx_delay=16421 rx_delay=16421 [000004.586 INF] uwb: panid=x1234(sys_cfg=x1234) panid_mask=xFFFF addr=xDECA618912204500 [000004.595 INF] mode: tn (act,twr,np,le) [000004.630 INF] uwbmac: connected prof=2 (manual) [000004.630 INF] uwbmac: bh disconnected [000004.631 INF] cfg: sync=0 fwup=1 ble=1 leds=1 le=1 lp=0 uab=1 stat_det=1 (sens=2) mode=0 upd_rate_norm=1 upd_rate_stat=1 label=ID4500 [000004.631 INF] enc: off [000004.632 INF] ble: addr=D2:A9:B7:4C:BD:24 leaps>
Optional: To see a list of anchors in range and connected to the device, use the
lacommand.
For example on an anchor 1:
leaps> la
[000681.346 INF] AN: cnt=4 seq=x03
[000681.347 INF]     0) id=468D seat=0 clk_lvl=0 seens=0 rssi=-127 cl=0000000F nbr=0000000F pos=0.00:7.50:1.55 rate=0
[000681.347 INF]     1) id=4F2E seat=3 clk_lvl=1 seens=36 rssi=-55 cl=0000000F nbr=00000000 pos=0.00:4.00:1.55 rate=99
[000681.348 INF]     2) id=4F9E seat=1 clk_lvl=1 seens=5 rssi=-62 cl=0000000F nbr=00000000 pos=5.50:7.50:1.55 rate=99
[000681.349 INF]     3) id=5886 seat=2 clk_lvl=1 seens=163 rssi=-68 cl=0000000F nbr=00000000 pos=5.50:4.00:1.50 rate=99
[000681.350 INF]
Once all configurations are complete, check the position of the Tag using the
lescommand.
For example on a Tag, the position will update and display real-time:
$ leaps> les
leaps> POS[2.76,3.94,0.70,170] 5886[5.50,4.00,1.50,100]=2.87 4F2E[0.00,4.00,1.55,100]=2.88 4F9E[5.50,7.50,1.55,100]=4.56 468D[0.00,7.50,1.55,100]=4.60
POS[2.76,3.93,0.70,170] 5886[5.50,4.00,1.50,100]=2.87 4F2E[0.00,4.00,1.55,100]=2.88 4F9E[5.50,7.50,1.55,100]=4.58 468D[0.00,7.50,1.55,100]=4.60
POS[2.75,3.94,0.67,170] 5886[5.50,4.00,1.50,100]=2.87 4F2E[0.00,4.00,1.55,100]=2.89 4F9E[5.50,7.50,1.55,100]=4.58 468D[0.00,7.50,1.55,100]=4.59
POS[2.76,3.94,0.63,170] 5886[5.50,4.00,1.50,100]=2.88 4F2E[0.00,4.00,1.55,100]=2.91 4F9E[5.50,7.50,1.55,100]=4.58 468D[0.00,7.50,1.55,100]=4.60
POS[2.76,3.92,0.65,170] 5886[5.50,4.00,1.50,100]=2.87 4F2E[0.00,4.00,1.55,100]=2.91 4F9E[5.50,7.50,1.55,100]=4.59 468D[0.00,7.50,1.55,100]=4.62
POS[2.77,3.93,0.65,170] 5886[5.50,4.00,1.50,100]=2.87 4F2E[0.00,4.00,1.55,100]=2.90 4F9E[5.50,7.50,1.55,100]=4.57 468D[0.00,7.50,1.55,100]=4.62
POS[2.75,3.93,0.71,170] 5886[5.50,4.00,1.50,100]=2.87 4F2E[0.00,4.00,1.55,100]=2.87 4F9E[5.50,7.50,1.55,100]=4.57 468D[0.00,7.50,1.55,100]=4.60
...
Besides, we can use the LEAPS Manager, to visualization of the devices and their positions.
Now the system has been successfully set up and configured the system. Enjoy using it!
Setting Up LEAPS Raspberry Pi
Install all Raspberry Pis using the LEAPS-RPI-IMAGE.
Each corresponding anchor connects to a Raspberry Pi, so at least 4 Raspberry Pis are required.
The image includes the setup and configuration for the
LEAPS Gateway,LEAPS Server,LEAPS Center, andMosquitto MQTT Broker.
Connecting Raspberry Pis
Connect all Raspberry Pis to the Router to ensure they are on the same LAN.
LEAPS Server Setup
Choose any Raspberry Pi to run the
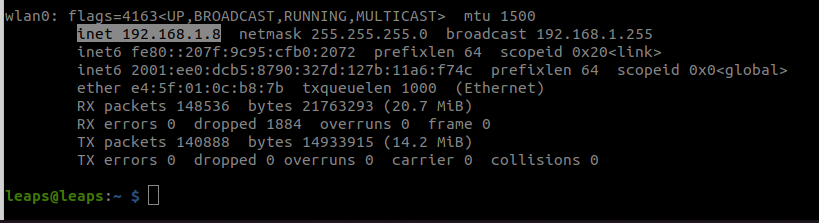
LEAPS Serverand check its IP address. To obtain the IP address, use the ifconfig command.
For example:
Updating Configuration
Using the IP address of the chosen Raspberry Pi, update the
leaps_server_hostconfiguration in/home/leaps/leaps-docker-linux/leaps-gateway-hub/data/leaps-gateway.conffor all LEAPS Gateways on all Raspberry Pis.
For example:
# LEAPS Server host
leaps_server_host = 192.168.1.8
Save the configuration and restart the
LEAPS Gatewaywith the following command:
sudo docker restart leaps_gateway
Then, restart the
LEAPS Serverwith the following command:
sudo docker restart leaps_server
Monitoring the System
Once the gateway is ready, monitor the system status using:
For example:
mosquitto_sub -h 192.168.1.8 -p 1883 -t '#' -v
Configuring LEAPS Center
For example: Open a web browser and navigate to:
192.168.1.8/2
This can be accessed directly on the Raspberry Pi or on a PC connected to the LEAPS-AP network broadcasted by the Raspberry Pi with the password
Leaps1234.If on a LAN network, you can also use another computer’s web browser to access the Raspberry Pi’s IP address.
Network Configuration
In the LEAPS Center, configure the network settings to match the network ID of the gateway board you have connected.
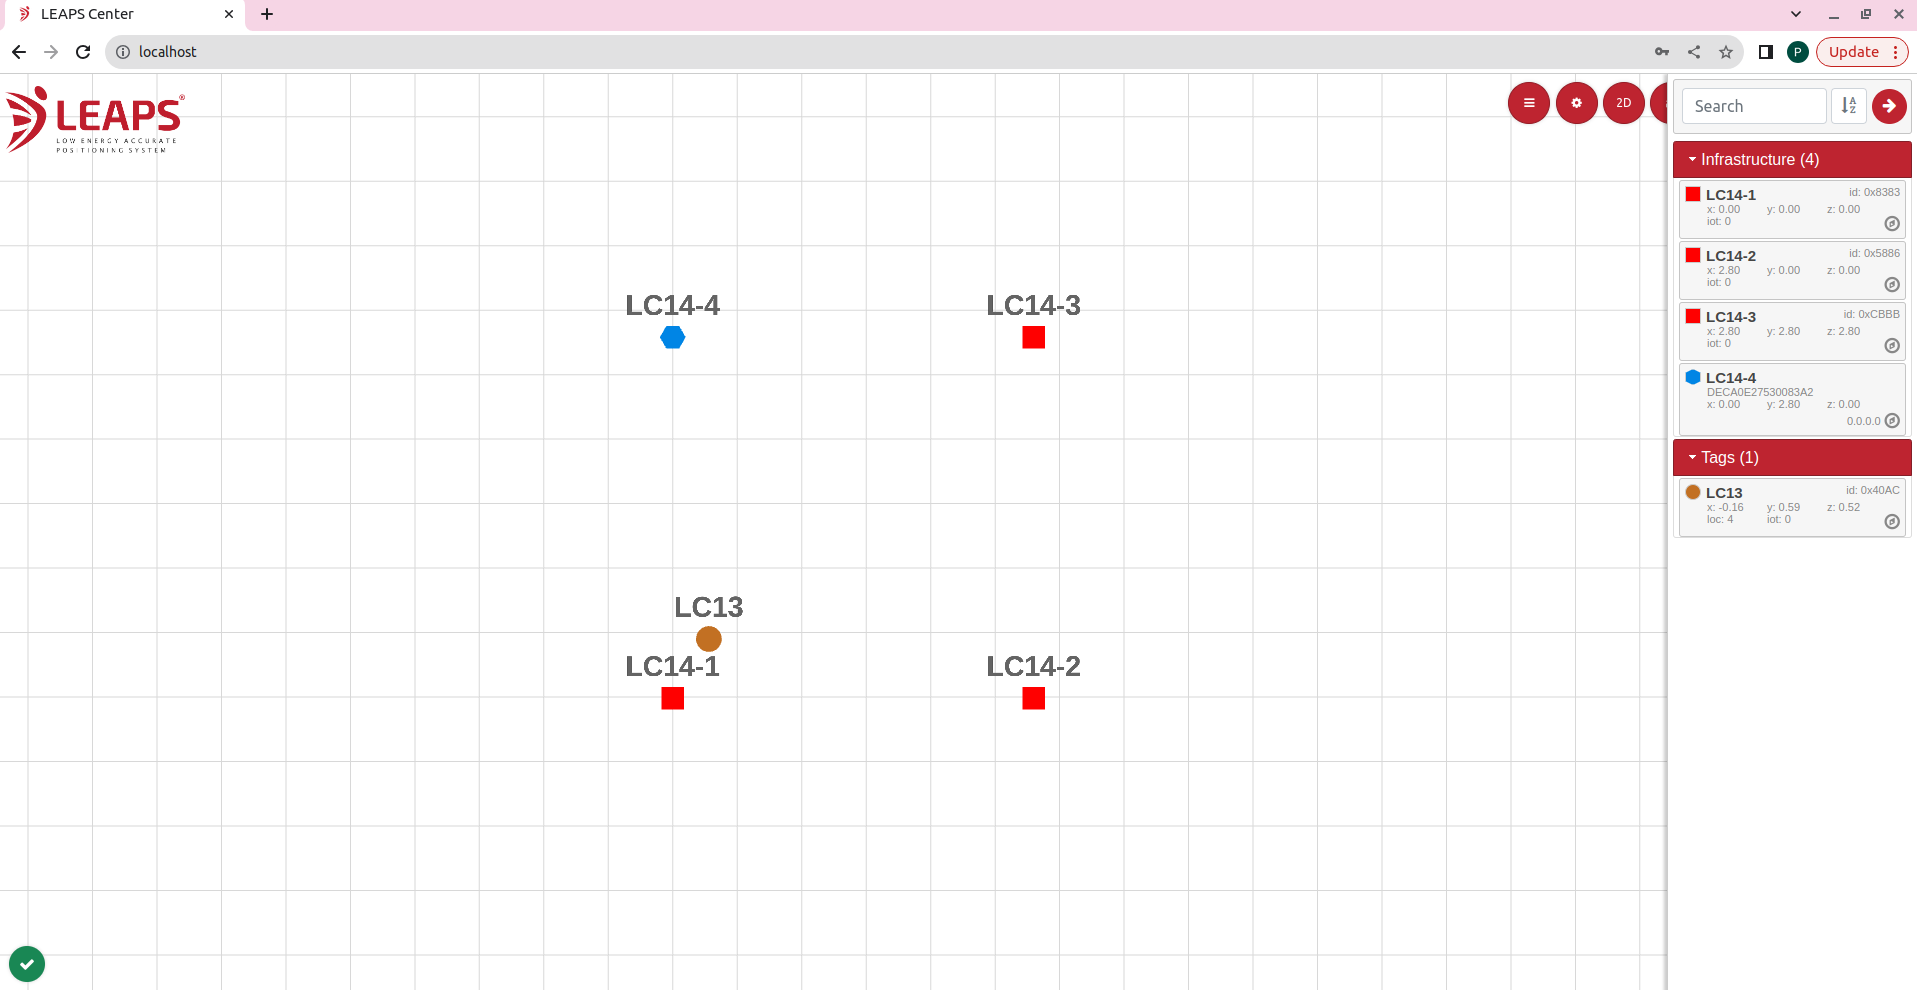
Now the system has been successfully set up and configured the system. Enjoy using it!
Here are some tips for fixing some issues related to the installation process:
Please check the version. We recommend using the latest official version found under Releases.
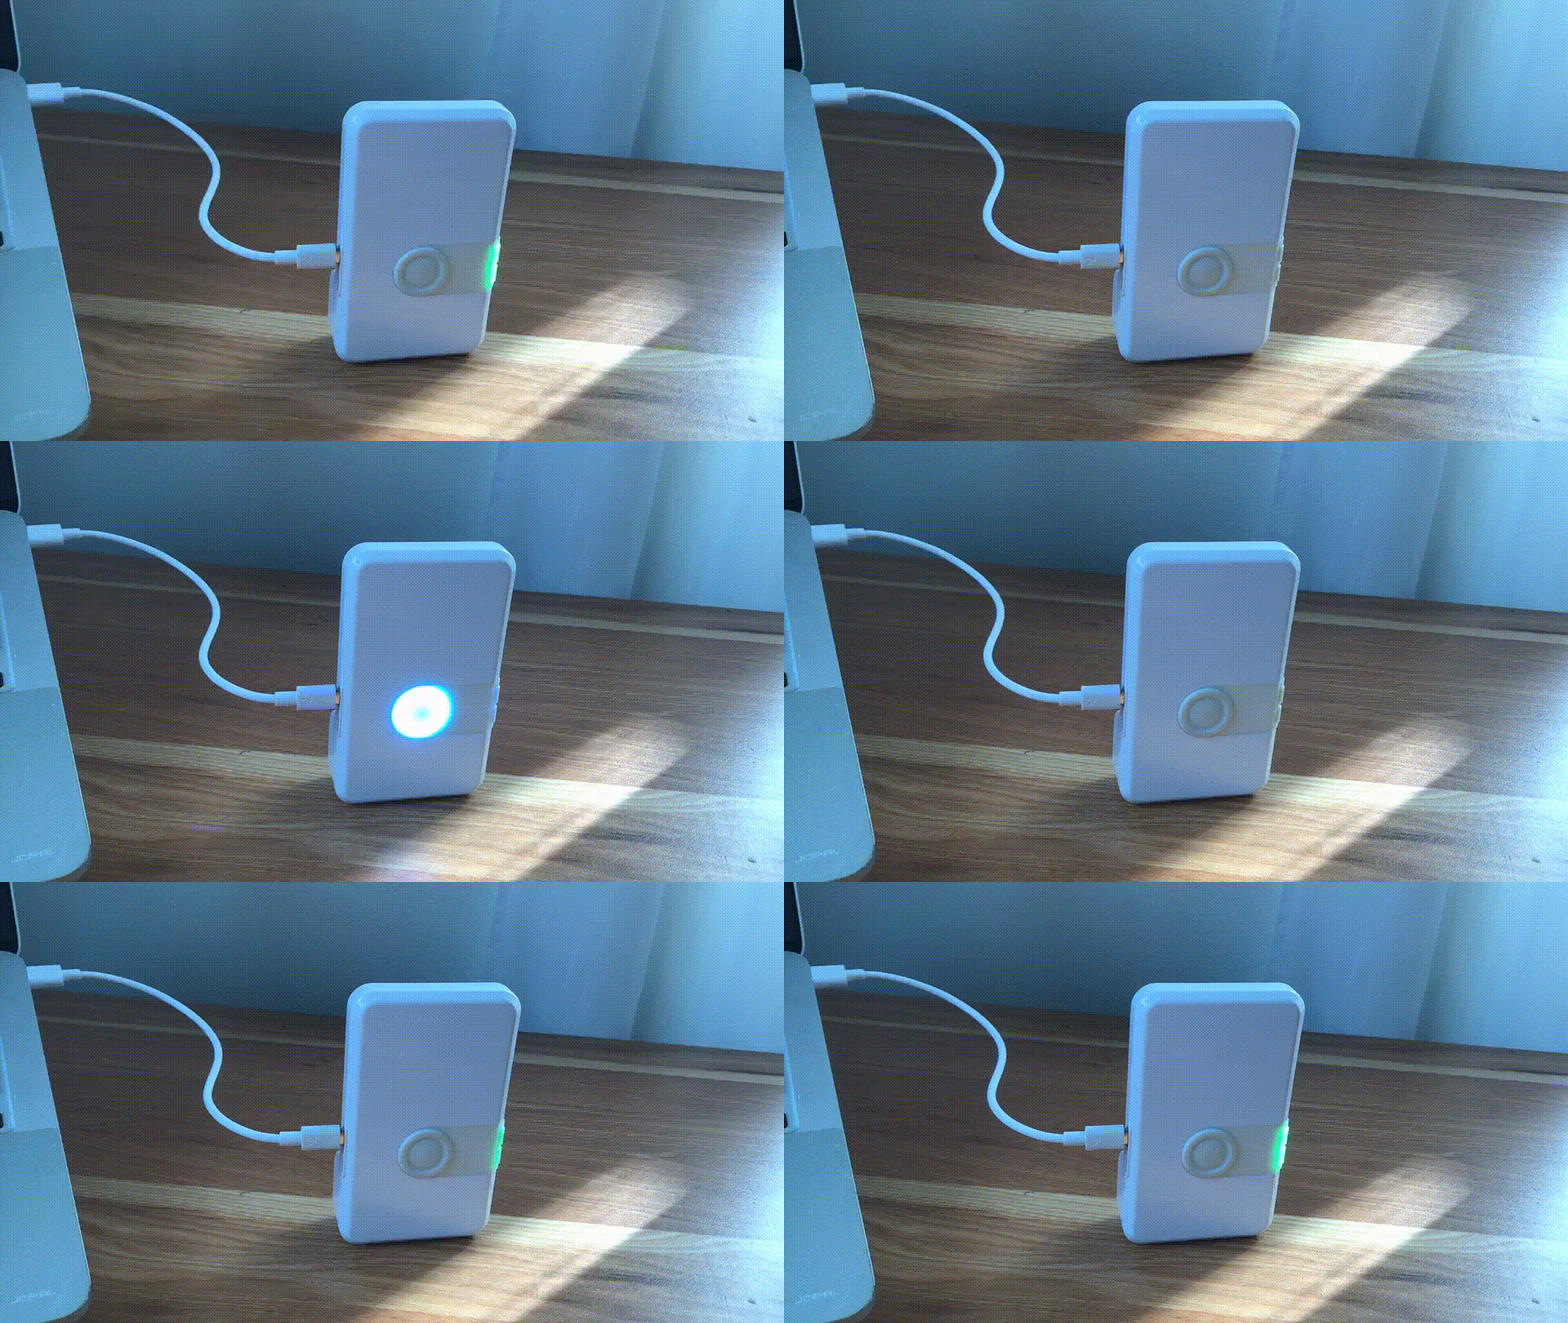
When Bluetooth and the LEDs are both disabled, users may erroneously perceive the board as non-functional. In this scenario, the quickest solution is to perform a factory reset (frst) command via the shell.
Use the Reset devices to default feature in Demo Selector on the LEAPS Manager when you don’t know the current state of the devices. Refer to the following GIF Image.
Quick Start with LEAPS Center
Refer to the software infrastructure to further explore the power of this demo. Our support includes LEAPS Docker, LEAPS VMWare and, LEAPS Raspberry Pi.
Note
For any comments or questions about our products, we encourage you to visit our LEAPS Forum.
For detail of known limitation and issue list, please refer section Releases.