TWR RTLS and Data Telemetry Demo
Prepare for setup
LEAPS Manager application installed on an Android device.
At least five LC14 devices.
Batteries or USB-C cables for powering the devices.
Recommended: clamp or tripod with a camera mount for attachment of the Anchor devices.
Recommended: A Raspberry Pi 3B or newer version or a PC, the data server, and the web application installation.
Optional: Putty, Teraterm, minicom, or your favorite terminal application installed on your computer.
Setup time: less than 5 minutes
Overview
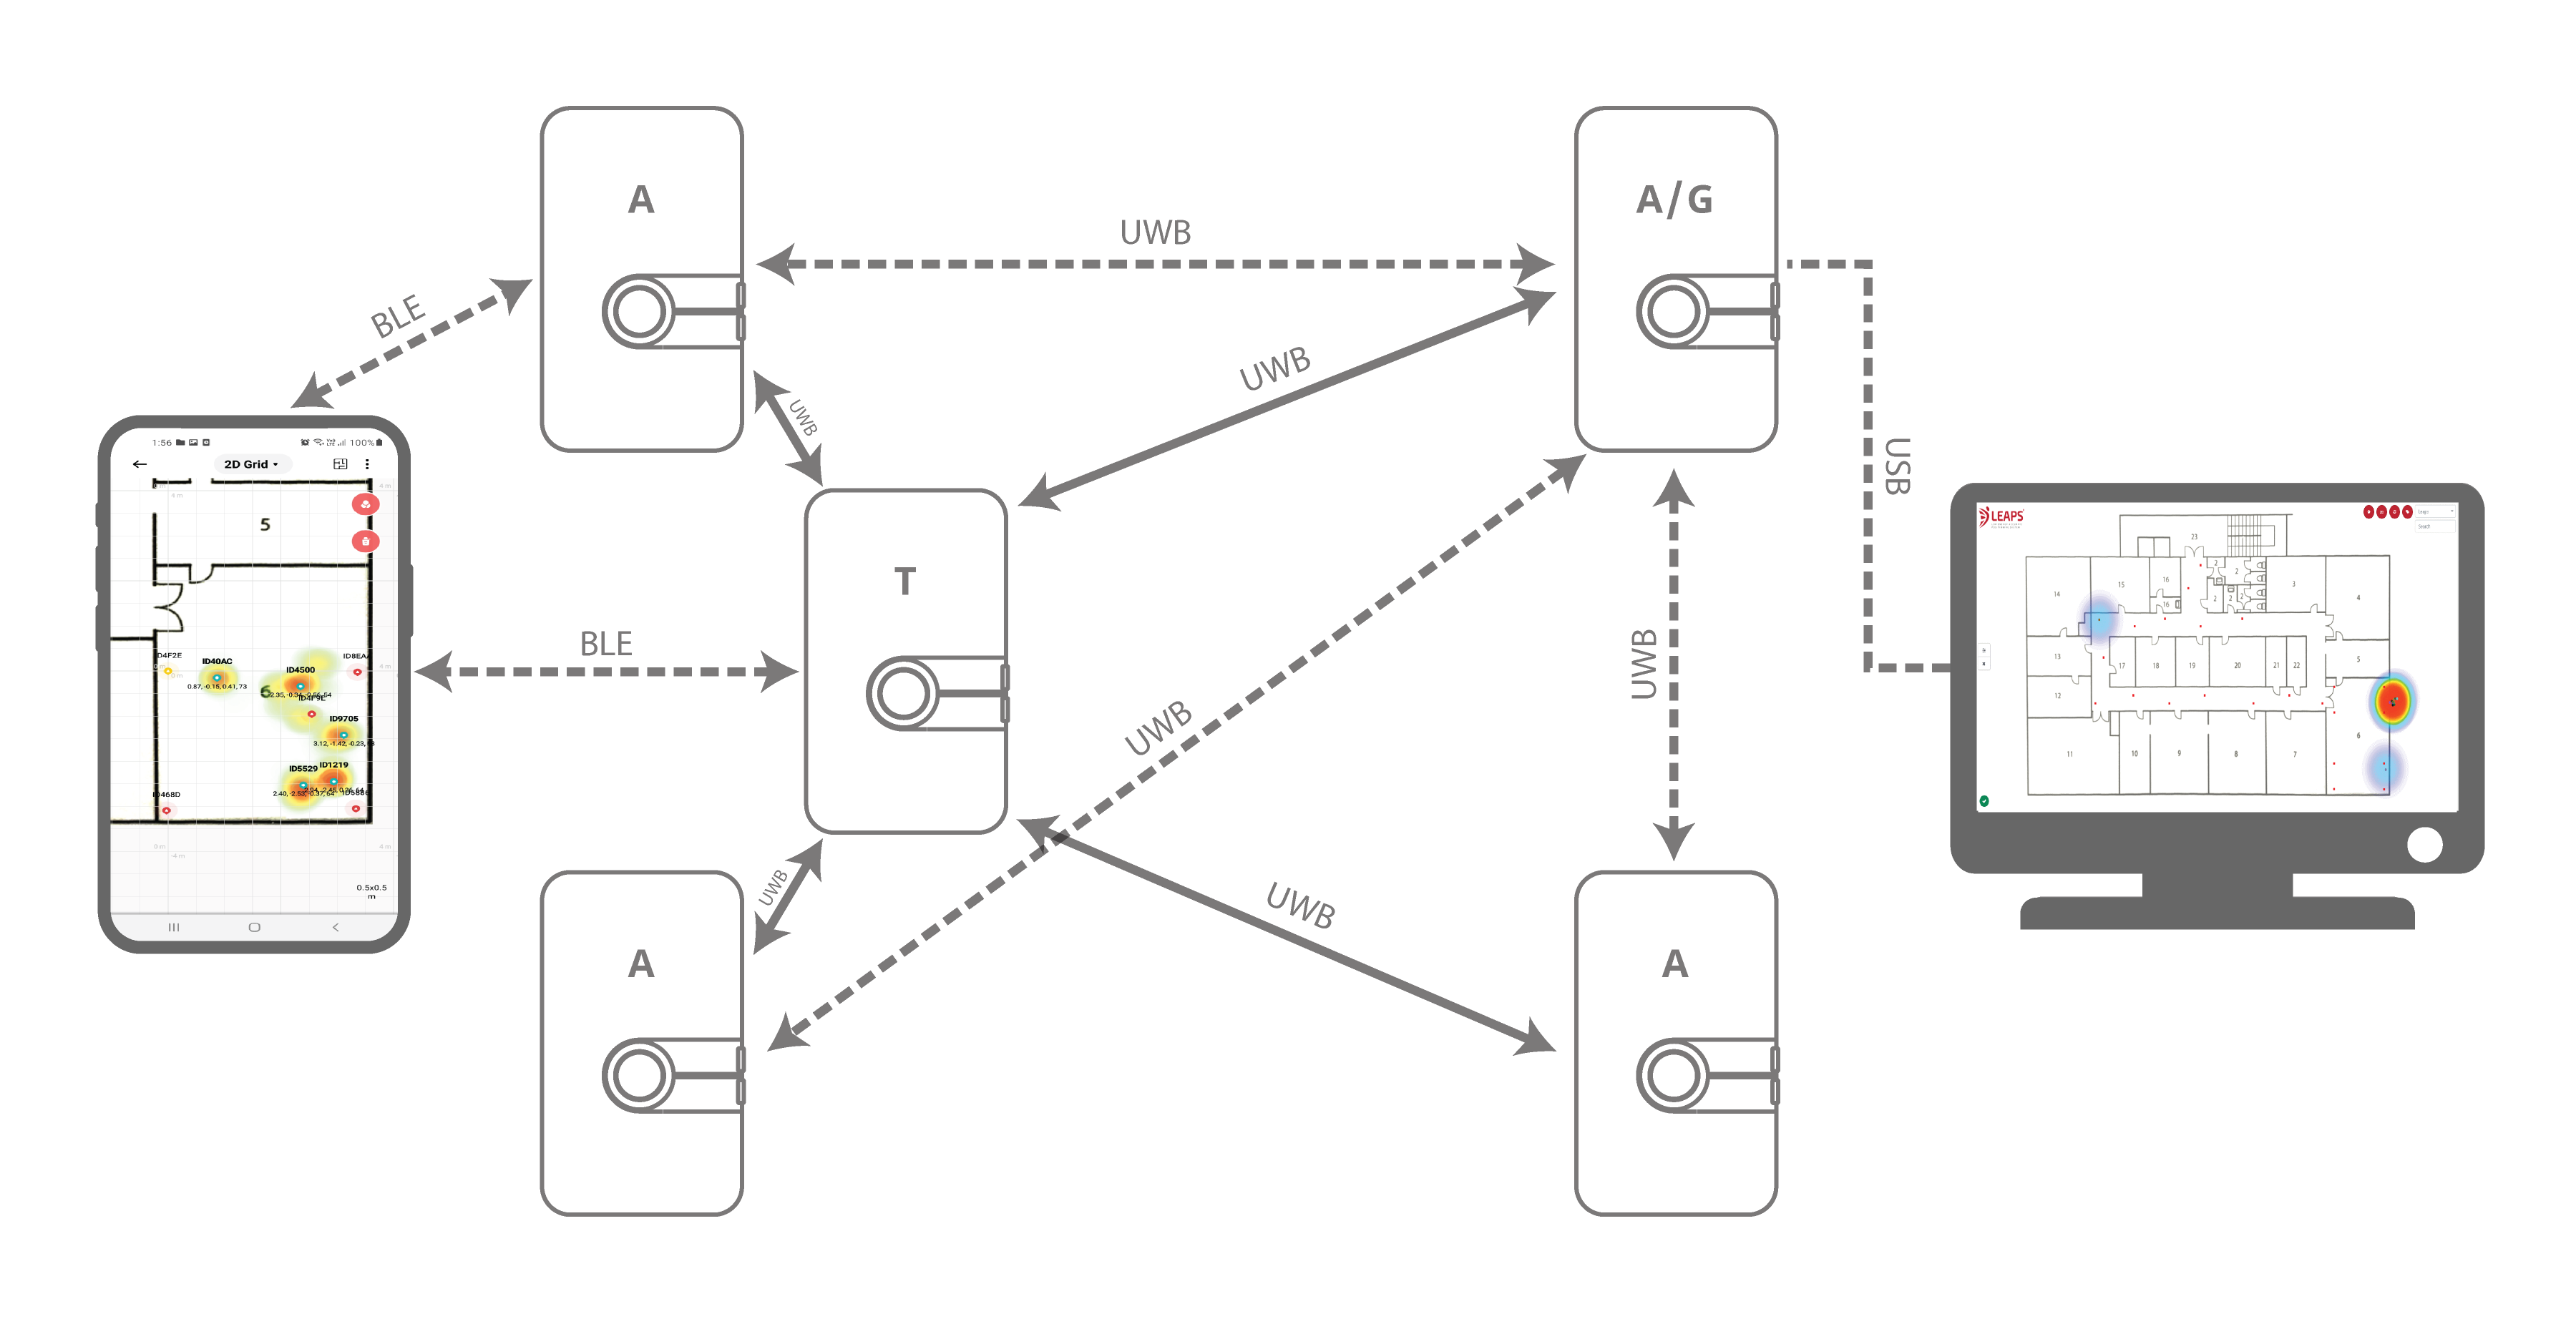
This setup demonstrates real-time navigation, tracking, and both ways of data telemetry using Two Way Ranging (TWR) technology. It demonstrates real-time navigation of an unlimited amount of Tags using DL-TDoA technology.
Typical applications: Indoor navigation, asset tracking, and real-time data telemetry supporting uplink and downlink.
Setup instructions
Power ON the devices.
The statically mounted devices will function as Anchors, providing location information to the Tags.
The moving devices will function as Tags configured in Two-Way Ranging measurement mode.
Configure using the Demo Selector in the LEAPS Manager:
Open the LEAPS Manager and select the Demo Selector from the left side menu or the main page.
Select the TWR RTLS And Data Telemetry.
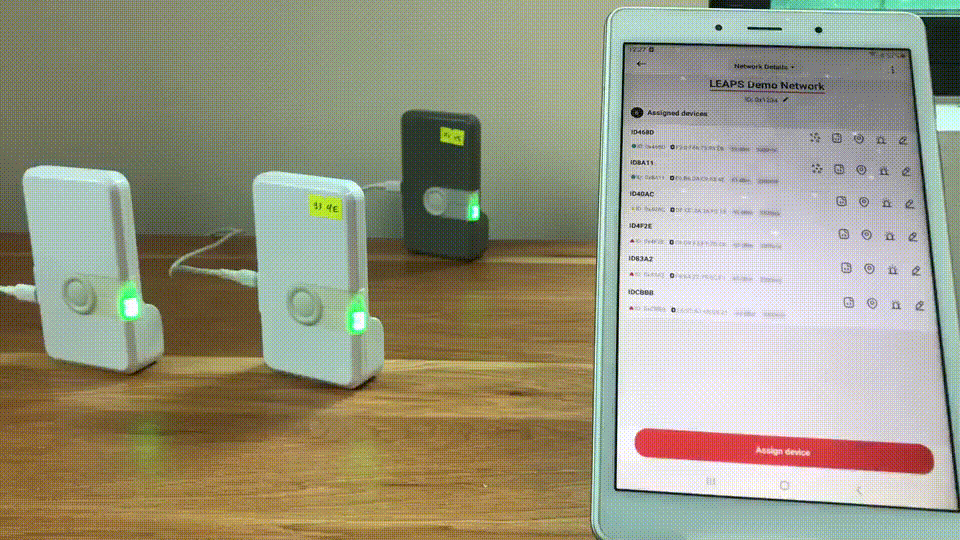
A list of discovered devices via Bluetooth will appear on the list. Swipe down to update the list if needed.
Select the devices that will be used for the demo. The anchors and tags on the top side indicate the amount of devices needed for the demo.
Press the SAVE to configure the device(s) into the LEAPS RTLS mode, networking profile 2 (supports TWR+UL / DL-Data, DL-TDoA).
A pop-up window Anchor Configuration will appear to offer the options to configure the Anchor’s positions. select the Manual, Auto positioning or Keep current position depending on the need, then Press the OK.
Please check visually that the RED LED blinks when the device starts.

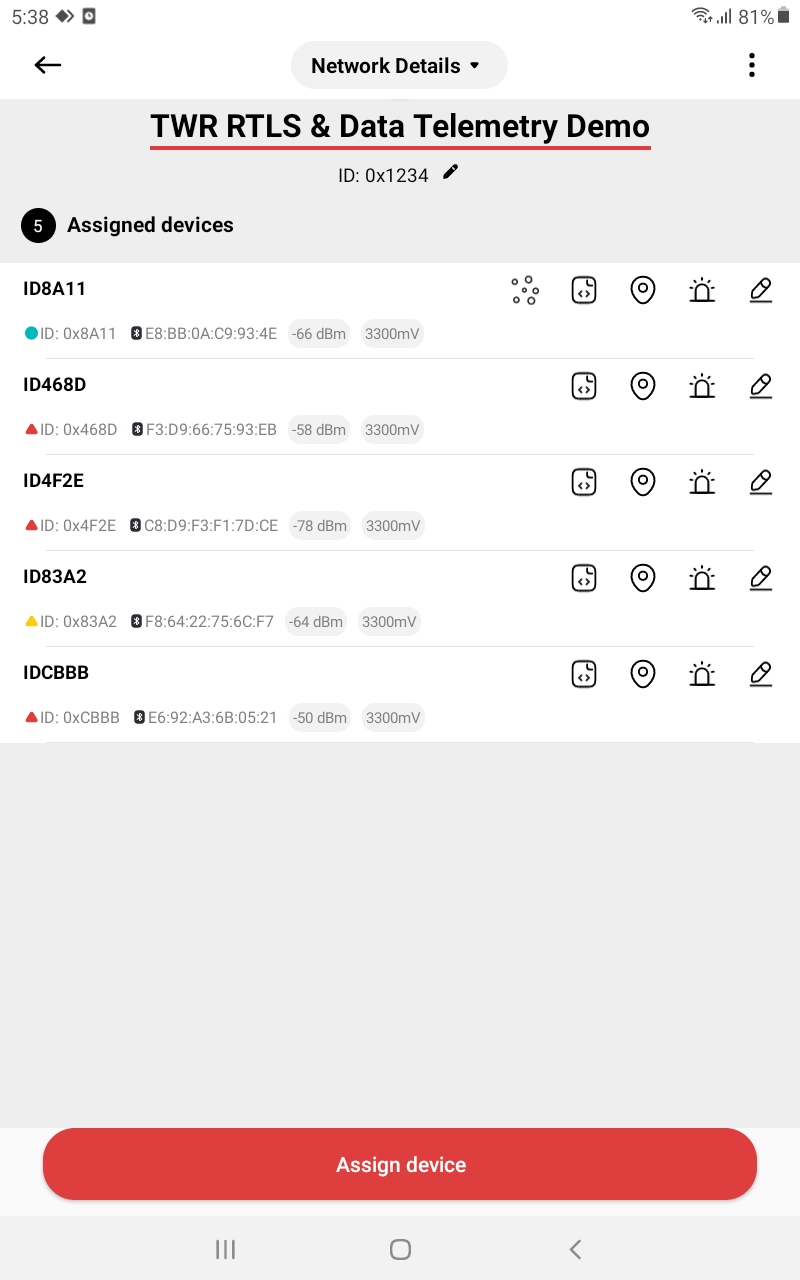
When the devices are configured successfully, the LEAPS Demo Network window will appear with a list of configured nodes.
Recommended: Use the alarm feature to identify the device, and move it to the correct physical location.
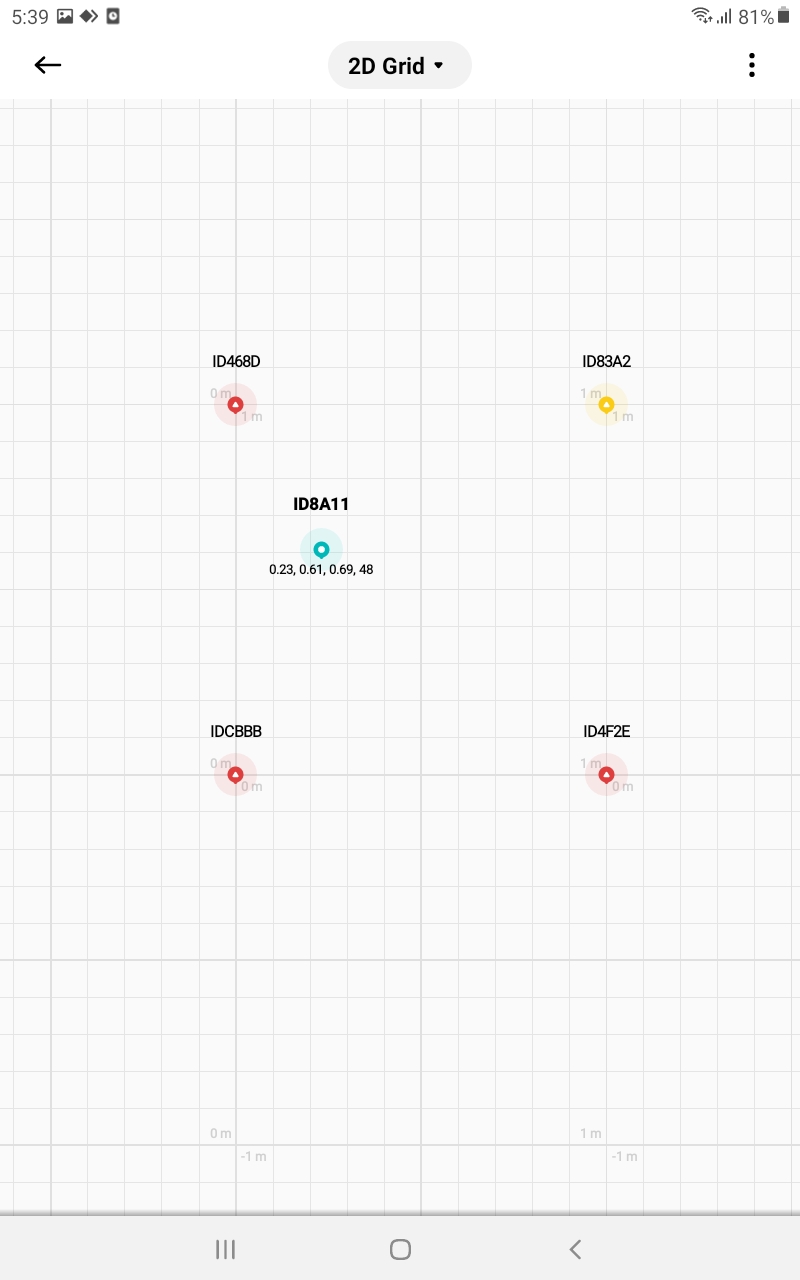
Open the Grid, located at the top drop-down menu, is for visualization of the devices and their positions.
(In GIF Images, anchor points are configured, and placed 1 meter apart)
Please refer to the LEAPS Manager for more details on how to use the application to configure and visualize the nodes and network.
Advanced setup
Get ready for the advanced setup! We’ll tap into the terminal’s power to help you configure your device like a pro. Just follow these steps and you’ll be all set.
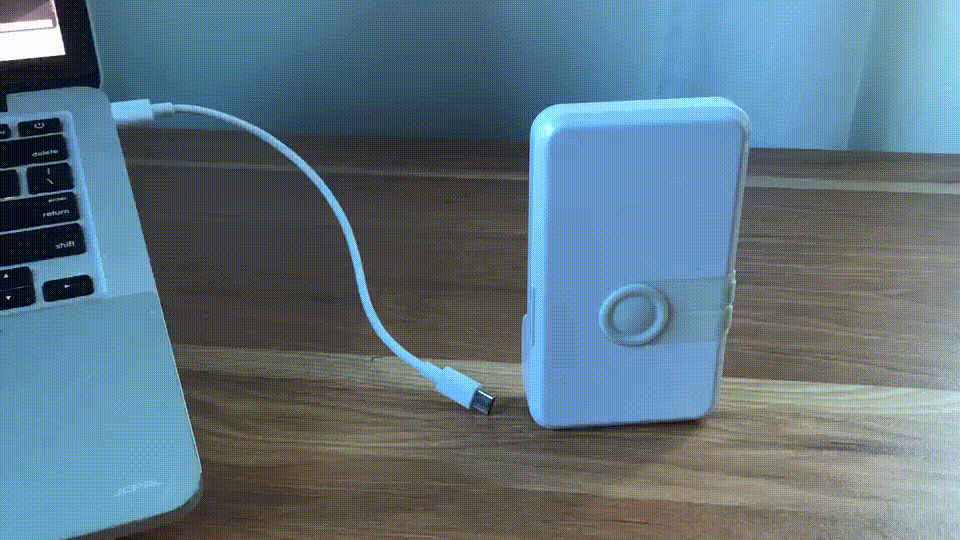
Use a USB-C Data Cable to connect the USB-C Data Port 1 or USB-C Data Port 2 of devices to your PC.
Connect to a serial port using your desired terminal application, such as Putty, Teraterm, Minicom, or your favorite terminal application. We need to configure the baud rate to 115200.
For example use Minicom, on Ubuntu (Linux):
$ minicom -b 115200 -D /dev/ttyACM0
Press Double enter on the shell console to access the command line control system.
For example open /dev/ttyACM0 and press double enter, on Ubuntu (Linux):
$ minicom -b 115200 -D /dev/ttyACM0

  Welcome to minicom 2.7.1

  OPTIONS: I18n
  Compiled on Dec 23 2019, 02:06:26.
  Port /dev/ttyACM0, 16:02:57

  Press CTRL-A Z for help on special keys


  Low Energy Accurate Positioning System

  FOR DEMO PURPOSE ONLY, NOT FOR SALE.

  Copyright :  2016-2023 LEAPS
  License   :  Please visit https://www.leapslabs.com/leaps-rtls-license
  Compiled  :  Jan  6 2024 09:38:07 (v0.15.0-ab84fb)

  Help      :  ? or help

  leaps>
Configure for each device, do the following steps:
Reset devices to default, run the frst command. (optional)
$ leaps> frst
frst ok
(Monitor and wait for the device to reset successfully. Then press double enter to access the command line control system.)
Use the command nps 2 to configure profile 2 (supports TWR+UL / DL-Data, DL-TDoA) for each device.
$ leaps> nps 2
nps: ok
Use the nis command to configure all devices in a network.
$ leaps> nis 0x1234
nis: ok
Then, it is neccessary to reset the device to update the configuration. Use the reset command to reset the device.
$ leaps> reset
reset ok
Note
In this example, we will configure an anchor with enable initiator, 3 anchors, and a tag.
Configure the mode for each anchor and tag.
To configure an anchor with enable initiator, use the command nmi to configure a device.
$ leaps> nmiThen, the device will reset, and to access the command line control system again, press double enter.
To configure 3 anchors, use the command nma to configure 3 devices to anchor mode, but do not enable initiator.
$ leaps> nmaThen, the device will reset, and to access the command line control system again, press double enter.
To configure a tag, use the command nmt to configure a device to tag mode
$ leaps> nmtThen, the device will reset, and to access the command line control system again, press double enter.
Configure the actual position for each anchor.
To get the position use pg command and to set the position use ps command for each anchor.
In this example, we will configure 4 anchors are placed 1 meter apart and arranged in a square shape:
leaps> ps 1000 1000 0 ps: ok leaps> pg pg: x:1000 y:1000 z:0 qf:100 leaps>leaps> ps 0 0 0 ps: ok leaps> pg pg: x:0 y:0 z:0 qf:100 leaps>leaps> ps 1000 0 0 ps: ok leaps> pg pg: x:1000 y:0 z:0 qf:100 leaps>leaps> ps 0 1000 0 ps: ok leaps> pg pg: x:0 y:1000 z:0 qf:100 leaps>
After successfully configuring the anchors, move it to the correct physical location 1 meter apart.
Configuration for each tag allows the use of TWR technology for measurement.
To configure, use the tcs mode 0 command for a tag.
$ leaps> tcs mode 0
tcs: ok
Then, it is neccessary to reset the device to update the configuration. Use the reset command to reset the device.
$ leaps> reset
reset ok
By default normal update rate is 5x and stationary update rate is 250x.. To increase speed, use urs command.
For example, configure normal update rate to 1x and, stationary update rate is 1x. Run the following command:
$ leaps> urs 1 1
urs: ok
In steps 5, 7 and, 8 can use the si command to verify whether the mode, profile, and network configurations are correct. (optional)
For example on 4 anchors and a tag:
mode: ani
panid=x1234
prof=2leaps> nps 2 nps: ok leaps> nis 0x1234 nis: ok leaps> nmi Low Energy Accurate Positioning System FOR DEMO PURPOSE ONLY, NOT FOR SALE. Copyright : 2016-2023 LEAPS License : Please visit https://www.leapslabs.com/leaps-rtls-license Compiled : Jan 6 2024 09:38:07 (v0.15.0-ab84fb) Help : ? or help leaps>si [000011.796 INF] release: LEAPS RTLS v0.15.0-ab84fb [000011.796 INF] sys: main main_ver=x02000001 cfg_ver=x01040000 batt=none board=LC14_B [000011.796 INF] uwb: ch9 prf64 plen128 pac8 txcode9 rxcode9 baud6800 phrmodeext phrratestd sfdtypeieee4a sfdto129 stsmodeoff stslen64 pdoamodem0 [000011.797 INF] uwb: tx_pwr=x34/xFAFAFAFA sts:shr:phr:data=27.7:27.7:27.7:27.7[dB] cpl=FCC/ETSI pgcnt=234 temp=25 [000011.797 INF] uwb: lna=1 pa=0 rf1=1 rf2=0 xtaltrim=27 tx_delay=16438 rx_delay=16438 [000011.798 INF] uwb: panid=x1234 addr=xDECA0E27530083A2 [000011.801 INF] mode: ani (act,real) [000011.813 INF] uwbmac: connected prof=2 (manual) [000011.813 INF] uwbmac: bh disconnected [000011.813 INF] cfg: sync=0 fwup=1 ble=1 leds=1 init=1 uab=1 bh=auto bh_stat=off cr=0 upd_rate_stat=30 label=ID83A2 [000011.845 INF] enc: off [000011.845 INF] ble: addr=F8:64:22:75:6C:F7 leaps>
mode: an
panid=x1234
prof=2leaps> nps 2 nps: ok leaps> nis 0x1234 nis: ok leaps> nma Low Energy Accurate Positioning System FOR DEMO PURPOSE ONLY, NOT FOR SALE. Copyright : 2016-2023 LEAPS License : Please visit https://www.leapslabs.com/leaps-rtls-license Compiled : Jan 6 2024 09:38:07 (v0.15.0-ab84fb) Help : ? or help leaps>si [000014.484 INF] release: LEAPS RTLS v0.15.0-ab84fb [000014.484 INF] sys: main main_ver=x02000001 cfg_ver=x01040000 batt=none board=LC14_B [000014.485 INF] uwb: ch9 prf64 plen128 pac8 txcode9 rxcode9 baud6800 phrmodeext phrratestd sfdtypeieee4a sfdto129 stsmodeoff stslen64 pdoamodem0 [000014.485 INF] uwb: tx_pwr=x34/xE6E6E6E6 sts:shr:phr:data=25.8:25.8:25.8:25.8[dB] cpl=FCC/ETSI pgcnt=233 temp=25 [000014.486 INF] uwb: lna=1 pa=0 rf1=1 rf2=0 xtaltrim=32 tx_delay=16438 rx_delay=16438 [000014.486 INF] uwb: panid=x1234 addr=xDECA9DD29FD0CBBB [000014.490 INF] mode: an (act,-) [000014.502 INF] uwbmac: connected prof=2 (manual) [000014.502 INF] uwbmac: bh disconnected [000014.502 INF] cfg: sync=0 fwup=1 ble=1 leds=1 init=0 uab=1 bh=auto bh_stat=off cr=0 upd_rate_stat=30 label=IDCBBB [000014.532 INF] enc: off [000014.532 INF] ble: addr=E6:92:A3:6B:05:21 leaps>
mode: an
panid=x1234
prof=2leaps> nps 2 nps: ok leaps> nis 0x1234 nis: ok leaps> nma Low Energy Accurate Positioning System FOR DEMO PURPOSE ONLY, NOT FOR SALE. Copyright : 2016-2023 LEAPS License : Please visit https://www.leapslabs.com/leaps-rtls-license Compiled : Jan 6 2024 09:38:07 (v0.15.0-ab84fb) Help : ? or help leaps> si [000007.647 INF] release: LEAPS RTLS v0.15.0-ab84fb [000007.647 INF] sys: main main_ver=x02000001 cfg_ver=x01040000 batt=42%:1785mV:discharging board=LC14_B [000007.648 INF] uwb: ch9 prf64 plen128 pac8 txcode9 rxcode9 baud6800 phrmodeext phrratestd sfdtypeieee4a sfdto129 stsmodeoff stslen64 pdoamodem0 [000007.648 INF] uwb: tx_pwr=x34/xEEEEEEEE sts:shr:phr:data=26.5:26.5:26.5:26.5[dB] cpl=FCC/ETSI pgcnt=245 temp=25 [000007.649 INF] uwb: lna=1 pa=0 rf1=1 rf2=0 xtaltrim=32 tx_delay=16436 rx_delay=16436 [000007.649 INF] uwb: panid=x1234 addr=xDECA7A20DFE04F2E [000007.667 INF] mode: an (act,-) [000007.668 INF] uwbmac: connected prof=2 (manual) [000007.668 INF] uwbmac: bh disconnected [000007.668 INF] cfg: sync=0 fwup=1 ble=1 leds=1 init=0 uab=1 bh=auto bh_stat=off cr=0 upd_rate_stat=30 label=ID4F2E [000007.692 INF] enc: off [000007.692 INF] ble: addr=C8:D9:F3:F1:7D:CE leaps>
mode: an
panid=x1234
prof=2leaps> nps 2 nps: ok leaps> nis 0x1234 nis: ok leaps> nma Low Energy Accurate Positioning System FOR DEMO PURPOSE ONLY, NOT FOR SALE. Copyright : 2016-2023 LEAPS License : Please visit https://www.leapslabs.com/leaps-rtls-license Compiled : Jan 6 2024 09:38:07 (v0.15.0-ab84fb) Help : ? or help leaps> si [000027.150 INF] release: LEAPS RTLS v0.15.0-ab84fb [000027.150 INF] sys: main main_ver=x02000001 cfg_ver=x01040000 batt=none board=LC14_B [000027.151 INF] uwb: ch9 prf64 plen128 pac8 txcode9 rxcode9 baud6800 phrmodeext phrratestd sfdtypeieee4a sfdto129 stsmodeoff stslen64 pdoamodem0 [000027.151 INF] uwb: tx_pwr=x34/xC6C6C6C6 sts:shr:phr:data=22.6:22.6:22.6:22.6[dB] cpl=FCC/ETSI pgcnt=236 temp=25 [000027.152 INF] uwb: lna=1 pa=0 rf1=1 rf2=0 xtaltrim=32 tx_delay=16431 rx_delay=16431 [000027.152 INF] uwb: panid=x1234 addr=xDECAED5BC8B1468D [000027.155 INF] mode: an (act,-) [000027.170 INF] uwbmac: connected prof=2 (manual) [000027.170 INF] uwbmac: bh disconnected [000027.170 INF] cfg: sync=0 fwup=1 ble=1 leds=1 init=0 uab=1 bh=auto bh_stat=off cr=0 upd_rate_stat=30 label=ID468D [000027.199 INF] enc: off [000027.199 INF] ble: addr=F3:D9:66:75:93:EB leaps>
By default configuration, the device will be in TWR mode. If it was in another mode, we would use the tcs mode 0 command.
mode: tn
panid=x1234
prof=2leaps> nps 2 nps: ok leaps> nis 0x1234 nis: ok leaps> nmt Low Energy Accurate Positioning System FOR DEMO PURPOSE ONLY, NOT FOR SALE. Copyright : 2016-2023 LEAPS License : Please visit https://www.leapslabs.com/leaps-rtls-license Compiled : Jan 6 2024 09:38:07 (v0.15.0-ab84fb) Help : ? or help leaps> urs 1 1 urs: ok leaps> si [000010.225 INF] release: LEAPS RTLS v0.15.0-ab84fb [000010.225 INF] sys: main main_ver=x02000001 cfg_ver=x01040000 batt=none board=LC14_B [000010.226 INF] uwb: ch9 prf64 plen128 pac8 txcode9 rxcode9 baud6800 phrmodeext phrratestd sfdtypeieee4a sfdto129 stsmodeoff stslen64 pdoamodem0 [000010.226 INF] uwb: tx_pwr=x34/xB6B6B6B6 sts:shr:phr:data=21.1:21.1:21.1:21.1[dB] cpl=FCC/ETSI pgcnt=231 temp=25 [000010.226 INF] uwb: lna=1 pa=0 rf1=1 rf2=0 xtaltrim=43 tx_delay=16434 rx_delay=16434 [000010.227 INF] uwb: panid=x1234 addr=xDECA80CB2C558A11 [000010.230 INF] mode: tn (act,twr,np,le) [000010.246 INF] uwbmac: connected prof=2 (manual) [000010.246 INF] uwbmac: bh disconnected [000010.247 INF] cfg: sync=0 fwup=1 ble=1 leds=1 le=1 lp=0 uab=1 stat_det=1 (sens=2) mode=0 upd_rate_norm=1 upd_rate_stat=1 label=ID8A11 [000010.274 INF] enc: off [000010.274 INF] ble: addr=E8:BB:0A:C9:93:4E leaps>
To see a list of anchors in range and connected to the device itself, use the la command. (optional)
For example on an anchor 1 (enable initiator):
leaps> la
[000025.454 INF] AN: cnt=4 seq=x03
[000025.454 INF]     0) id=83A2 seat=0 clk_lvl=0 seens=0 rssi=-127 cl=0000000F nbr=0000000F pos=1.00:1.00:0.00
[000025.454 INF]     1) id=468D seat=2 clk_lvl=1 seens=81 rssi=-55 cl=0000000F nbr=00000000 pos=0.00:1.00:0.00
[000025.455 INF]     2) id=4F2E seat=3 clk_lvl=1 seens=67 rssi=-55 cl=0000000F nbr=00000000 pos=1.00:0.00:0.00
[000025.455 INF]     3) id=CBBB seat=1 clk_lvl=1 seens=111 rssi=-55 cl=0000000F nbr=00000000 pos=0.00:0.00:0.00
[000025.456 INF]
After completing all configuration. Open the shell console for the Tag and view the Tag position using the les command.
For example on a Tag, the position will update and display real-time:
$ leaps> les
  leaps> POS[0.34,0.18,0.70,50] CBBB[0.00,0.00,0.00,100]=0.79 4F2E[1.00,0.00,0.00,100]=0.98 468D[0.00,1.00,0.00,100]=1.12 83A2[1.00,1.00,0.00,100]=0.87
  POS[0.34,0.19,0.71,50] CBBB[0.00,0.00,0.00,100]=0.81 4F2E[1.00,0.00,0.00,100]=0.99 468D[0.00,1.00,0.00,100]=1.13 83A2[1.00,1.00,0.00,100]=0.87
  POS[0.34,0.20,0.70,49] CBBB[0.00,0.00,0.00,100]=0.81 4F2E[1.00,0.00,0.00,100]=0.98 468D[0.00,1.00,0.00,100]=1.12 83A2[1.00,1.00,0.00,100]=0.87
  POS[0.35,0.23,0.73,50] CBBB[0.00,0.00,0.00,100]=0.84 4F2E[1.00,0.00,0.00,100]=1.00 468D[0.00,1.00,0.00,100]=1.12 83A2[1.00,1.00,0.00,100]=0.87
  POS[0.36,0.22,0.74,51] CBBB[0.00,0.00,0.00,100]=0.85 4F2E[1.00,0.00,0.00,100]=1.00 468D[0.00,1.00,0.00,100]=1.13 83A2[1.00,1.00,0.00,100]=0.88
  POS[0.37,0.22,0.74,52] CBBB[0.00,0.00,0.00,100]=0.85 4F2E[1.00,0.00,0.00,100]=1.00 468D[0.00,1.00,0.00,100]=1.13 83A2[1.00,1.00,0.00,100]=0.90
  POS[0.37,0.22,0.73,52] CBBB[0.00,0.00,0.00,100]=0.85 4F2E[1.00,0.00,0.00,100]=0.99 468D[0.00,1.00,0.00,100]=1.13 83A2[1.00,1.00,0.00,100]=0.88
  POS[0.36,0.21,0.73,51] CBBB[0.00,0.00,0.00,100]=0.84 4F2E[1.00,0.00,0.00,100]=0.99 468D[0.00,1.00,0.00,100]=1.13 83A2[1.00,1.00,0.00,100]=0.89
  POS[0.33,0.21,0.73,51] CBBB[0.00,0.00,0.00,100]=0.83 4F2E[1.00,0.00,0.00,100]=1.02 468D[0.00,1.00,0.00,100]=1.12 83A2[1.00,1.00,0.00,100]=0.89
  POS[0.33,0.20,0.72,50] CBBB[0.00,0.00,0.00,100]=0.81 4F2E[1.00,0.00,0.00,100]=1.00 468D[0.00,1.00,0.00,100]=1.12 83A2[1.00,1.00,0.00,100]=0.91
  POS[0.34,0.22,0.72,50] CBBB[0.00,0.00,0.00,100]=0.83 4F2E[1.00,0.00,0.00,100]=1.00 468D[0.00,1.00,0.00,100]=1.11 83A2[1.00,1.00,0.00,100]=0.92
  POS[0.36,0.22,0.71,50] CBBB[0.00,0.00,0.00,100]=0.83 4F2E[1.00,0.00,0.00,100]=0.98 468D[0.00,1.00,0.00,100]=1.12 83A2[1.00,1.00,0.00,100]=0.91
  ...
Besides, we can use the LEAPS Manager, to visualization of the devices and their positions.

Now the system has been successfully set up and configured the system. Enjoy using it!
Here are some tips for fixing some issues related to the installation process.
Please check the version. We recommend you use the latest official version.
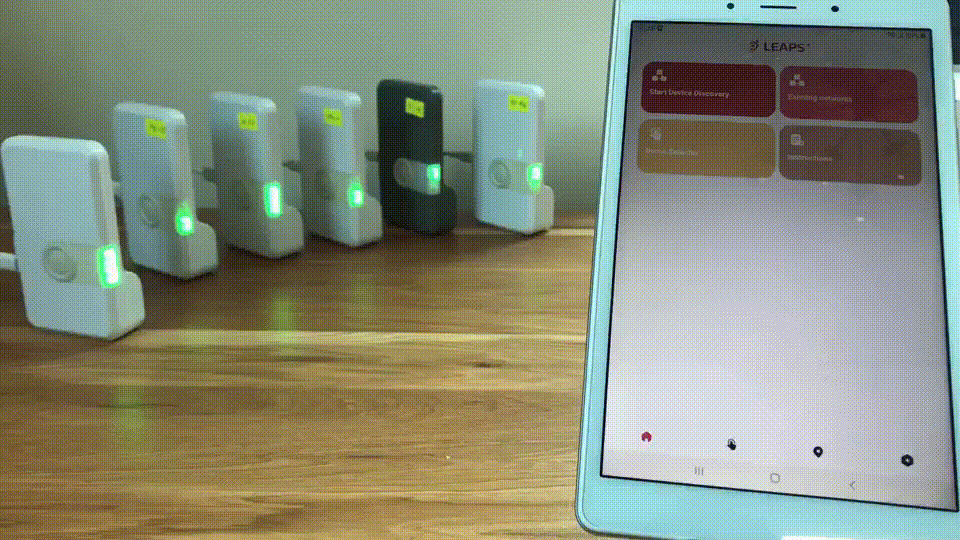
Use the Reset devices to default feature in Demo Selector on the LEAPS Manager when you don’t know the current state of the devices. Refer to the following GIF Image.
Note
Refer to the software infrastructure to further explore the power of this demo. Our support includes LEAPS Docker, LEAPS VMWare and, LEAPS Raspberry Pi.
For any comments or questions about our products, we encourage you to visit our LEAPS Forum.
For detail of known limitation and issue list, please refer section Releases.